Buick Century Custom 1996 - 1996 GENERAL MOTORS Century, Cutlass Ciera & Cutlass Cruiser
Buick Century Custom 1996 - BUZZERS, RELAYS & TIMERS
Buick Century Custom 1996 BUZZERS, RELAYS & TIMERS
Component Component Location A/C Compressor Control Relay (2.2L VIN 4) On relay bracket, in right front corner of engine compartment. See Fig. 1 . A/C Compressor Control Relay (3.1L VIN M) On relay bracket, in right front corner of engine compartment. See Fig. 2 . Antenna Relay Behind right side of dash, above glove box. Blower Motor Relay On relay bracket, in right front corner of engine compartment. Compartment Release Relay (Rear) Behind right side of dash, behind glove box. Cooling Fan Motor Relay (Puller) (2.2L VIN 4) On relay bracket, in right front corner of engine compartment. See Fig. 1 . Cooling Fan Motor Relay (Puller) (3.1L VIN M) On relay bracket, in right front corner of engine compartment. See Fig. 2 . Cooling Fan Motor Relay (Pusher) (2.2L VIN 4) On relay bracket, in right front corner of engine compartment. See Fig. 1 . Cooling Fan Motor Relay (Pusher) (3.1L VIN M) On relay bracket, in right front corner of engine compartment. See Fig. 2 . Door Lock Relay Right "A" pillar. Electronic Brake Control Relay On right side of firewall. Fuel Pump Relay (2.2L VIN 4) On relay bracket, in right front corner of engine compartment. See Fig. 1 . Fuel Pump Relay (3.1L VIN M) On relay bracket, in right front corner of engine compartment. See Fig. 2 . Hazard Flasher On convenience center. Horn Relay On convenience center. Turn Signal Lamp Flasher Behind center of dash, behind ashtray.
Buick Century Custom 1996 - CIRCUIT PROTECTION DEVICES
Buick Century Custom 1996 CIRCUIT PROTECTION DEVICES
Component Component Location Convenience Center (Buick) Behind left side of dash. Convenience Center (Oldsmobile) Behind right side of dash, right of glove box. Engine A/C In-Line Fuse Taped in wiring harness, behind fuse block. Fuel Pump In-Line Fuse (2.2L VIN 4) On relay bracket, in right front corner of engine compartment. See Fig. 1 . Fuel Pump In-Line Fuse (3.1L VIN M) On relay bracket, in right front corner of engine compartment. See Fig. 2 . Fuse Block (2.2L VIN 4) Behind right side of dash, to left of glove box. See Fig. 1 . Fuse Block (3.1L VIN M) Behind right side of dash, to left of glove box. See Fig. 2 . Fusible Links At starter solenoid, or battery positive terminal pigtail. Multi-Function Alarm In-Line Fuse Near fuse block, taped to harness. Power Accessory Circuit Breaker In fuse block. SIR Crank In-Line Fuse Taped to harness, behind fuse block.
Buick Century Custom 1996 - CONTROL UNITS
Buick Century Custom 1996 CONTROL UNITS
Component Component Location Automatic Door Unlock Module Behind left side of dash, near heater duct. Cruise Control Module Front of left shock tower. See Fig. 2 . Daytime Running Lamps (DRL) Module Behind left side of dash. Diagnostic Energy Reserve Module (DERM) Behind left side of dash, right of steering column. EBCM Independent Lamp Driver Module Under left side dash, left of steering column. Electronic Brake Control Module Behind right side of dash. Ignition Control Module (2.2L VIN 4) Left rear of engine, above transaxle. See Fig. 1 . Ignition Control Module (3.1L VIN M) Top right side of engine. See Fig. 2 . Power Window Control Module Behind right side of dash. Powertrain Control Module (PCM) (2.2L VIN 4) Behind right side of dash. See Fig. 1 . Powertrain Control Module (PCM) (3.1L VIN M) Behind right side of dash. See Fig. 2 . Remote Control Door Lock Receiver Forward left rear wheelwell. Seat Belt/Ignition Key/Lamps & Turn Signal Alarm (Buick) Behind dash, left of steering column. Seat Belt/Ignition Key/Lamps & Turn Signal Alarm (Oldsmobile) Behind dash, right of glove box. Windshield Wiper Motor On left side of firewall. Window Wiper Pump Top center of tailgate.
Buick Century Custom 1996 - MOTORS
Buick Century Custom 1996 MOTORS
Component Component Location Blower Motor On right side of firewall. Door Lock Actuators In each door. Outside Rearview Mirror Motors In each mirror assembly. Seat Adjuster Motor Assembly (Driver) Under left side of driver's seat. Window Motors In each door. Windshield Washer Pump In front & rear washer fluid reservoir.
Buick Century Custom 1996 - SENDING UNITS & SENSORS
Buick Century Custom 1996 SENDING UNITS & SENSORS
Component Component Location A/C Refrigerant Pressure Sensor (2.2L VIN 4) On right side of engine compartment, on A/C line. See Fig. 1 . A/C Refrigerant Pressure Sensor (3.1L VIN M) On right side of engine compartment, on A/C line. See Fig. 2 . Arming Sensor Behind dash, left of PCM. Brake Fluid Level Indicator Sensor Left rear of engine compartment, on ABS hydraulic modulator. Camshaft Position Sensor (3.1L VIN M) Right side of engine, below intake plenum. See Fig. 2 . Crankshaft Position Sensor (High Resolution 24x) (2.2L VIN 4) Center rear of engine, below ignition control module. Crankshaft Position Sensor (High Resolution 24x) (3.1L VIN M) Right side of engine, at end of crankshaft. See Fig. 2 . Crankshaft Position Sensor (Low Resolution 7x) (3.1L VIN M) Lower rear of engine. See Fig. 2 . Forward Discriminating Sensor Forward of engine compartment, below hood latch. Engine Coolant Temp. (ECT) Sensor (2.2L VIN 4) Top left side of engine. See Fig. 1 . Engine Coolant Temp. (ECT) Sensor (3.1L VIN M) On left rear of engine. See Fig. 2 . Heated Oxygen Sensor 1 (H02S1) (3.1L VIN M) Rear of engine, in exhaust manifold. See Fig. 2 . Heated Oxygen Sensor 2 (H02S2) (3.1L VIN M) In exhaust system, behind catalytic converter. See Fig. 2 . Intake Air Temperature (IAT) Sensor (2.2L VIN 4) On top right rear of engine, on intake manifold. See Fig. 1 . Intake Air Temperature (IAT) Sensor (3.1L VIN M) Left front of engine compartment, on air intake duct. See Fig. 2 . Knock Sensor (2.2L VIN 4) On right side of engine, near ignition coil pack. See Fig. 1 . Knock Sensor (3.1L VIN M) On left side of engine block, below exhaust manifold. See Fig. 2 . Manifold Absolute Pressure (MAP) Sensor (2.2L VIN 4) On right side of air cleaner assembly. See Fig. 1 . Manifold Absolute Pressure (MAP) Sensor (3.1L VIN M) Top center of engine. Mass Air Flow (MAF) Sensor (3.1L VIN M) Top left side of engine, near throttle body. See Fig. 2 . Oxygen Sensor (02S) (2.2L VIN 4) Front of engine, in exhaust manifold. See Fig. 1 . Passenger Compartment Discriminating Sensor Behind dash, forward of center console. Throttle Position (TP) Sensor (2.2L VIN 4) On throttle body assembly. See Fig. 1 . Throttle Position (TP) Sensor (3.1L VIN M) On throttle body assembly. See Fig. 2 . Vehicle Speed Sensor (VSS) (2.2L VIN 4) On right side of transaxle. See Fig. 1 . Vehicle Speed Sensor (VSS) (3.1L VIN M) On right side of transaxle. See Fig. 2 . Wheel Speed Sensor (Left Front) On left front wheel bearing knuckle. Wheel Speed Sensor (Left Rear) On left rear bearing assembly. Wheel Speed Sensor (Right Front) On right front wheel bearing knuckle. Wheel Speed Sensor (Right Rear) On right rear bearing assembly.
Buick Century Custom 1996 - SOLENOIDS & SOLENOID VALVES
Buick Century Custom 1996 SOLENOIDS & SOLENOID VALVES
Component Component Location ABS Solenoid (Left Front) Left rear of engine compartment, mounted to master cylinder. ABS Solenoid (Right Front) Left rear of engine compartment, mounted to master cylinder. Brake Transmission Shift Interlock (BTSI) Solenoid Base of steering column. Compartment Lid Release Solenoid (Rear) Center rear of rear compartment lid. Evapoative Emissions (EVAP) Canister Purge Solenoid (2.2L VIN 4) On right side of engine, under intake plenum. See Fig. 1 . Evapoative Emissions (EVAP) Canister Purge Solenoid (3.1L VIN M) On right side of engine, under intake manifold. See Fig. 2 . Idle Air Control (IAC) Valve (2.2L VIN 4) On throttle body assembly. See Fig. 1 . Idle Air Control (IAC) Valve (3.1L VIN M) On throttle body assembly. See Fig. 2 . Lap Retractor Release Solenoids In lower rear of respective front door. Liftgate Lock Release Solenoid (Wagon) In center of tailgate. Linear Exhaust Gas Recirculation (EGR) Solenoid (2.2L VIN 4) Top left side of engine. Linear Exhaust Gas Recirculation (EGR) Solenoid (3.1L VIN M) Top left rear of engine. Shoulder Retractor Release Solenoids In lower rear of respective front door.
Buick Century Custom 1996 - SWITCHES
Buick Century Custom 1996 SWITCHES
Component Component Location BTSI/Stoplamp Brake Switch On brake pedal support bracket. Fuel Pump/Oil Pressure Sender Switch (2.2L VIN 4) On center rear of engine, near ignition control module. Fuel Pump/Oil Pressure Sender Switch (3.1L VIN M) On front of engine, above starter. Liftgate Ajar Switch (Wagon) Bottom center of tailgate. Park Brake Switch On parking brake assembly. Park/Neutral Position (PNP) Switch (2.2L VIN 4) On right side of transaxle. See Fig. 1 . Seat Belt Switch Part of driver's seat belt assembly. Stoplamp/Cruise/TCC Switch On brake pedal support bracket. Transaxle Range Switch (3.1L VIN M) Left side of engine compartment, on transaxle. See Fig. 2 .
Buick Century Custom 1996 - MISCELLANEOUS
Buick Century Custom 1996 MISCELLANEOUS
Component Component Location A/C Compressor Clutch Diode Right front of engine, below A/C compressor. Blower Motor Resistors Right rear of engine compartment. Center High Mount Stoplamp In wiring harness, in liftgate. Data Link Connector (DLC) (2.2L VIN 4) Under left side of dash, near steering column. See Fig. 1 . Data Link Connector (DLC) (3.1L VIN M) Under left side of dash, near steering column. See Fig. 2 . Dimmer Transistor Behind left side of dash, near lamp switch. Fuel Pump Prime Connector (3.1L VIN M) On right front corner of engine compartment. See Fig. 2 . Keyless Entry Program Connector Left side of rear compartment. Photo resistor On top center of dash.
Buick Century Custom 1996 - CONNECTORS
Buick Century Custom 1996 CONNECTORS LOCATION
Component Location C100 (Black, 34 Pin) Behind strut tower. C101 (3 Pin) Left front of engine compartment. C102 (2.2L VIN 4) (Black, 10 Pin) Near transaxle fill tube. C102 (3.1L VIN M) (Black, 10 Pin) Top right rear of engine. C104 (1 Pin) Near underhood lamp. C108 (Black, 6 Pin) Near power brake booster. C109 (3 Pin) Top front of engine. C112 Next to transaxle fill tube. C155 (2 Pin) Below powertrain control module. C187 (2 Pin) Near right shock tower. C188 (2 Pin) Near left shock tower. C201 (Black, 4 Pin) Behind left side of dash. C202 (Black, 4 Pin) Behind right side of dash. C203 (4 Pin) Behind left side of dash. C204 (Black, 23 Pin) Behind left side of dash. C206 (Black, 48 Pin) Behind left side of dash. C210 (Black, 23 Pin) Below powertrain control module. C211 (Blue, 8 Pin) Below powertrain control module. C212 (Black, 8 Pin) Behind left side of dash. C225 I/P wiring harness, center of steering column. C230 (Black, 8 Pin) Left rear of rear compartment. C231 (3 Pin) Center of dash, above ashtray. C250 (2 Pin) Behind right side of dash. C251 (1 Pin) Behind left side of dash. C252 (3 Pin) Behind left side of dash. C256 (2 Pin) Behind center of dash. C271 (1 Pin) Behind left side of dash. C304 (Black, 6 Pin) Near center access hole. C305 (2 Pin) Near right rear wheel speed sensor. C306 (2 Pin) Near left rear wheel speed sensor. C307 (Black, 6 Pin) Near center access hole. C314 (1 Pin) Behind left side of dash. C315 (1 Pin) Behind right side of dash. C318 (Black, 15 Pin) Left rear of cargo compartment. C319 (1 Pin) At left rear quarterpanel. C326 (2 Pin) Between front seats. C328 (2 Pin) Under left front seat. C329 (2 Pin) Under right front seat. C331 (Black, 6 Pin) Behind left side of dash. C334 (3 Pin) Behind left side of dash. C338 (2 Pin) Under left front seat. C339 (2 Pin) Under right front seat. C341 (1 Pin) Under left side of dash. C347 (Black, 6 Pin) Under left front seat. C348 (Black, 8 Pin) In front of left front door. C398 (Black, 4 Pin) In front of left front door. C399 (Black, 4 Pin) In front of right front door. C403 (2 Pin) In left rear of rear compartment. C404 (2 Pin) Underside of rear compartment lid. C409 (Black, 4 Pin) Forward of fuel tank. C410 (3 Pin) At base of right liftgate pillar. C411 (Black, 6 Pin) Near top of left liftgate pillar. C412 (Black, 6 Pin) Near top of left liftgate pillar. C413 (3 Pin) In bottom center of liftgate. C415 (Black, 4 Pin) Rear of vehicle, at top of right tailgate pillar. C416 (Black, 4 Pin) In tailgate. C417 (1 Pin) On top left side of tailgate. C418 (1 Pin) Top left side of liftgate header. C419 (3 Pin) Top center of tailgate header. C424 (2 Pin) Near top left tailgate pillar. C425 (2 Pin) Near top of left tailgate pillar.
Buick Century Custom 1996 - GROUNDS
Buick Century Custom 1996 GROUNDS LOCATION
Component Location G101 Behind left headlamp. G102 On radiator support. G103 On radiator support. G104 On radiator support. G105 Under intake manifold. G106 On transaxle stud. G107 On radiator support. G112 Behind starter solenoid. G202 Left of ashtray. G203 Left of ashtray. G210 On right shroud. G305 Lower right kick panel. G307 Right bottom side of roof pillar. G310 Near driver's seat. G403 Near left wheelhouse. G409 Top center of liftgate header. G410 On liftgate license compartment. G412 Near top of left liftgate pillar. G413 Near left radio speaker.
Buick Century Custom 1996 - SPLICES
Buick Century Custom 1996 SPLICES LOCATION
Component Location S101 Forward lamps wiring harness, 10 cm from G102 breakout. S102 Forward lamps wiring harness, 12 cm from C108 breakout. S104 Forward lamps wiring harness, 7 cm from windshield washer pump breakout. S107 Forward lamps wiring harness, 17 cm from G102 breakout. S108 Forward lamps wiring harness, 7 cm from windshield washer pump breakout. S109 Engine jumper harness, 4 cm from C102 breakout. S112 Engine wiring harness, 8 cm from engine oil pressure indicator switch breakout. S113 Engine wiring harness, 14 cm from engine oil pressure indicator switch breakout. S114 Engine wiring harness, 35 cm from VSS. S115 Engine wiring harness, 10 cm from VSS breakout. S117 Forward lamps wiring harness, 21 cm from C101. S118 Forward lamps wiring harness, 39 cm from P101 breakout. S122 Forward lamps wiring harness, 4 cm from C187 breakout. S123 Engine wiring harness, 7 cm from primary engine cooling fan breakout. S124 Engine wiring harness, 7 cm from puller engine cooling fan. S125 Engine jumper harness, 3 cm from fuel injector No. 1 breakout. S127 Forward lamp wiring harness, 10 cm from P101. S130 Engine wiring harness, 22 cm from blower motor breakout. S131 Engine wiring harness, 7 cm from G105 breakout. S132 Engine wiring harness, 4 cm from VSS breakout. S134 Engine wiring harness, 17 cm from blower motor breakout. S136 Engine wiring harness, 24 cm from blower motor breakout. S137 Engine wiring harness, 7 cm from C100 breakout. S139 Forward lamp wiring harness, behind right headlamp. S140 Engine wiring harness, 10 cm from G104 breakout. S141 Engine jumper harness, 21 cm from C102. S142 I/P wiring harness, near convenience center. S146 Engine wiring harness, 8 cm from starter motor breakout. S155 Engine wiring harness, 2 cm from starter motor breakout. S164 Engine wiring harness, 15 cm from blower motor breakout. S165 Engine wiring harness, 10 cm from G104 breakout. S166 Engine wiring harness, 9 cm from A/C compressor clutch coil breakout. S171 (2.2L VIN 4) Engine wiring harness, 13 cm from C100 breakout. S171 (3.1L VIN M) Engine wiring harness, 8 cm from G104 breakout. S185 Forward lamps wiring harness, 14 cm from G102 breakout. S186 (2.2L VIN 4) Engine wiring harness, 1 cm from engine oil pressure indicator switch breakout. S186 (3.1L VIN M) Engine wiring harness, 13 cm from engine oil pressure indicator switch breakout. S201 I/P wiring harness, 3 cm from radio breakout. S202 (Buick) I/P wiring harness, 20 cm from G202 breakout. S202 (Oldsmobile) I/P wiring harness, 8 cm from radio breakout. S203 (Buick) I/P wiring harness, 8 cm from radio breakout. S203 (Oldsmobile) I/P wiring harness, 16 cm from glove compartment lamp breakout. S204 (Buick) I/P wiring harness, 19 cm from radio breakout. S204 (Oldsmobile) I/P wiring harness, 13 cm from headlamp switch breakout. S205 (Buick) I/P wiring harness, 8 cm from data link connector breakout. S205 (Oldsmobile) I/P wiring harness, 4 cm from radio breakout. S206 (Buick) I/P wiring harness, 12 cm from radio breakout. S206 (Oldsmobile) I/P wiring harness, 4 cm from radio breakout. S207 Forward lamps wiring harness, 26 cm from EBCM. S209 I/P wiring harness, 5 cm from park brake switch breakout. S210 (Buick) I/P wiring harness, 22 cm from radio breakout. S210 (Oldsmobile) I/P wiring harness, 24 cm from headlamp switch breakout. S211 (Buick) I/P wiring harness, 4 cm from headlamp switch breakout. S211 (Oldsmobile) I/P wiring harness, 9 cm from headlamp switch breakout. S212 (Buick) I/P wiring harness, At convenience center breakout. S212 (Oldsmobile) I/P wiring harness, behind dash, above steering wheel. S213 I/P wiring harness, 25 cm from radio breakout. S217 I/P wiring harness, 8 cm from glove compartment lamp breakout. S218 I/P wiring harness, 4 cm from headlamp switch breakout. S220 I/P wiring harness, 12 cm from power antenna relay breakout. S221 Front body wiring harness, 4 cm from G310 breakout. S222 (Buick) I/P wiring harness, 4 cm from radio breakout. S222 (Oldsmobile) I/P wiring harness, 12 cm from dash lamp breakout. S223 (Buick) I/P wiring harness, 41 cm from C206. S223 (Oldsmobile) I/P wiring harness, 12 cm from C206. S224 (Buick) I/P wiring harness, 24 cm from G202 breakout. S224 (Oldsmobile) I/P wiring harness, 4 cm from G202 breakout. S225 (Buick) I/P wiring harness, 2 cm from G203 breakout. S225 (Oldsmobile) I/P wiring harness, 16 cm from power antenna relay breakout. S226 I/P wiring harness, 46 cm from C206. S227 I/P wiring harness, 9 cm from headlamp switch breakout. S228 (Buick) I/P wiring harness, 15 cm from G202 breakout. S228 (Oldsmobile) I/P wiring harness, 9 cm from glove compartment lamp breakout. S230 I/P wiring harness, 5 cm from DLC breakout. S231 (Buick) I/P wiring harness, 4 cm from DLC breakout. S231 (Oldsmobile) I/P wiring harness, 4 cm from G202 breakout. S234 Engine wiring harness, 7 cm from PCM breakout. S236 Engine wiring harness, 3 cm from C210 breakout. S237 I/P wiring harness, 7 cm from G202 breakout. S240 I/P wiring harness, 3 cm from G202 breakout. S253 (Buick) I/P wiring harness, 4 cm from map reading lamp breakout. S253 (Oldsmobile) I/P wiring harness, 12 cm from radio breakout. S254 I/P wiring harness, 12 cm from fuse block breakout. S257 (Buick) I/P wiring harness, 19 cm from fuse block breakout. S257 (Oldsmobile) I/P wiring harness, 4 cm from glove compartment lamp breakout. S260 (Buick) I/P wiring harness, 8 cm from fuse block breakout. S260 (Oldsmobile) I/P wiring harness, 8 cm from glove compartment lamp. S293 (Buick) I/P wiring harness, 10 cm from G202 breakout. S293 (Oldsmobile) I/P wiring harness, 13 cm from power antenna relay breakout. S295 (Buick) I/P wiring harness, 10 cm from G202 breakout. S295 (Oldsmobile) I/P wiring harness, 13 cm from power antenna relay breakout. S298 I/P-SIR wiring harness, 7 cm from C204 breakout. S299 I/P-SIR wiring harness, 5 cm from DERM breakout. S301 Cross-body wiring harness, 4 cm from dome lamp breakout. S302 Cross-body harness, 6 cm from C212 breakout. S303 Cross-body wiring harness, 11 cm from dome lamp breakout. S304 Cross-body harness, 11 cm from dome lamp breakout. S305 Cross-body wiring harness, 10 cm from right sunshade illuminated mirror breakout. C314 Rear body wiring harness, 37 cm from C318. S316 Roof wiring harness, 10 cm from dome lamp breakout. S322 Rear body wiring harness, 13 cm from C318. S325 Power seat wiring harness, 9 cm from left seat recliner motor. S327 Recliner seat wiring harness, 24 cm from right reclining seat switch. S335 Cross-body wiring harness, 20 cm G305 breakout. S336 Cross-body wiring harness, 10 cm from right sunshade illuminated mirror breakout. S344 Power seat wiring harness, 3 cm from left seat recliner motor. S350 Cross-body wiring harness, 10 cm from G305 breakout. S351 Cross-body wiring harness, 4 cm from right sunshade illuminated mirror breakout. S352 Cross-body wiring harness, 8 cm from dome lamp breakout. S398 Outside rearview mirror wiring harness, 25 cm from C348. S399 Outside rearview mirror wiring harness, 22 cm from right outside rearview mirror. S401 Rear body wiring harness, 17 cm from P400. S402 Rear body wiring harness, 21 cm from C409 breakout. S403 Rear body wiring harness, right side of rear compartment. S404 Front body wiring harness, 4 cm from G310 breakout. S405 Rear body wiring harness, 2 cm from P400. S409 Left taillamp wiring harness, 5 cm from C412. S410 Rear body wiring harness, 23 cm from C230. S411 Back-up lamp jumper harness, 4 cm from license lamp breakout. S412 Right taillamp wiring harness, 12 cm from P401. S413 Right taillamp wiring harness, 15 cm from C410. S491 Rear of vehicle, top of left tailgate pillar. S492 Rear of vehicle, top of left tailgate pillar. S500 Cross-body wiring harness, 10 cm from C212 breakout.
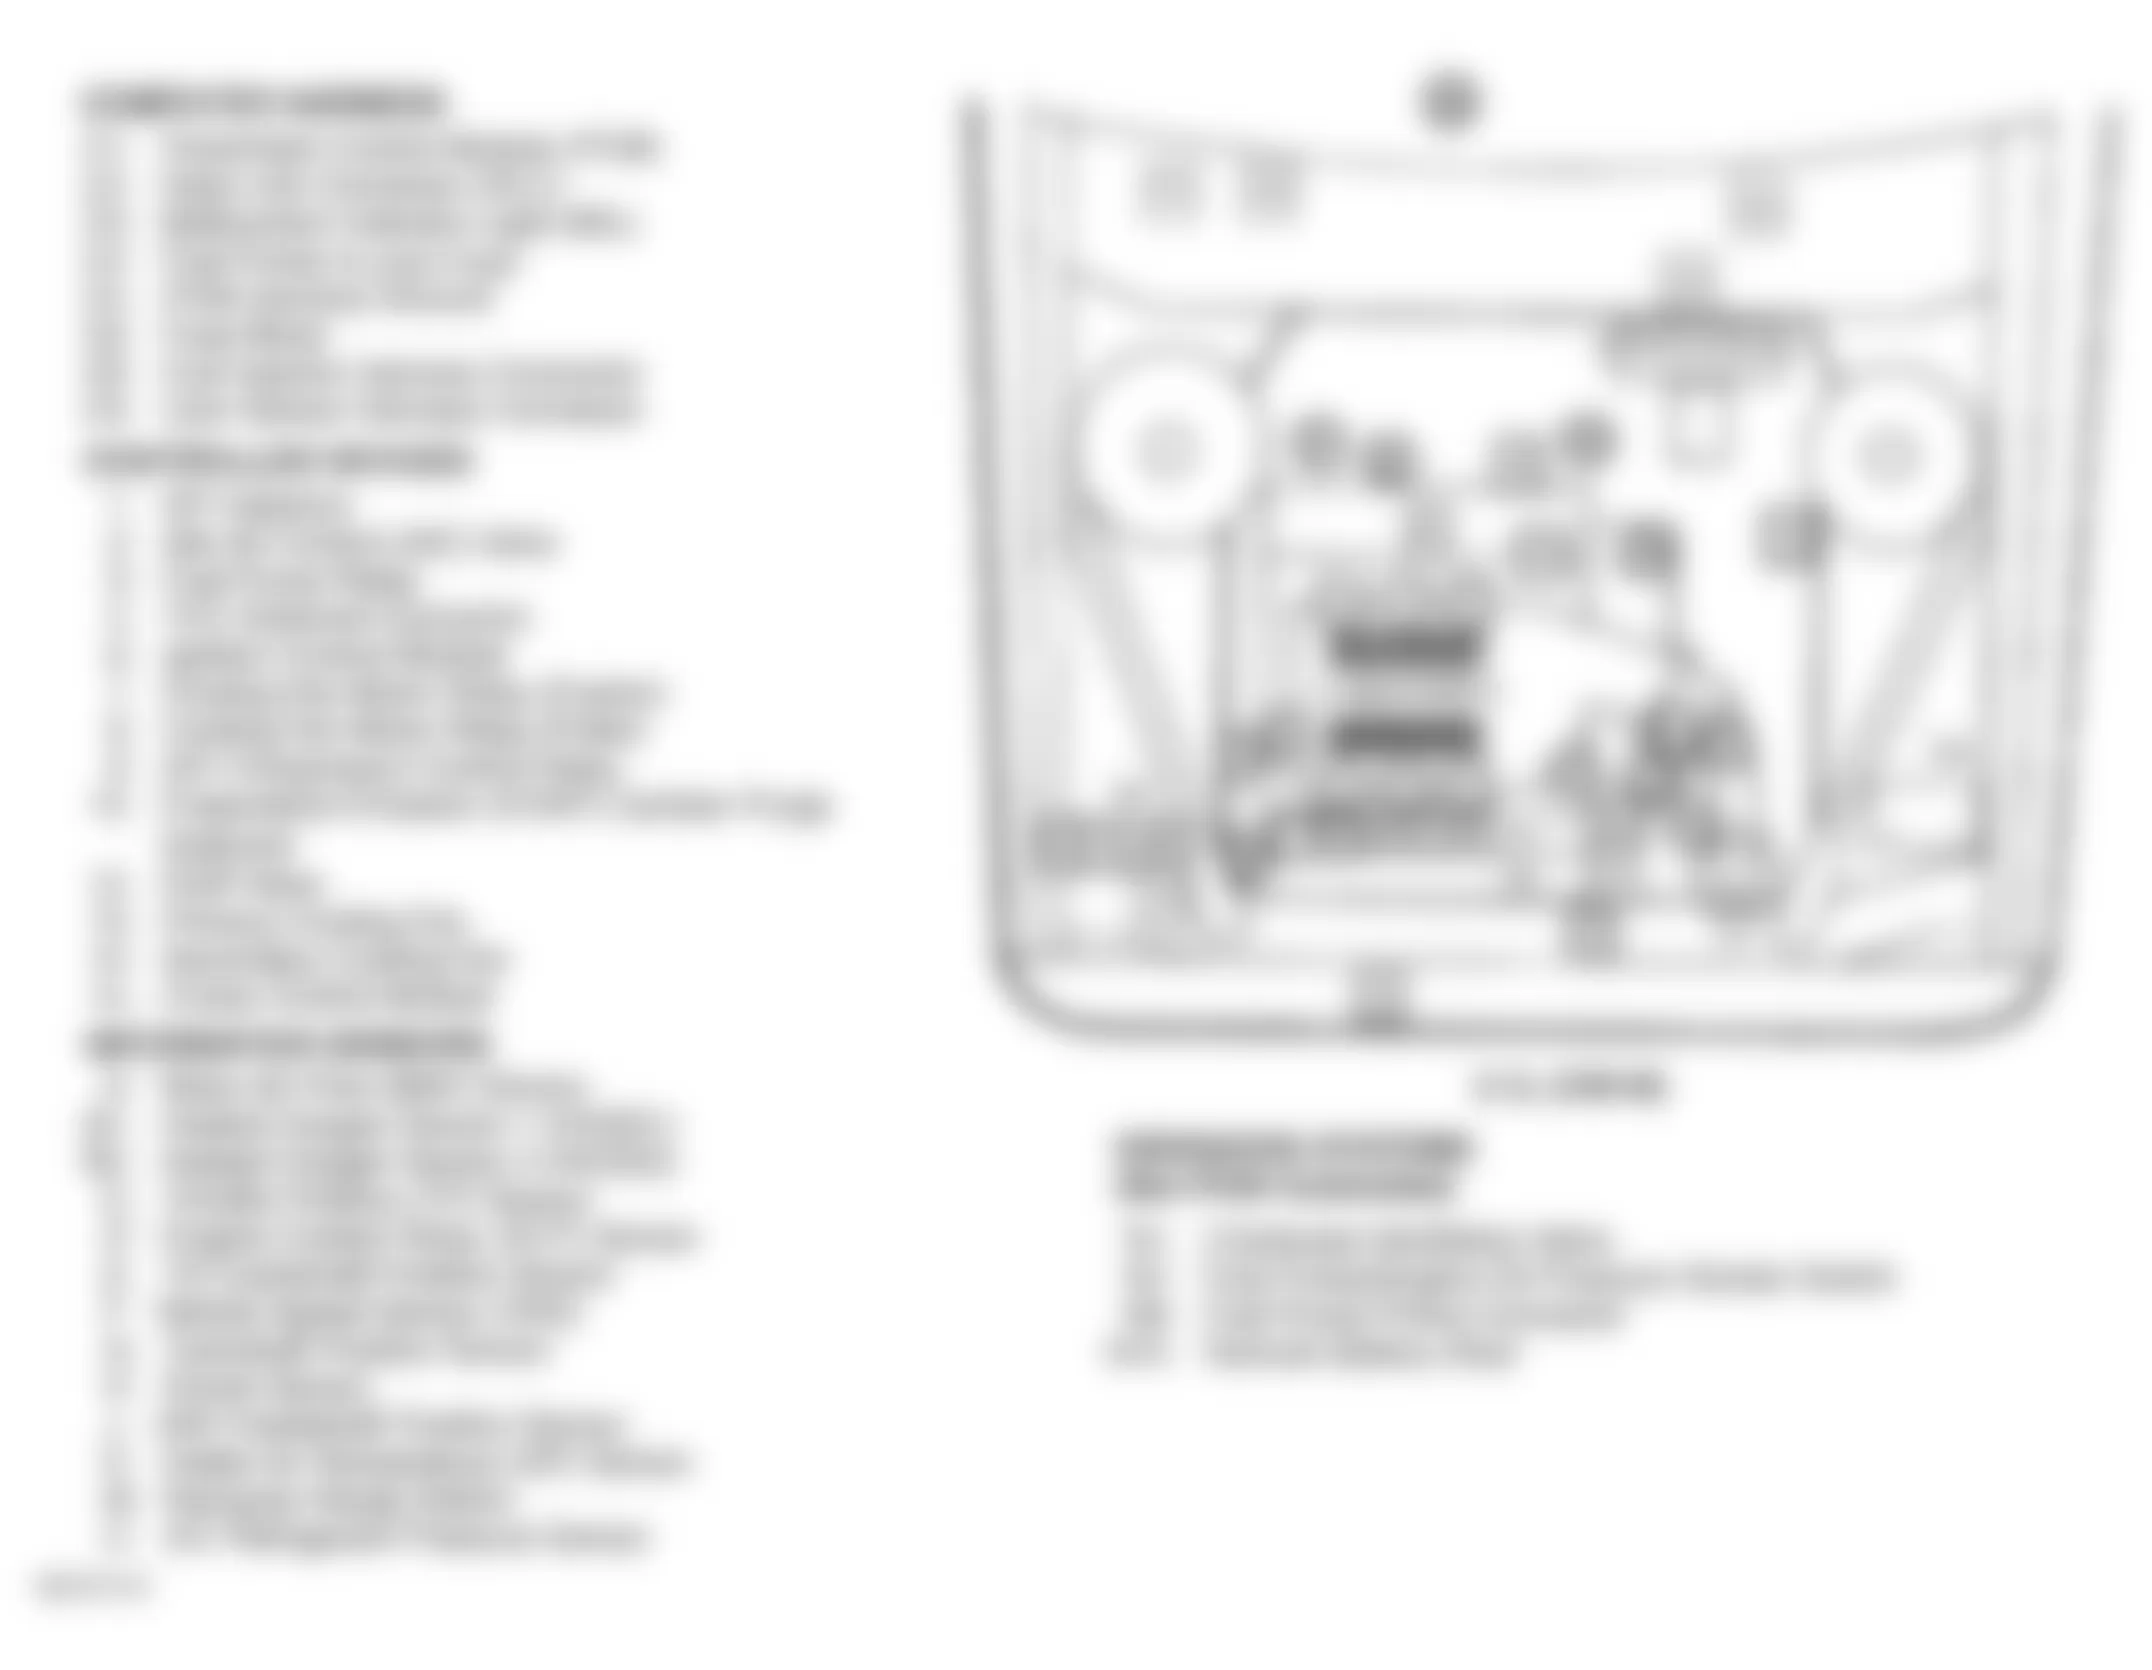
Buick Century Custom 1996 - COMPONENT LOCATION GRAPHICS
NOTE:
Fig.res may show multiple component locations. - appropriate table for proper figure references.

Fig. 1: Buick Century Custom 1996 - Component Locations - Engine Compartment (2.2L VIN 4)
Fig. 2: Buick Century Custom 1996 - Component Locations - Engine Compartment (3.1L VIN M)