
Honda Prelude 2.0 Si 1990 - 1990 ENGINE COOLING Electric Cooling Fan Trouble Shooting
Honda Prelude 2.0 Si 1990 - ELECTRIC COOLING FAN TROUBLE SHOOTING - ACCORD
NOTE: For water pump removal procedure, see appropriate ENGINE article.
Honda Prelude 2.0 Si 1990 - COOLING & CONDENSER FANS DO NOT OPERATE
If both fans are not operating, check the following:
- No. 2 (15A) fuse blown. Located in underdash fuse box.
- Coolant temperature switch "A"
- Cooling fan timer
- Ground circuit No. 101
- Open or loose terminal in Yellow/Black wire circuit between radiator fan relay and underdash fuse box.
- Open or loose terminal in Yellow wire circuit between underdash fuse box and ignition switch.
- Open or loose terminal in Blue wire circuit between radiator fan relay and coolant temperature switch "A".
Honda Prelude 2.0 Si 1990 - ONLY ONE FAN OPERATES
If only one fan is operating, check the following:
- No. 29 (15A) fuse blown. Located in under-hood fuse box.
- Radiator or condenser fan relay
- Radiator or condenser fan motor
- Noise suppressor
- A/C Diode
- Ground circuits No. 401 and 402
- Open or loose terminal in Blue wire circuit between radiator fan relay, coolant temperature switch "A" and condenser fan relay.
- Open or loose terminal in Blue/Black wire circuit between radiator fan relay and radiator fan.
- Open or loose terminal in Blue/Black wire circuit between noise suppressor and condenser fan motor.
- Open or loose terminal in Blue/Black wire circuit between A/C diode and SFI ECU.
- Open or loose terminal in Blue/Yellow wire circuit between condenser fan relay and noise suppressor.
- Open or loose terminal in Yellow/Black wire circuit between underdash fuse box and cooling fan timer.
- Open or loose terminal in Yellow/White wire circuit between radiator fan timer unit and condenser fan relay.
- Open or loose terminal in Blue/Green wire circuit between noise suppressor and condenser fan motor.
- Open or loose terminal in Yellow wire circuit between cooling fan timer and radiator fan relay.
- Open or loose terminal in White wire circuit between under- hood relay box, cooling fan timer and condenser fan relay.
Honda Prelude 2.0 Si 1990 - FAN TIMER MALFUNCTION
If fan timer is not operating properly, check the following:
- Cooling fan timer
- Coolant temperature switch "B".
- Poor ground circuits No. 401 and 402.
- Open or loose terminal in White wire circuit between under- hood relay box, cooling fan timer and condenser fan relay.
- Open or loose terminal in White/Green wire circuit between cooling fan timer and coolant temperature switch "B".
- Open or loose terminal in Yellow/White wire circuit between cooling fan timer and condenser fan relay.
Honda Prelude 2.0 Si 1990 - TROUBLE SHOOTING - PRELUDE COOLING & CONDENSER FANS DO NOT OPERATE
If both fans are not operating, check the following:
- No. 12 (10A) and/or No. 17 (15A) fuses blown in underdash fuse box.
- Coolant temperature switch "A" or "B" (fuel injected)
- Coolant temperature switch "A" or Intake Air Temperature (TA) sensor (carbureted).
- Cooling fan timer
- Ground circuit No. 203
- Open or loose terminal in both Black/Yellow wire circuits between underdash fuse box and radiator fan timer.
Honda Prelude 2.0 Si 1990 - ONLY ONE FAN OPERATES
If only one fan is operating, check the following:
- Fuses No. 35 (10A), 36 (15A) or 39 (20A) blown in under-hood relay box.
- Radiator or condenser fan relay.
- Radiator or condenser fan motor.
- Ground circuits No. 201 and 202.
- Open or loose terminal in Blue/Black wire circuit between radiator fan relay and radiator fan motor.
- Open or loose terminal in Blue/Black wire circuit between condenser fan relay and condenser fan motor.
Honda Prelude 2.0 Si 1990 - FAN TIMER MALFUNCTION
If cooling fan timer is not operating properly, check the following:
- Fuses No. 35 (10A), 36 (15A) or 39 (20A) blown in under-hood relay box.
- Cooling fan timer
- A/C system
- Ground circuits No. 101, 401, 402 and 471.
- Open or loose terminal in White/Green wire circuit between cooling fan timer and Intake Air Temperature (TA) sensor.
- Open or loose terminal in Blue wire circuit between radiator fan relay, condenser fan relay and coolant temperature switch "A".
- Open or loose terminal in White/Yellow wire circuit between under-hood relay box and fan timer.
Honda Prelude 2.0 Si 1990 - COOLING FAN TIMER ACCORD
- Perform the following checks with cooling fan timer connected and ignition on. For terminal identification, See Fig. 1 . Correct any problem before continuing. Terminal "D" (Black wire) should have continuity to body ground. If continuity to ground does not exist, repair open between terminal "D" and ground.

Fig. 1: Honda Prelude 2.0 Si 1990 - Component Locations - Identifying Fan Timer Terminals (Accord) - Terminal "F" (White wire) should have battery voltage present. If battery voltage is not present, check fuse No. 29 or repair open in White wire.
- Terminal "G" (Black/Yellow wire) should have battery voltage present. If battery voltage is not present, check fuse No. 2 or repair open in Black/Yellow wire.
- Terminal "B" (Yellow/Black wire) should have battery voltage present. If battery voltage is not present, check fuse No. 8 or repair Yellow/Black wire. Terminal "A" (Yellow/White wire) should have battery voltage present. If battery voltage is not present, replace cooling fan timer.
- Terminal "C" (Yellow wire) should have battery voltage present. If battery voltage is not present, replace cooling fan timer. Connect terminal "H" (Blue wire) to body ground. Condenser and radiator cooling fans should come on.
- If fans do not come on, check for open in Blue wire between fan timer and condenser fan relay or radiator fan relay. If blue wire is okay, check for open in Yellow/White or Yellow wire between fan timer and condenser fan relay. If Yellow/White and Yellow wires are okay, test condenser fan or radiator fan relay.
- Terminal "E" (White/Green wire) should have approximately 11 volts with coolant temperature less than 226.4?F (108?C). If 11 volts is not present, coolant temperature switch is faulty, short to ground exists or fan timer is faulty.
Honda Prelude 2.0 Si 1990 - PRELUDE
- Perform the following tests with ignition on and fan timer unplugged. Any problem should be corrected before advancing through tests. Before performing any tests, check fuses No. 12, 17, 35, 36 and 39. For terminal identification, See Fig. 2 . If all tests are okay, replace fan timer with known good part.
Fig. 2: Honda Prelude 2.0 Si 1990 - Component Locations - Identifying Fan Timer Terminals (Prelude) - Connect terminal No. 1 (Yellow/Black wire) to White/Yellow wire using jumper wire. Condenser fan should come on. If condenser fan does not come on, repair open in Yellow/Black wire between cooling fan timer and under-hood relay box.
- Terminal 2 (Black/Yellow wire) should have battery voltage present. If battery voltage is not present, repair open in Black/Yellow wire between fuse No. 17 and cooling fan timer.
- Connect terminal No. 3 (Red/Green wire) to terminal No. 6 White/Yellow using jumper wire. Cooling fan should come on. If cooling fan does not come on, repair open in Red/Green wire between cooling fan timer and under-hood relay box.
- Terminal No. 4 (Black wire) should have continuity to ground. If continuity to ground is not present, repair open to body ground. Terminal No. 6 (White/Yellow wire) should have battery voltage present. If battery voltage is not present, repair open between fuse No. 35 and cooling fan timer.
- Terminal No. 7 (Black/Yellow wire) should have battery voltage present. If battery voltage is not present, repair open in Black/Yellow wire between fuse No. 12 and cooling fan timer.
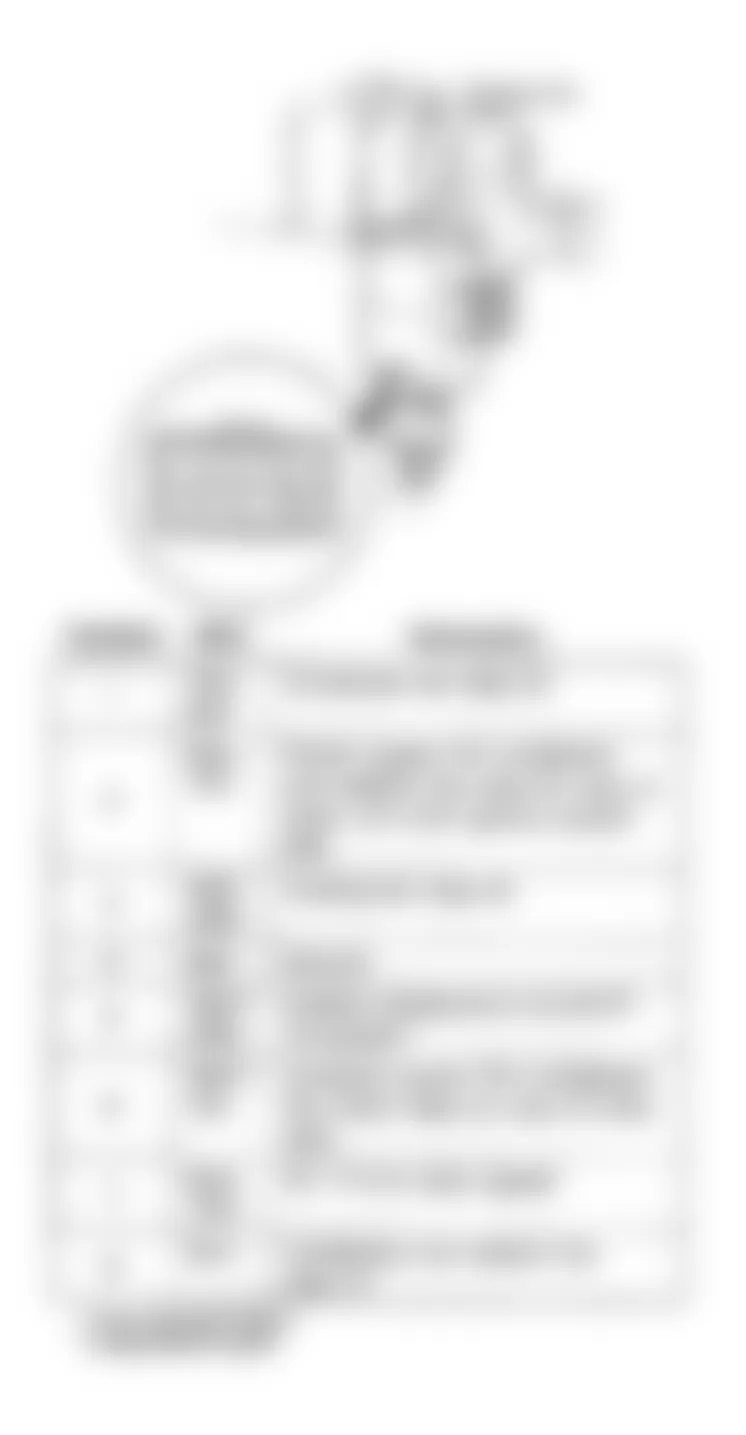
NOTE: There are 2 Black/Yellow wires at Prelude cooling fan control unit. See Fig. 2 .
Honda Prelude 2.0 Si 1990 - FAN MOTOR TEST
Unplug 2-pin connector from fan motor. Connect battery power to one of the fan motor terminals. Connect ground to the other fan motor terminal. Replace motor if it fails to run.
Honda Prelude 2.0 Si 1990 - RELAY TEST
- Remove radiator and condenser fan relays. On Civic, radiator fan relay is located on right front inner fender and condenser fan relay is located on right firewall. On Accord and Prelude, both condenser and radiator fan relays are located inside under-hood relay box.
- On all models, connect positive battery power to relay terminal "C" and connect terminal "D" to ground. Continuity should be present between relay terminals "A" and "B". No continuity should be present when battery power is disconnected. See appropriate chassis wiring diagram in WIRING DIAGRAMS.
Honda Prelude 2.0 Si 1990 - CIVIC - COOLANT TEMPERATURE SWITCH TEST
- Remove coolant temperature switch (located on engine block). Suspend temperature switch and thermometer in a container with a 50/50 mixture of coolant and water. Do not allow thermometer or temperature switch to touch bottom of container. Heat coolant mixture.
- Check continuity between temperature switch terminals. With coolant temperature between 182-188?F (83-87?C), continuity should not exist. With coolant temperature between 191-197?F (88-92?C), continuity should be present.
Honda Prelude 2.0 Si 1990 - "A", "B" TEST - ACCORD & PRELUDE
- Remove coolant temperature switch "A" from radiator or switch "B" from thermostat housing. Suspend temperature switch and thermometer in a container with a 50/50 mixture of coolant and water. Do not allow thermometer or temperature switch to touch bottom of container. Heat coolant mixture.
- Check continuity between temperature switch terminals. With coolant temperature greater than 189-199?F (87-93?F) for switch "A", continuity should exist. With coolant temperature less than 176-196?F (80-91?C) for switch "A", continuity should not exist. If readings are not correct, replace switch.
- For switch B, if coolant temperature is greater than 221-232?F (105-111?C) continuity should exist. If coolant temperature is less than 208-228?F (98-109?C) continuity should not exist. If readings are not correct, replace switch.
Honda Prelude 2.0 Si 1990 - INTAKE AIR TEMPERATURE SENSOR TEST (PRELUDE W/CARB)
Remove intake air sensor from emission control box bracket. Suspend sensor in a container of water. Heat water and check for continuity. With temperature less than 99-116?F (37-47?C), continuity should be present. With temperature greater than 135-145?F (57-63?C), continuity should not exist.