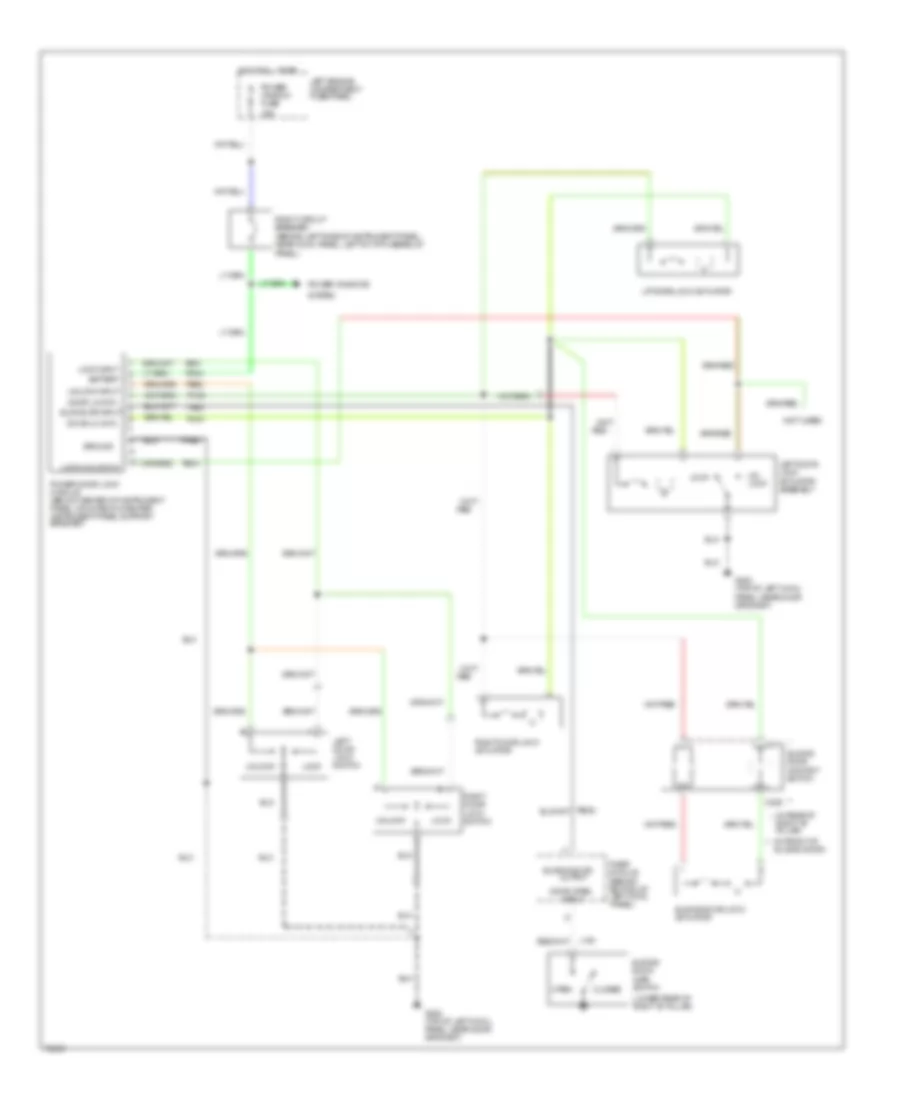
POWER DOOR LOCKS
Keyless Entry Wiring Diagram for Mercury Villager Nautica 1995

List of elements for Keyless Entry Wiring Diagram for Mercury Villager Nautica 1995:
- (behind top left side of i/p, taped to harness)
- (left rear corner of cargo area)
- (not used)
- (top left of cowl panel, near door grommet)
- (top right of cowl panel, near door grommet)
- 1/2
- 1/2 input
- 3/4
- 3/4 input
- 5/6
- 5/6 input
- 7/8
- 7/8 input
- 9/0
- 9/0 input
- Battery
- C219
- C221
- Chime control
- Closed
- Diode junction box
- Door ajar input
- Door ajar warning/ rear interior lamp control
- Door lock control
- Door lock/unlock input
- Door open input
- Electron bat fuse 13 10a
- G200
- G200 (top left of cowl panel, near door grommet)
- G200 (top left of cowl panel, near door grommet)
- G203
- G409/g411
- Ground
- Hot at all times
- I/p fuse/relay panel
- Ignition key reminder switch
- Illuminated entry signal input
- Illuminated entry signal output
- Illumination output
- Key in ignition input
- Key-in ign input
- Keyless entry chime (in rear of left front door)
- Keyless entry keypad assembly
- Keyless entry module (behind center of i/p, on center support brace)
- Left door jamb switch
- Left door lock actuator assembly
- Left door lock switch
- Left engine compartment fuse panel
- Liftgate latch switch
- Liftgate lock actuator
- Liftgate open input
- Lock
- Lock input
- Nca
- Open
- Pb05
- Ph01
- Ph02
- Ph03
- Ph05
- Ph06
- Ph07
- Ph08
- Ph09
- Ph11
- Ph16
- Ph18
- Ph20
- Ph31
- Ph32
- Ph34
- Ph35
- Ph38
- Ph41
- Ph42
- Phe1
- Phe2
- Pnk
- Power window fuse 30a
- Right circuit breaker (behind left side of i/p, near cowl panel)
- Right door jamb switch
- Right door lock actuator
- Right door lock switch
- Room lamp fuse 25 15a
- Sliding door ajar input
- Sliding door ajar switch
- Sliding door contact switch
- Sliding door lock actuator
- Sliding door output (delay lock)
- Timer module (behind bottom of left cowl panel)
- Unlock
- Unlock input
Power Door Locks Wiring Diagram for Mercury Villager Nautica 1995
List of elements for Power Door Locks Wiring Diagram for Mercury Villager Nautica 1995:
- (behind left side of instrument panel, near cowl panel, left of i/p fuse/relay
- (in front of **
- (in rear of * right "b" pillar)
- (lower rear of right "b" pillar)
- (not used)
- 30a
- Ajar switch
- Battery
- C311
- C329
- Closed
- Door lk cntl
- Door open
- G200 (top of left cowl panel, near door grommet)
- Ground
- Hot at all times
- Input
- L194
- Left door lock switch
- Left door lock actuator assembly
- Left engine compartment fuse panel
- Liftgate lock actuator
- Lock
- Lock input
- Lock/unlock in
- Open
- Output
- Panel)
- Pb01
- Pb02
- Pb04
- Pb05
- Pbo5
- Ph31
- Ph34
- Ph35
- Phe2
- Power window fuse
- Power door lock module (below center of instrument panel, mounted on center instrument panel support bracket)
- Power windows
- Red
- Right door lock switch
- Right circuit breaker
- Right door lock actuator
- Sliding door
- Sliding door
- Sliding door contact switch
- Sliding door lock actuator
- Sliding door)
- Sliding dr input
- System
- Timer module (behind bottom of left cowl panel)
- Un- lock
- Unlock
- Unlock input