
 Čeština
 Dansk
Dansk Deutsch
 Ελληνικά
 English
 English
 Español
 Suomi
Suomi Français
 Français
 עברית
עברית Hrvatski
 Magyar
 Italiano
 日本語
日本語 한국어
한국어 Nederlands
 Polski
 Português
 Português
 Русский
 Slovenčina
 Slovenščina
 Svenska
 Türkçe
 中文 (中国)

Dodge Colt GL 1992 - G - TESTS W/CODES 1992 ENGINE PERFORMANCE Chrysler Motors Self-Diagnostics
Dodge Colt GL 1992 - INTRODUCTION
If no faults were found while performing BASIC TESTING , proceed with self-diagnostics. If no fault codes or only pass codes are present after entering self-diagnostics, proceed to TESTS W/O CODES article in the ENGINE PERFORMANCE Section for diagnosis by symptom (i.e., ROUGH IDLE, NO START, etc.).
Dodge Colt GL 1992 - SELF-DIAGNOSTIC SYSTEM SYSTEM DIAGNOSIS
Use Chrysler Motors code charts when using Chrysler's Diagnostic Readout Box (DRB-II). If DRB-II is not available, system diagnosis can be accomplished using a voltmeter. To perform self-diagnostics using a voltmeter, see RETRIEVING CODES (USING VOLTMETER) .
NOTE: Chrysler Motors recommends using DRB-II to diagnose system. Voltmeter usage has limited diagnostic capabilities, but can be used if DRB-II is not available.
Engine Control Unit (ECU) monitors several different engine control system circuits. If an abnormal input signal occurs, a fault code is stored in ECU memory and given a fault code number. Each circuit has its own fault number and message. A fault code does not condemn any specific component; it simply points out a probable malfunctioning area.
Fault codes can be confirmed by using a voltmeter or Chrysler's Diagnostic Readout Box (DRB-II). See RETRIEVING CODES (USING VOLTMETER) or RETRIEVING CODES (USING DRB-II) . By using DRB-II, self-diagnostic capabilities of this system can simplify testing and reduce diagnostic time.
System malfunctions encountered are identified as either hard failures or intermittent failures as determined by ECU.
Dodge Colt GL 1992 - Hard Failures
Hard failures cause CHECK ENGINE light to illuminate and remain on until malfunction is repaired. If light comes on and remains on (light may flash) during vehicle operation, cause of malfunction must be determined by using FAULT CODES table (if testing with voltmeter) or diagnostic CODE CHARTS (if testing with DRB-II). If a sensor fails, ECU will use a substitute value in its calculations to continue engine operation. In this condition, vehicle is functional, but loss of good driveability may result.
Dodge Colt GL 1992 - Intermittent Failures
Intermittent failures may cause CHECK ENGINE light to flicker or illuminate and go out after intermittent fault goes away. However, corresponding trouble code will be retained in ECU memory. If related fault does not reoccur within a certain time frame, related trouble code will be erased from ECU memory. Intermittent failures may be caused by a sensor, connector or wiring related problems. See INTERMITTENTS in TESTS W/O CODES article in the ENGINE PERFORMANCE Section.
Dodge Colt GL 1992 - PRETEST INSPECTION
Before proceeding with diagnosis, following precautions must be observed:
- Vehicle must have a fully charged battery and functional charging system.
- Visually inspect connectors and circuit wiring being worked on.
- DO NOT disconnect battery or ECU. This will erase any fault codes stored in ECU.
- DO NOT cause short circuits when performing electrical tests. This will set additional fault codes, making diagnosis of original problem more difficult.
- DO NOT use a test light in place of a voltmeter.
- When checking for spark, ensure coil wire is NOT more than 1/4" from ground. If coil wire is more than 1/4" from ground, damage to vehicle electronics and/or ECU may result.
- DO NOT prolong testing of fuel injectors. Engine may hydrostatically (liquid) lock.
- When a vehicle has multiple fault codes, always repair lowest number fault code first.
- If using DRB-II to diagnose system, always perform verification test after repairs are made.
Dodge Colt GL 1992 - RETRIEVING CODES (USING VOLTMETER)
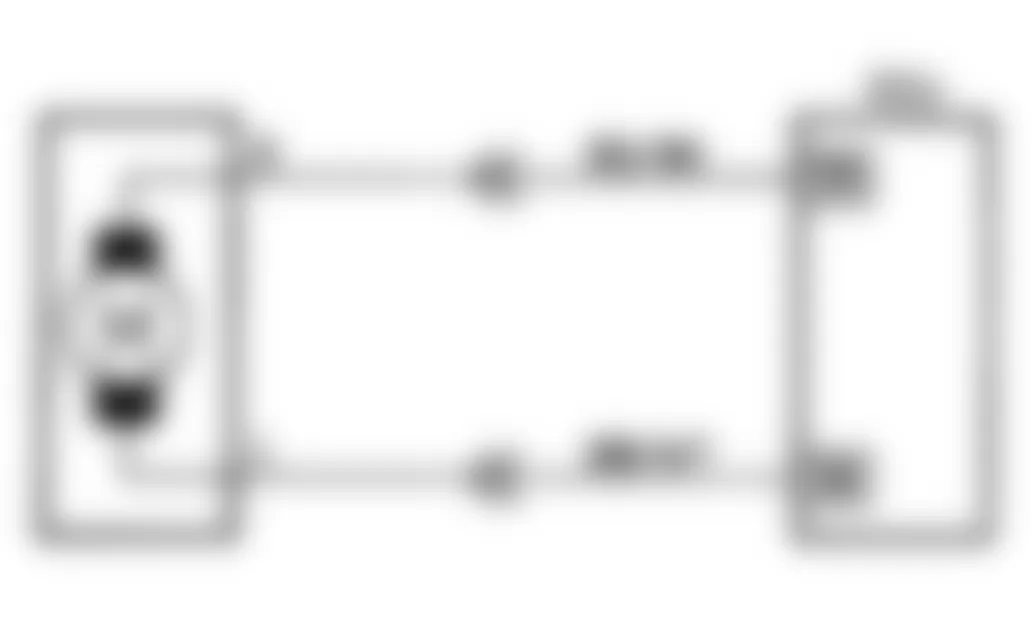
- Before entering on-board diagnostics, see PRETEST INSPECTION . Turn ignition switch to OFF position. Locate self-diagnostic connector, which is next to fuse block. Using an analog voltmeter, connect volt-meter positive lead to self-diagnostic connector terminal No. 1 (output) and negative lead to terminal No. 12 (ground). See Fig. 1 .
- Turn ignition switch to ON position and disclosure of ECU memory will begin. If 2 or more systems are non-functional, they are indicated by order of increasing code number. Indication is made by 12-volt pulses of voltmeter pointer. A constant repetition of short 12-volt pulses indicates system is normal. If system is abnormal, voltmeter will pulse between zero and 12 volts.
- Signals will appear on voltmeter as long and short 12-volt pulses. Long pulses represent tens; short pulses represent ones. For example, 4 long pulses and 3 short pulses indicate Code 43. After recording abnormal code(s), perform necessary repair. See FAULT CODES .


Fig. 1: Dodge Colt GL 1992 - Component Locations - Self-Diagnostic Connector Terminal ID
Dodge Colt GL 1992 - DIAGNOSTIC PROCEDURE (USING DRB-II)
NOTE: When using diagnostic code charts, DO NOT skip any steps in chart or incorrect diagnosis may result. Always check related Technical Service Bulletins (TSBs).
- RETRIEVING CODES (USING DRB-II) to retrieve fault codes. If fault codes are NOT present and DRB-II is used, proceed to one of the following tests:
- Go to NO START TEST 1 (NS-1) chart if a no-start condition exists or engine stalls after start-up. Perform indicated VERIFICATION PROCEDURE chart (when provided) after repairs. Ensure charts apply to engine being tested.
- Go to DRIVEABILITY TEST 1 (DR-1) chart if engine runs but has performance problems. Perform indicated VERIFICATION TEST chart (when provided) after repairs. Ensure charts apply to engine being tested.
Dodge Colt GL 1992 - DRB-II KEY FUNCTIONS YES Or Down Arrow & NO Or Up Arrow
Keys will move lines on screen up or down, allowing user to choose an item or scroll through all selections available.
Dodge Colt GL 1992 - F1 & F2 Keys
Keys are used to scroll through sensor displays.
Dodge Colt GL 1992 - ATM Key
Key will return user to previous screen.
Dodge Colt GL 1992 - ENTER Key
Allows user to select a test or display. Flashing arrow must be on display user wishes to select. Pressing ENTER in sensor state will cause display to change from a 3-line display to a 1-line display.
Dodge Colt GL 1992 - F3 Key
Key is used to display a help screen. This key may be used at any time.
Dodge Colt GL 1992 - Number Keys
Keys are used for choosing a display or test by number for test or display.
Dodge Colt GL 1992 - READ/HOLD Key
Key is used to freeze any sensor display.
Dodge Colt GL 1992 - MODE & ATM Keys
Pressing MODE and ATM keys at same time will cause DRB-II to reset to copyright screen.
Dodge Colt GL 1992 - RETRIEVING CODES (USING DRB-II)
- Before entering on-board diagnostics, see PRE-TEST INSPECTION . Turn ignition off. Locate self-diagnostic connector, which is next to fuse block. Using appropriate Mitsubishi cartridge and adapter, connect DRB-II to diagnostic connector.
- Ensure all accessories are off. Turn ignition on. All character positions will illuminate and copyright information will appear on screen for a few seconds.
- If DRB-II screen displays an error message, see DRB-II ERROR SCREENS. DRB-II will offer 4 menus: VEHICLES TESTED, HOW TO USE, CONFIGURE and SELECT VEHICLE.
Dodge Colt GL 1992 - VEHICLES TESTED
Press "1" key or ENTER key when VEHICLES TESTED appears on DRB-II. DRB-II shows models covered by cartridge. Screen will display for 5 seconds and return to DRB-II menu. To return to DRB-II menu sooner, press ATM key.
Dodge Colt GL 1992 - HOW TO USE
Press "2" key or press down arrow to display HOW TO USE option and press ENTER. Press and hold F3 key. DRB-II displays instructions for cartridge usage. To return to DRB-II menu, press ATM key.
Dodge Colt GL 1992 - CONFIGURE
Press "3" key or press down arrow to display CONFIGURE option, and press ENTER. CONFIGURE allows user to customize DRB-II display. For example, if metric system is more useful, select METRIC from menu. All selections in CONFIGURE option remain active until user changes selection.
Dodge Colt GL 1992 - SELECT VEHICLE
- This allows user to enter information about vehicle being tested. Usually, this option has more than one display screen. Use ENTER key to enter vehicle information.
- When all information about vehicle is entered, DRB-II will display an information summary technician has entered. DRB-II will show an additional option marked CONFIRM. If information is correct, press CONFIRM. DRB-II will display MAIN MENU.
Dodge Colt GL 1992 - MAIN MENU
MAIN MENU represents all diagnostic functions available. Functions are SYSTEM TESTS, READ FAULTS, STATE DISPLAYS, ACTUATOR TESTS and ADJUSTMENTS. SYSTEM TESTS is NOT available.
Dodge Colt GL 1992 - READ FAULTS
This allows technician to read fault codes stored in ECU memory.
Dodge Colt GL 1992 - STATE DISPLAYS
- This allows technician to view conditions at signal level. The 2 types of signals are analog and digital. Analog signals are monitored at pins corresponding to vehicle harness splices (e.g., fuel pump relay).
- Digital signals correspond to data transmitted by system controllers. Both signals are displayed in common units (e.g., temperature). Use up and down arrow keys on DRB-II to scroll through displays available.
- Following ENGINE state displays are available on DRB-II:
- Module Information: This mode allows technician to read ECU part number and application.
- Engine Sensors: This mode allows technician to look at various engine sensors during engine operation.
- Inputs/Outputs: This mode allows technician to read input and output states of various switches and sensors.
- Custom Display: This screen allows technician to set up his/her own custom display. Two custom display screens can be programmed into DRB-II.
- Minimum/Current/Maximum: MIN/CURRENT/MAX display shows a history of conditions for a specific sensor. When this option is selected, maximum, current (static) and minimum values can be displayed for a specific sensor. To reset sensors to a zero value, simply press ENTER key. This display may be used to isolate intermittent faults. MIN/CURRENT/MAX display allows technician to observe operation of 6 different sensor values. Information is displayed as a 3-digit number. First value displayed is the minimum reading, second number is current reading and third value is the maximum reading. Typically sensors range between 2 and 252. Values less than 2 or greater than 252 will usually indicate that a sensor is shorted or disconnected. Watch minimum and maximum values to help diagnose intermittent problems.
- Monitors: This screen shows technician sensors and system controllers which affect fuel control, spark advance, RPM and A/C relay. There are 4 different screens available. For example, screen No. 1 will show: airflow sensor, O2 sensor, battery and fuel injector. All of these inputs affect fuel control.
Dodge Colt GL 1992 - Actuator Tests
This mode allows technician to actuate injectors, fuel pump, purge control, EGR solenoid, fuel pressure solenoid and wastegate.
Dodge Colt GL 1992 - Adjustments
This option provides a means for erasing fault code information stored in ECU. Follow DRB-II instructions to accomplish this task.
Dodge Colt GL 1992 - DRB-II ERROR SCREENS SYSTEM FAULT ROM CHECK SUM XXXX Message
Cartridge or DRB-II failure.
Dodge Colt GL 1992 - SYSTEM FAULT KEYBOARD FAILURE Message
Restart DRB-II. Ensure DRB-II keys are not pressed during power up. Another possibility is DRB-II failure.
Dodge Colt GL 1992 - SYSTEM FAULT ROM FAILURE XXXX Message
DRB-II failure.
Dodge Colt GL 1992 - SYSTEM FAULT EEPROM FAILURE Message
DRB-II failure.
Dodge Colt GL 1992 - SYSTEM FAILURE, COMMUNICATION FAILURE, REFER TO
DIAGNOSTIC PROCEDURES Message
On 1.5L, 2.4L and 3.0L Ram-50, perform diagnostic connector test. See DRIVEABILITY TEST No. 8 (DR-8). Failure of Mitsubishi Motor Corporation (MMC) adapter is another possibility.
Dodge Colt GL 1992 - SYSTEM FAILURE NO RESPONSE FROM ADAPTER or SYSTEM FAILURE
ADAPTER REQUIRED TO DIAGNOSE WITH THIS CARTRIDGE Message
Ensure you are using a correct Mitsubishi Motor Corporation cartridge. Failure of MMC adapter is another possibility.
Dodge Colt GL 1992 - FAULT CODES
NOTE: Codes listed in FAULT CODES table are not used on all vehicles.
Dodge Colt GL 1992 FAULT CODES
Code Component (1) Possible Cause (2) Engine Control Unit Engine Control Unit 11 Oxygen Sensor(3) Harness & Connector, Oxygen Sensor, Fuel Pressure, Injectors, Intake Air Leaks 12 Airflow Sensor Harness & Connector, Airflow Meter 13 Intake Air Temperature Sensor Harness & Connector, Intake Air Temperature Sensor 14 Throttle Position Sensor Harness & Connector, Throttle Position Sensor, Idle Position Switch 15 Motor Position Sensor Harness & Connector, Motor Position Sensor, Throttle Position Sensor 21 Coolant Temperature Sensor Harness & Connector, Coolant Temperature Sensor 22 Crank Angle Sensor Harness & Connector, Distributor Assembly 23 Top Dead Center Sensor Harness & Connector, Crank Angle Sensor 24 Vehicle Speed Sensor Harness & Connector, Vehicle Speed Sensor 25 Barometric Pressure Sensor Harness & Connector, Barometric Pressure Sensor 31 Detonation Sensor(4) Harness & Connector, Detonation Sensor 36 Ignition Timing Adjustment Signal Harness & Connector 39 Oxygen Sensor(5) Harness & Connector, Oxygen Sensor, Fuel Pressure, Injectors, Air Intake Leaks 41 Injector Harness & Connector, Injector Coil Resistance 42 Fuel Pump Harness & Connector, Control Relay 43 EGR(6) Harness & Connector, EGR Temperature Sensor, EGR Valve, EGR Control Solenoid, EGR Valve Control Vacuum 44 Ign. Coil & Power Transistor (Cyl. No. 1 & 4)(4) Harness & Connector, Ignition Coil, Power Transistor 52 Ign. Coil & Power Transistor (Cyl. No. 2 & 5)(4) Harness & Connector, Ignition Coil, Power Transistor 53 Ign. Coil & Power Transistor (Cyl. No. 3 & 6)(4) Harness & Connector, Ignition Coil, Power Transistor 61 Torque Reduction Signal Low(4) (7) Harness & Connector, Transaxle Control Unit 62 Induction Control Valve Position Sensor(8) Harness & Connector, Induction Control Valve Position Sensor, Air Intake Plenum Assembly
(1) Replace ECU if inspection of possible cause items reveals no problem.
(2) CHECK ENGINE Light Stays On
(3) Applies to non-turbo models.
(4) Dual Overhead Cam (DOHC) models.
(5) Oxygen sensor for front cylinders on Stealth turbo.
(6) California only.
(7) Automatic transaxle only.
(8) Non-turbo only.
Dodge Colt GL 1992 - CLEARING CODES
Using DRB-II, from main menu select ADJUSTMENTS. Enter ERASE FAULTS. Follow DRB-II instructions to accomplish this task. If DRB-II is not available, fault codes may be cleared by disconnecting negative battery cable for at least 10 seconds, allowing ECU to clear fault codes.
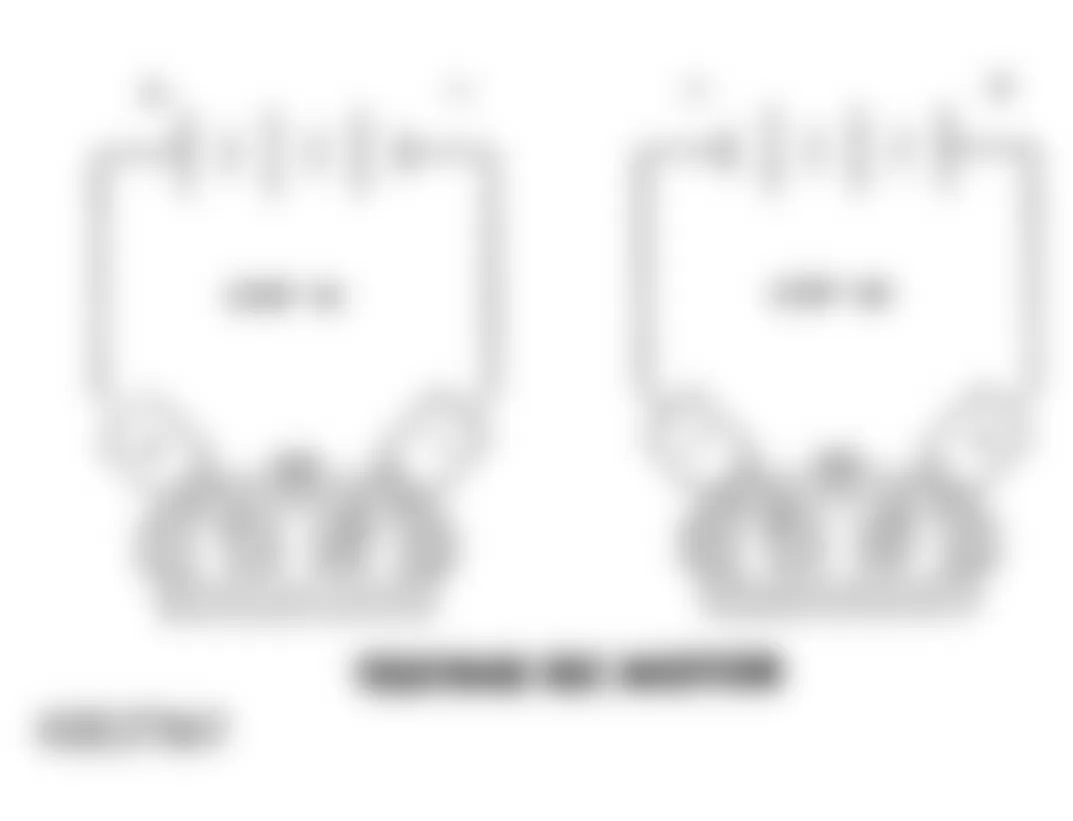
Dodge Colt GL 1992 - ECU LOCATION
Dodge Colt GL 1992 ECU LOCATION
Application Location All Models Behind Right Side Of Instrument Panel, Next To Blower Motor
Dodge Colt GL 1992 - CONNECTOR IDENTIFICATION
Fig. 2: Dodge Colt GL 1992 - Component Locations - ECU 10-Way Connector Terminal ID

Fig. 3: Dodge Colt GL 1992 - Component Locations - ECU 18-Way Connector Terminal ID

Fig. 4: Dodge Colt GL 1992 - Component Locations - ECU 24-Way Connector Terminal ID

Dodge Colt GL 1992 - CODE CHARTS * PLEASE READ THIS FIRST *
NOTE: Following trouble shooting charts and illustrations are courtesy of Chrysler Motors. To identify ECU connector terminals, see CONNECTOR IDENTIFICATION .
Dodge Colt GL 1992 - NS-1: IGNITION CHECK
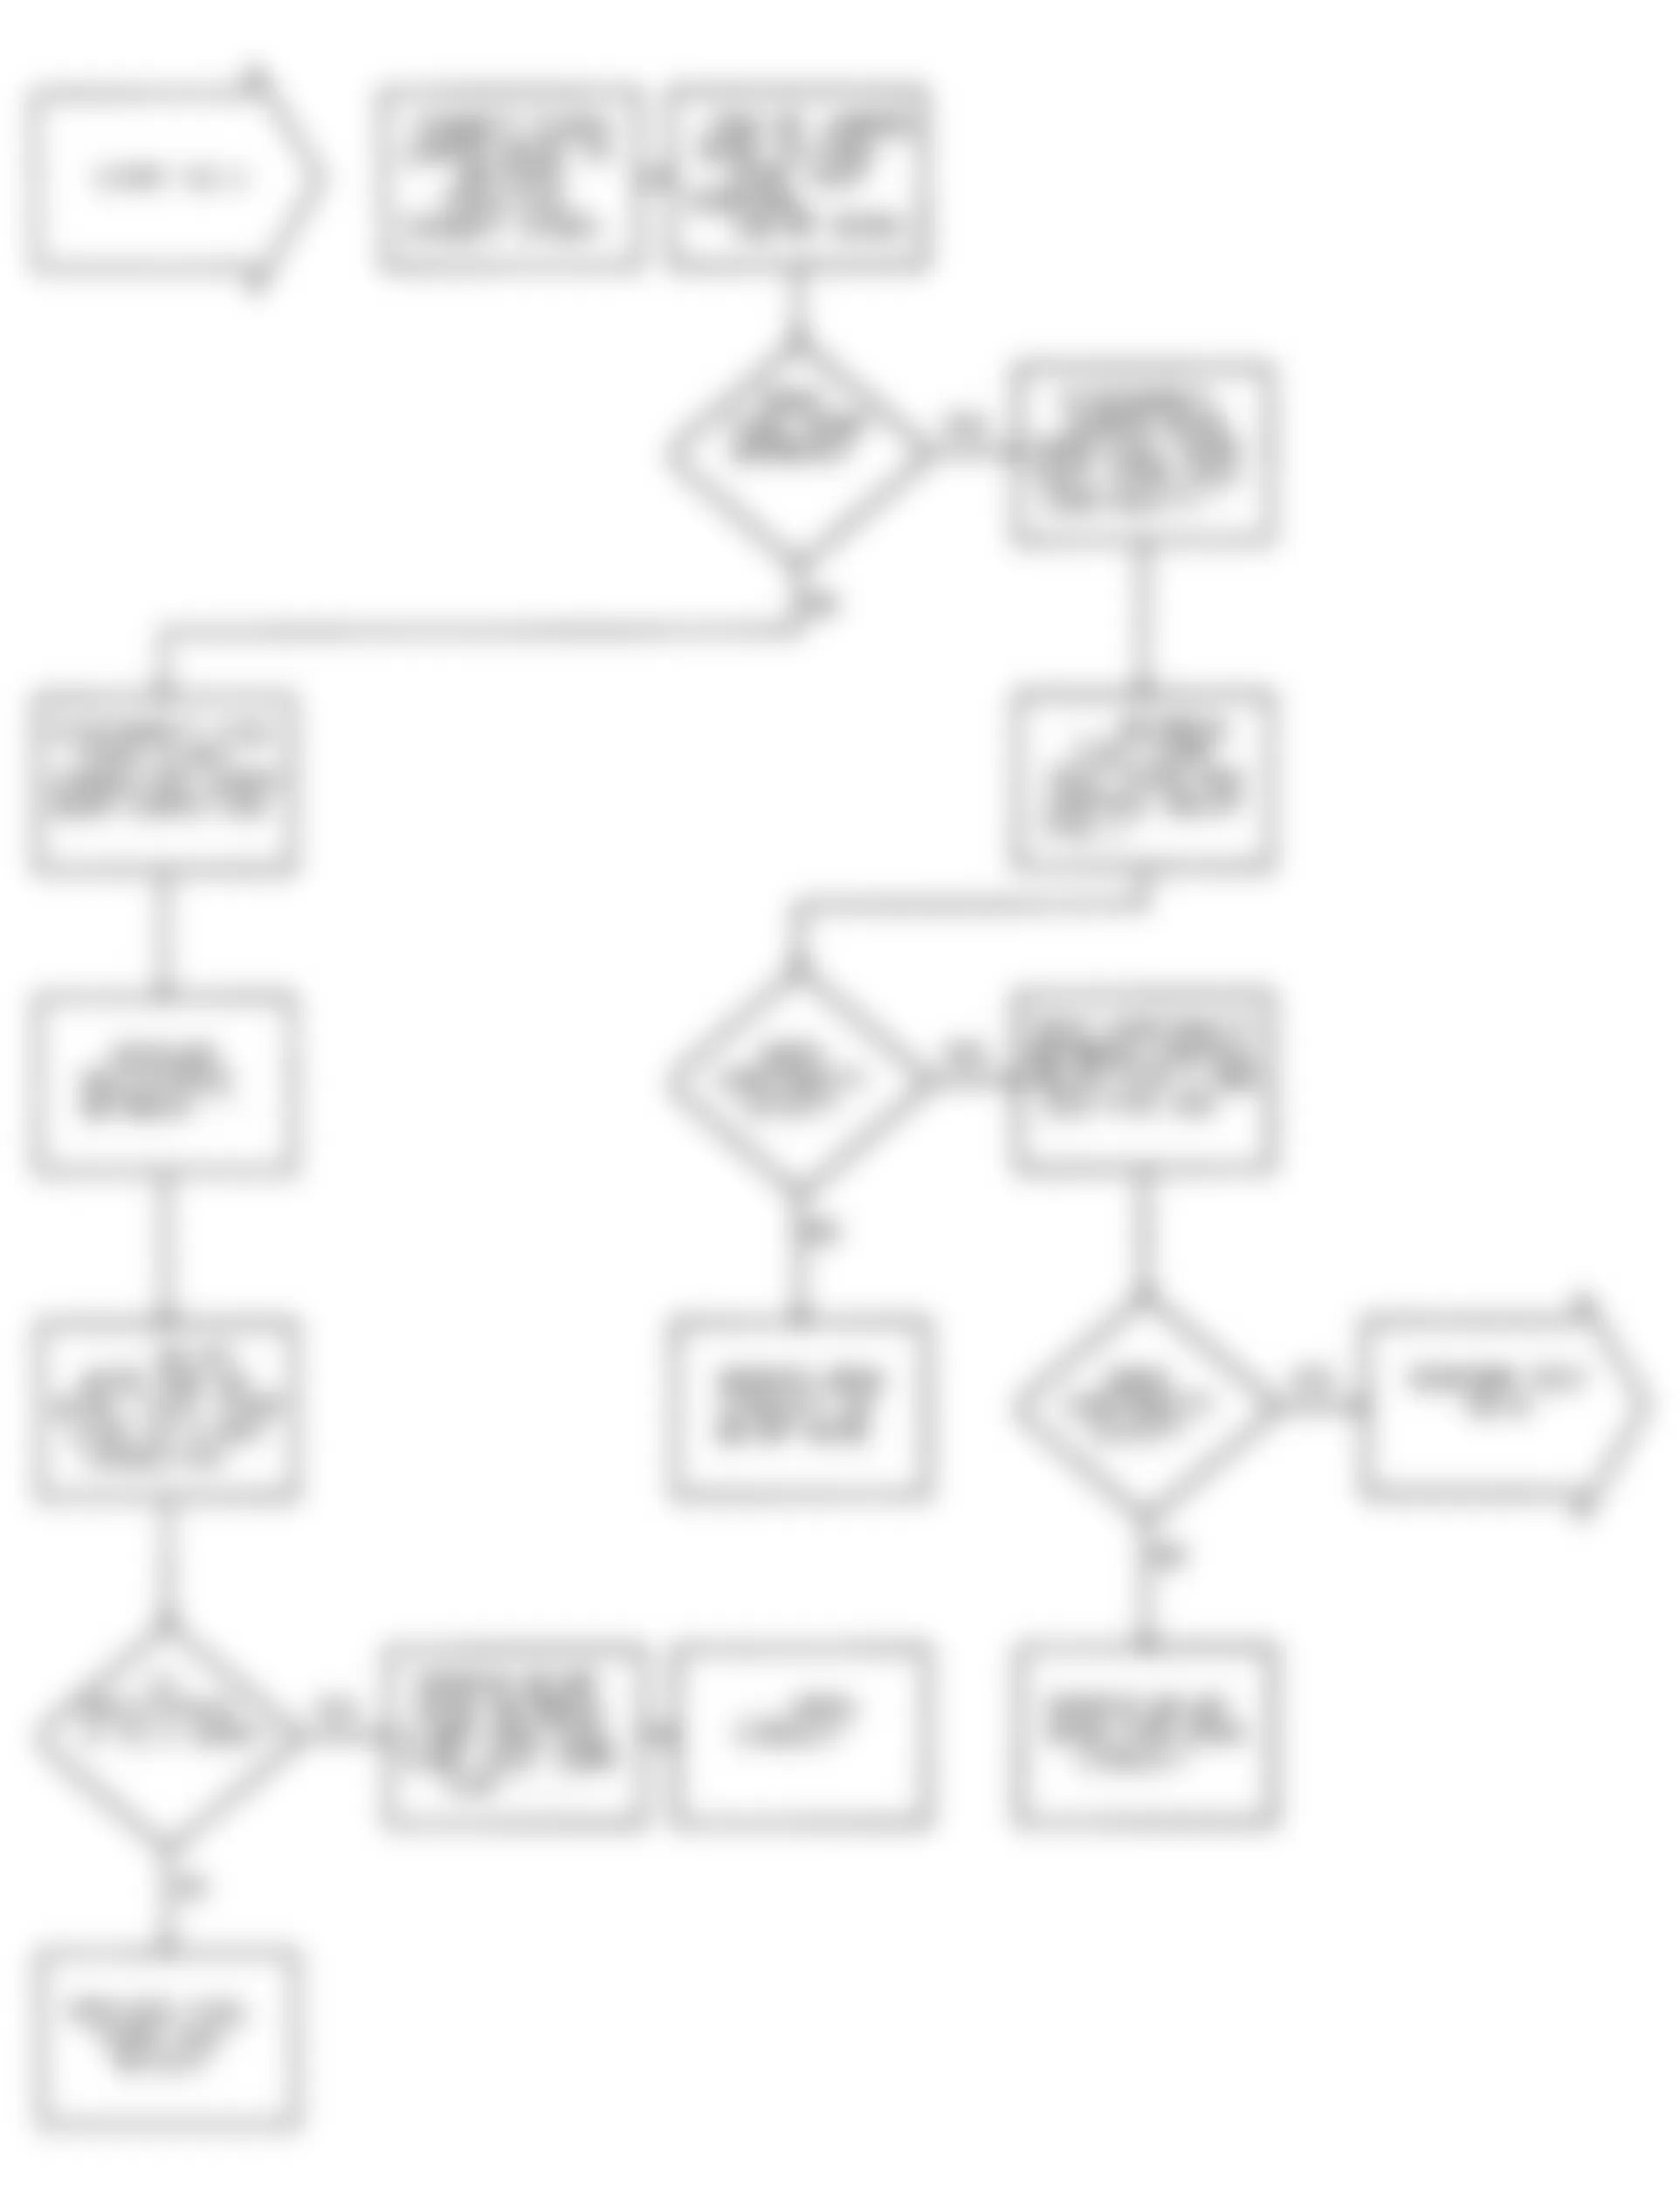
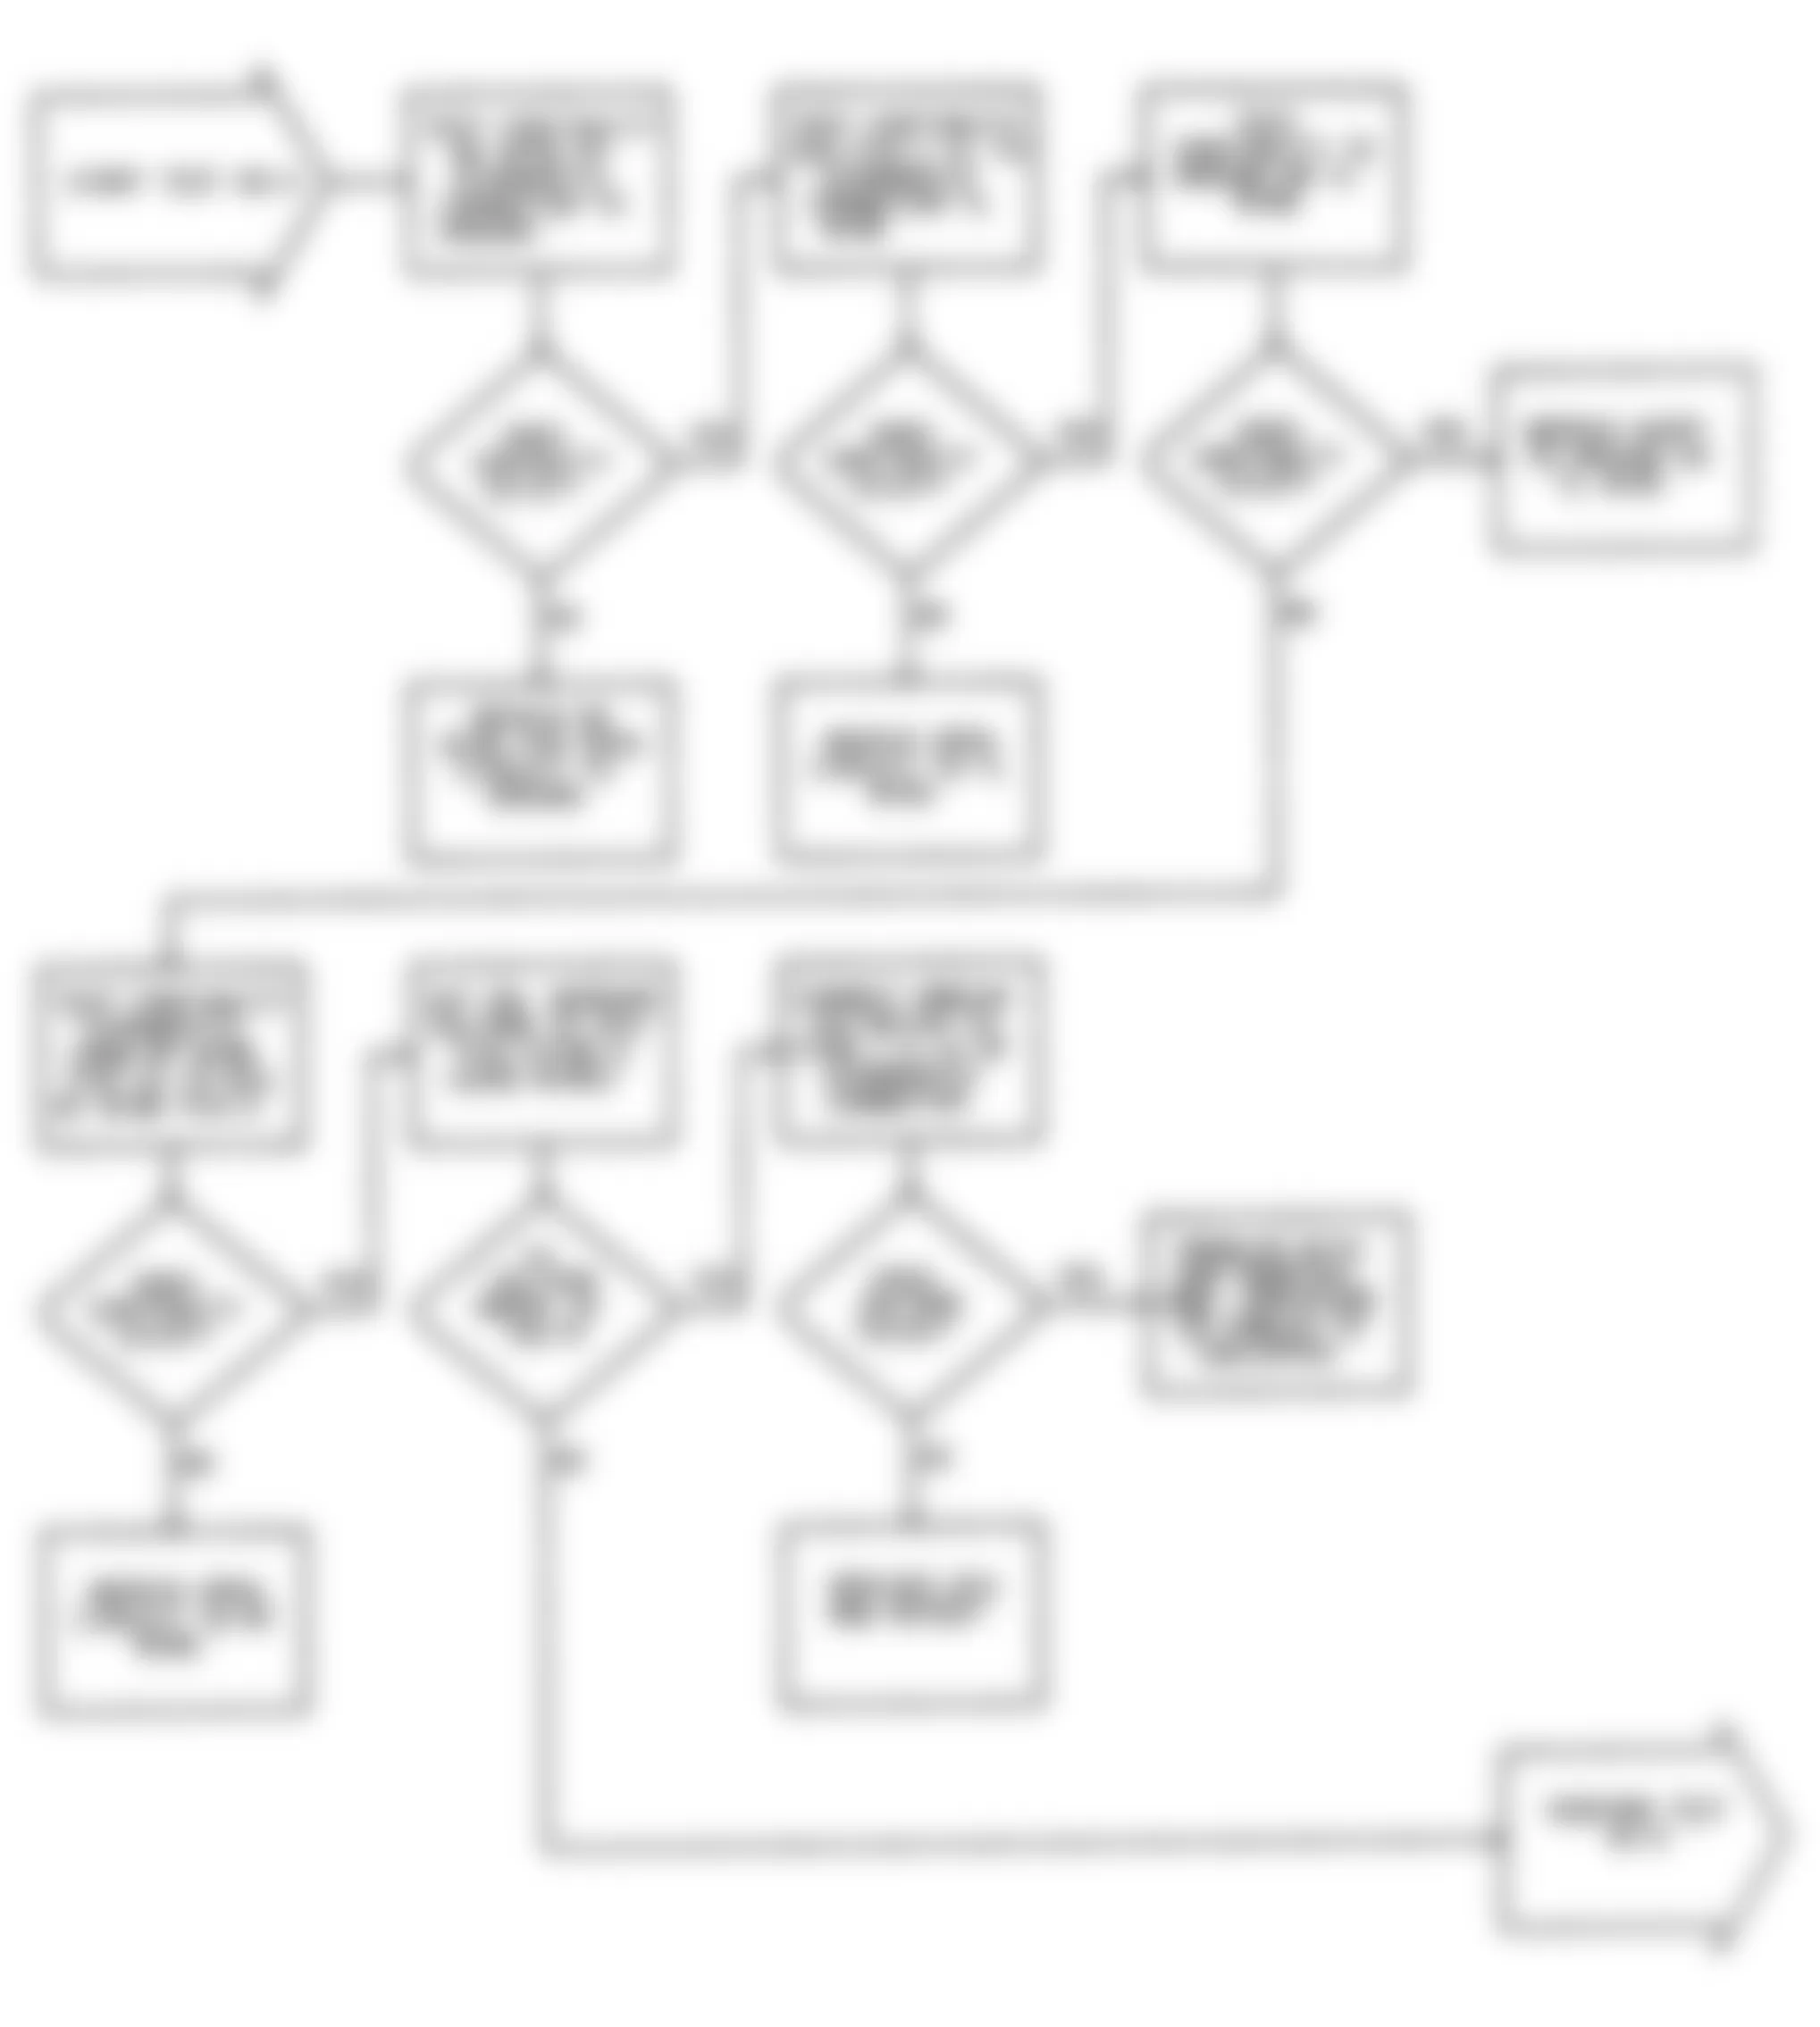
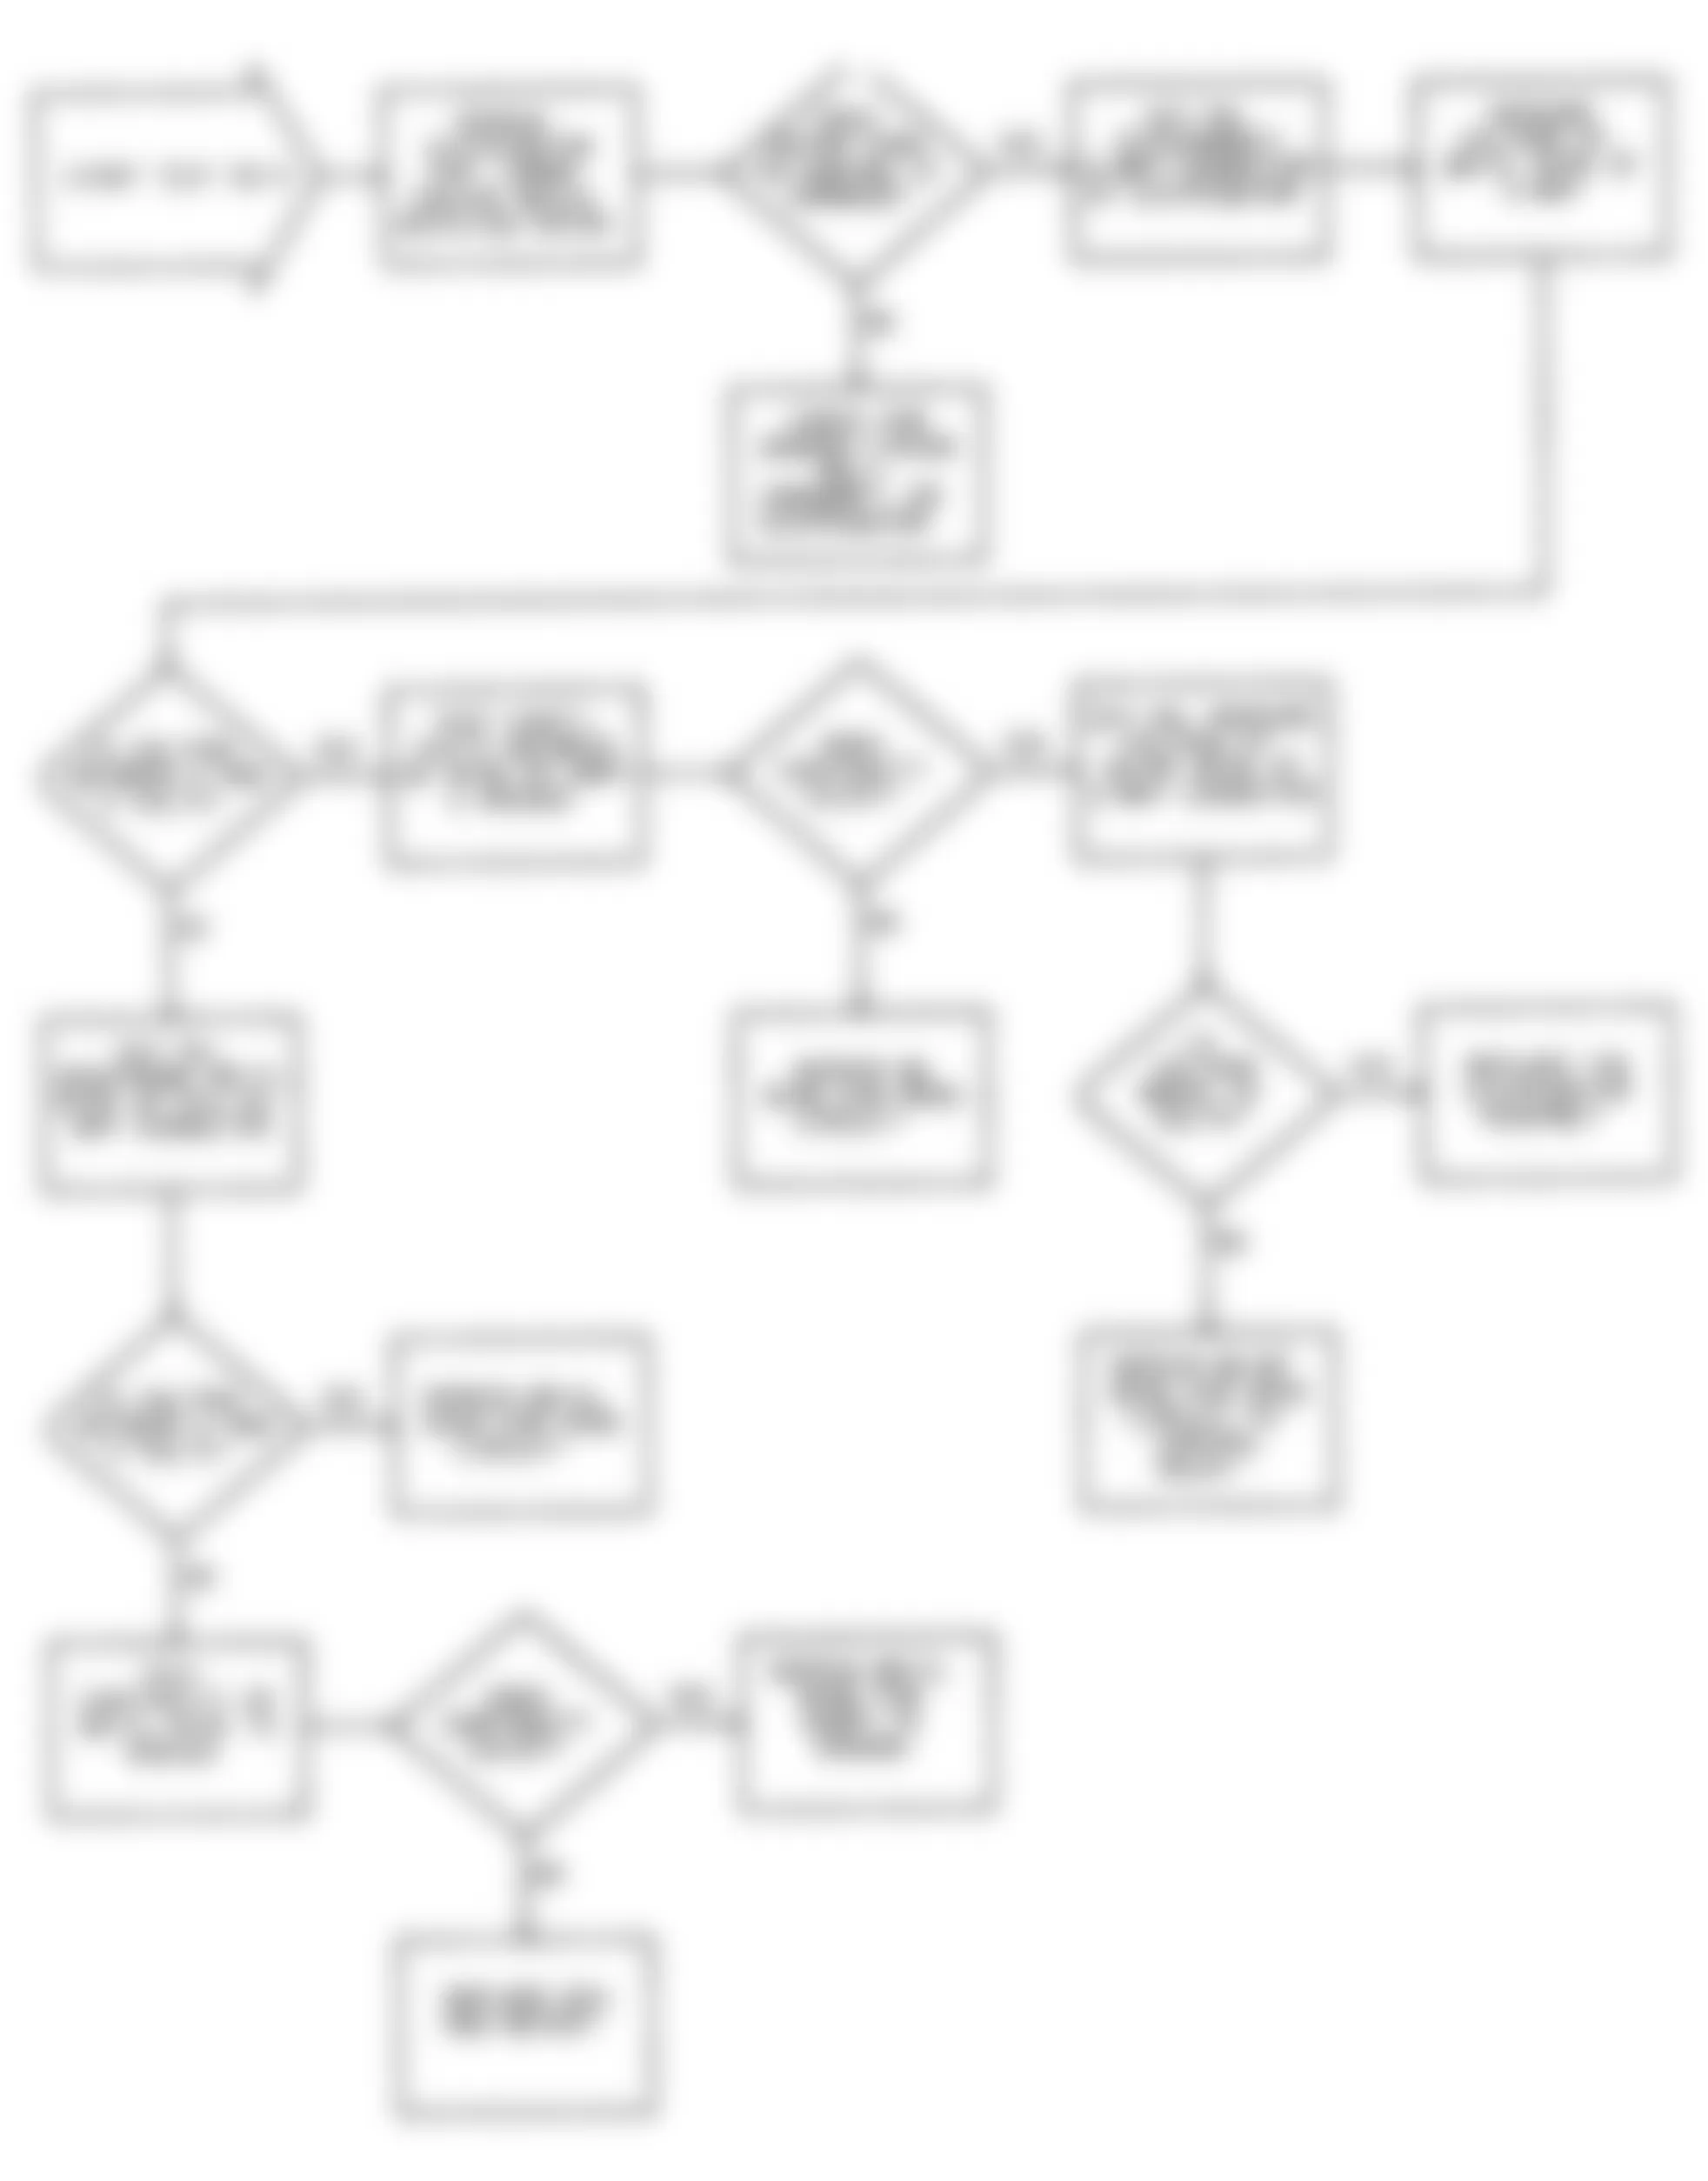
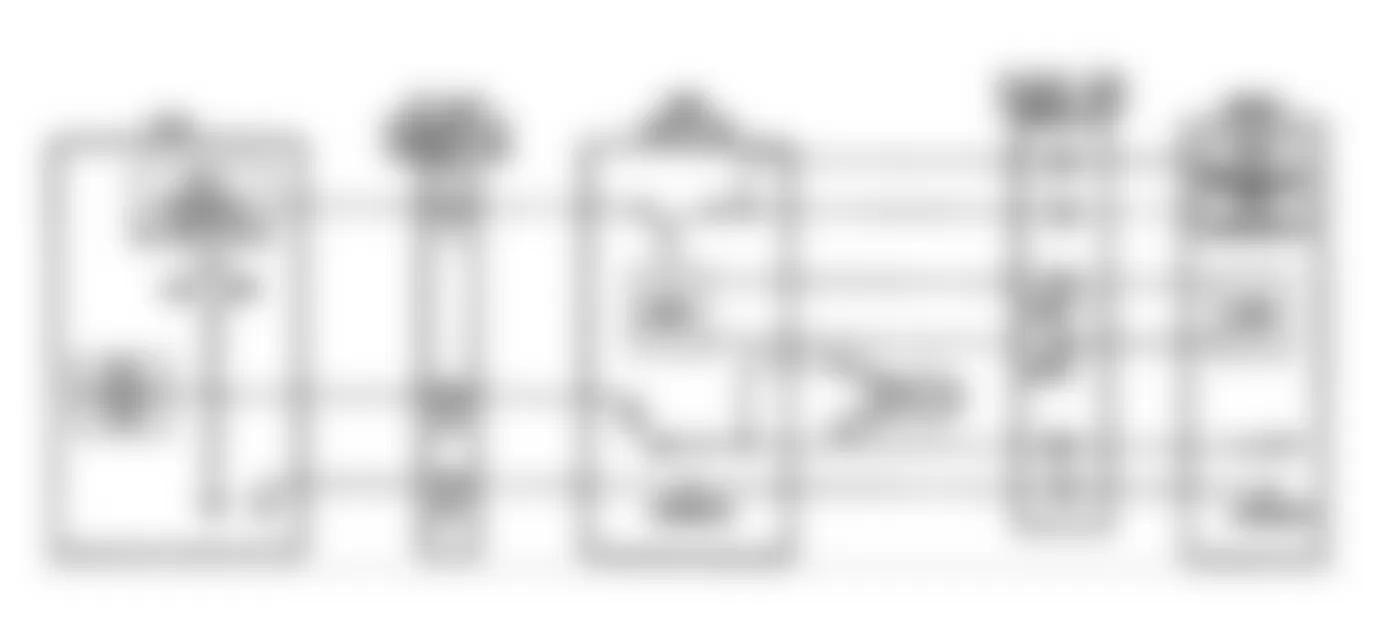
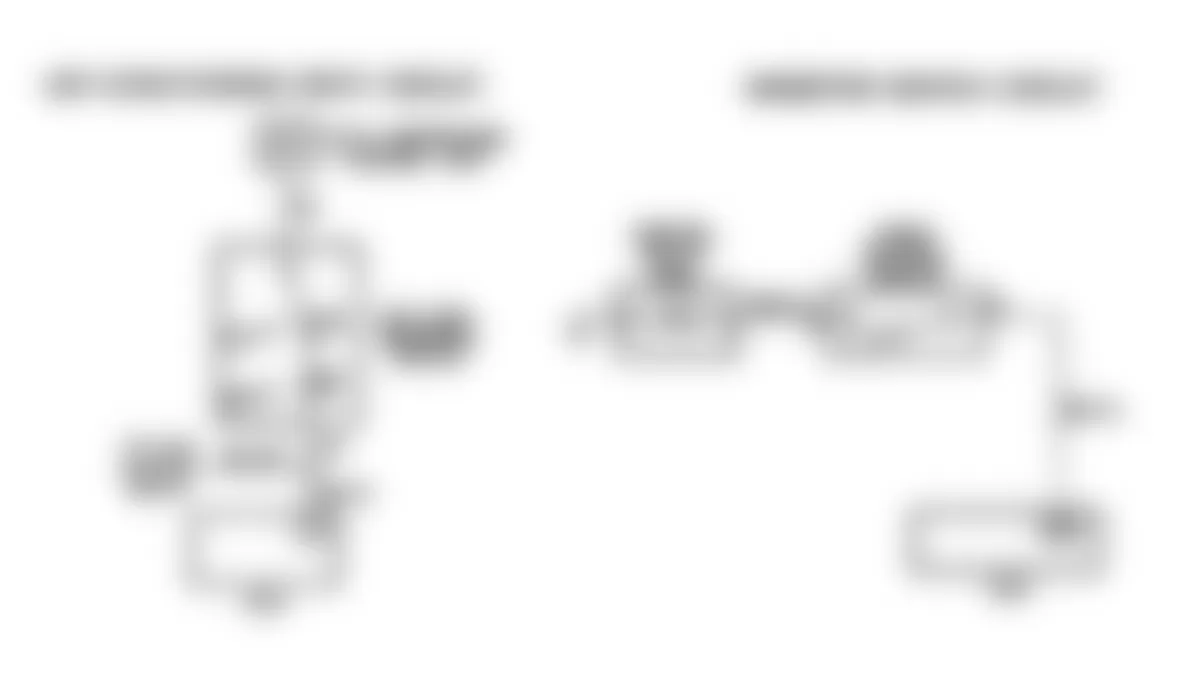
Fig. 5: Dodge Colt GL 1992 - Component Locations - No Start Test 1 Schematic (1 Of 3) Ignition Check

Fig. 6: Dodge Colt GL 1992 - Component Locations - No Start Test 1 Schematic (2 Of 3) Ignition Check
Fig. 7: Dodge Colt GL 1992 - Component Locations - No Start Test 1 Schematic (3 Of 3) Ignition Check
Dodge Colt GL 1992 - NS-2: TESTING FOR FUEL PRESSURE

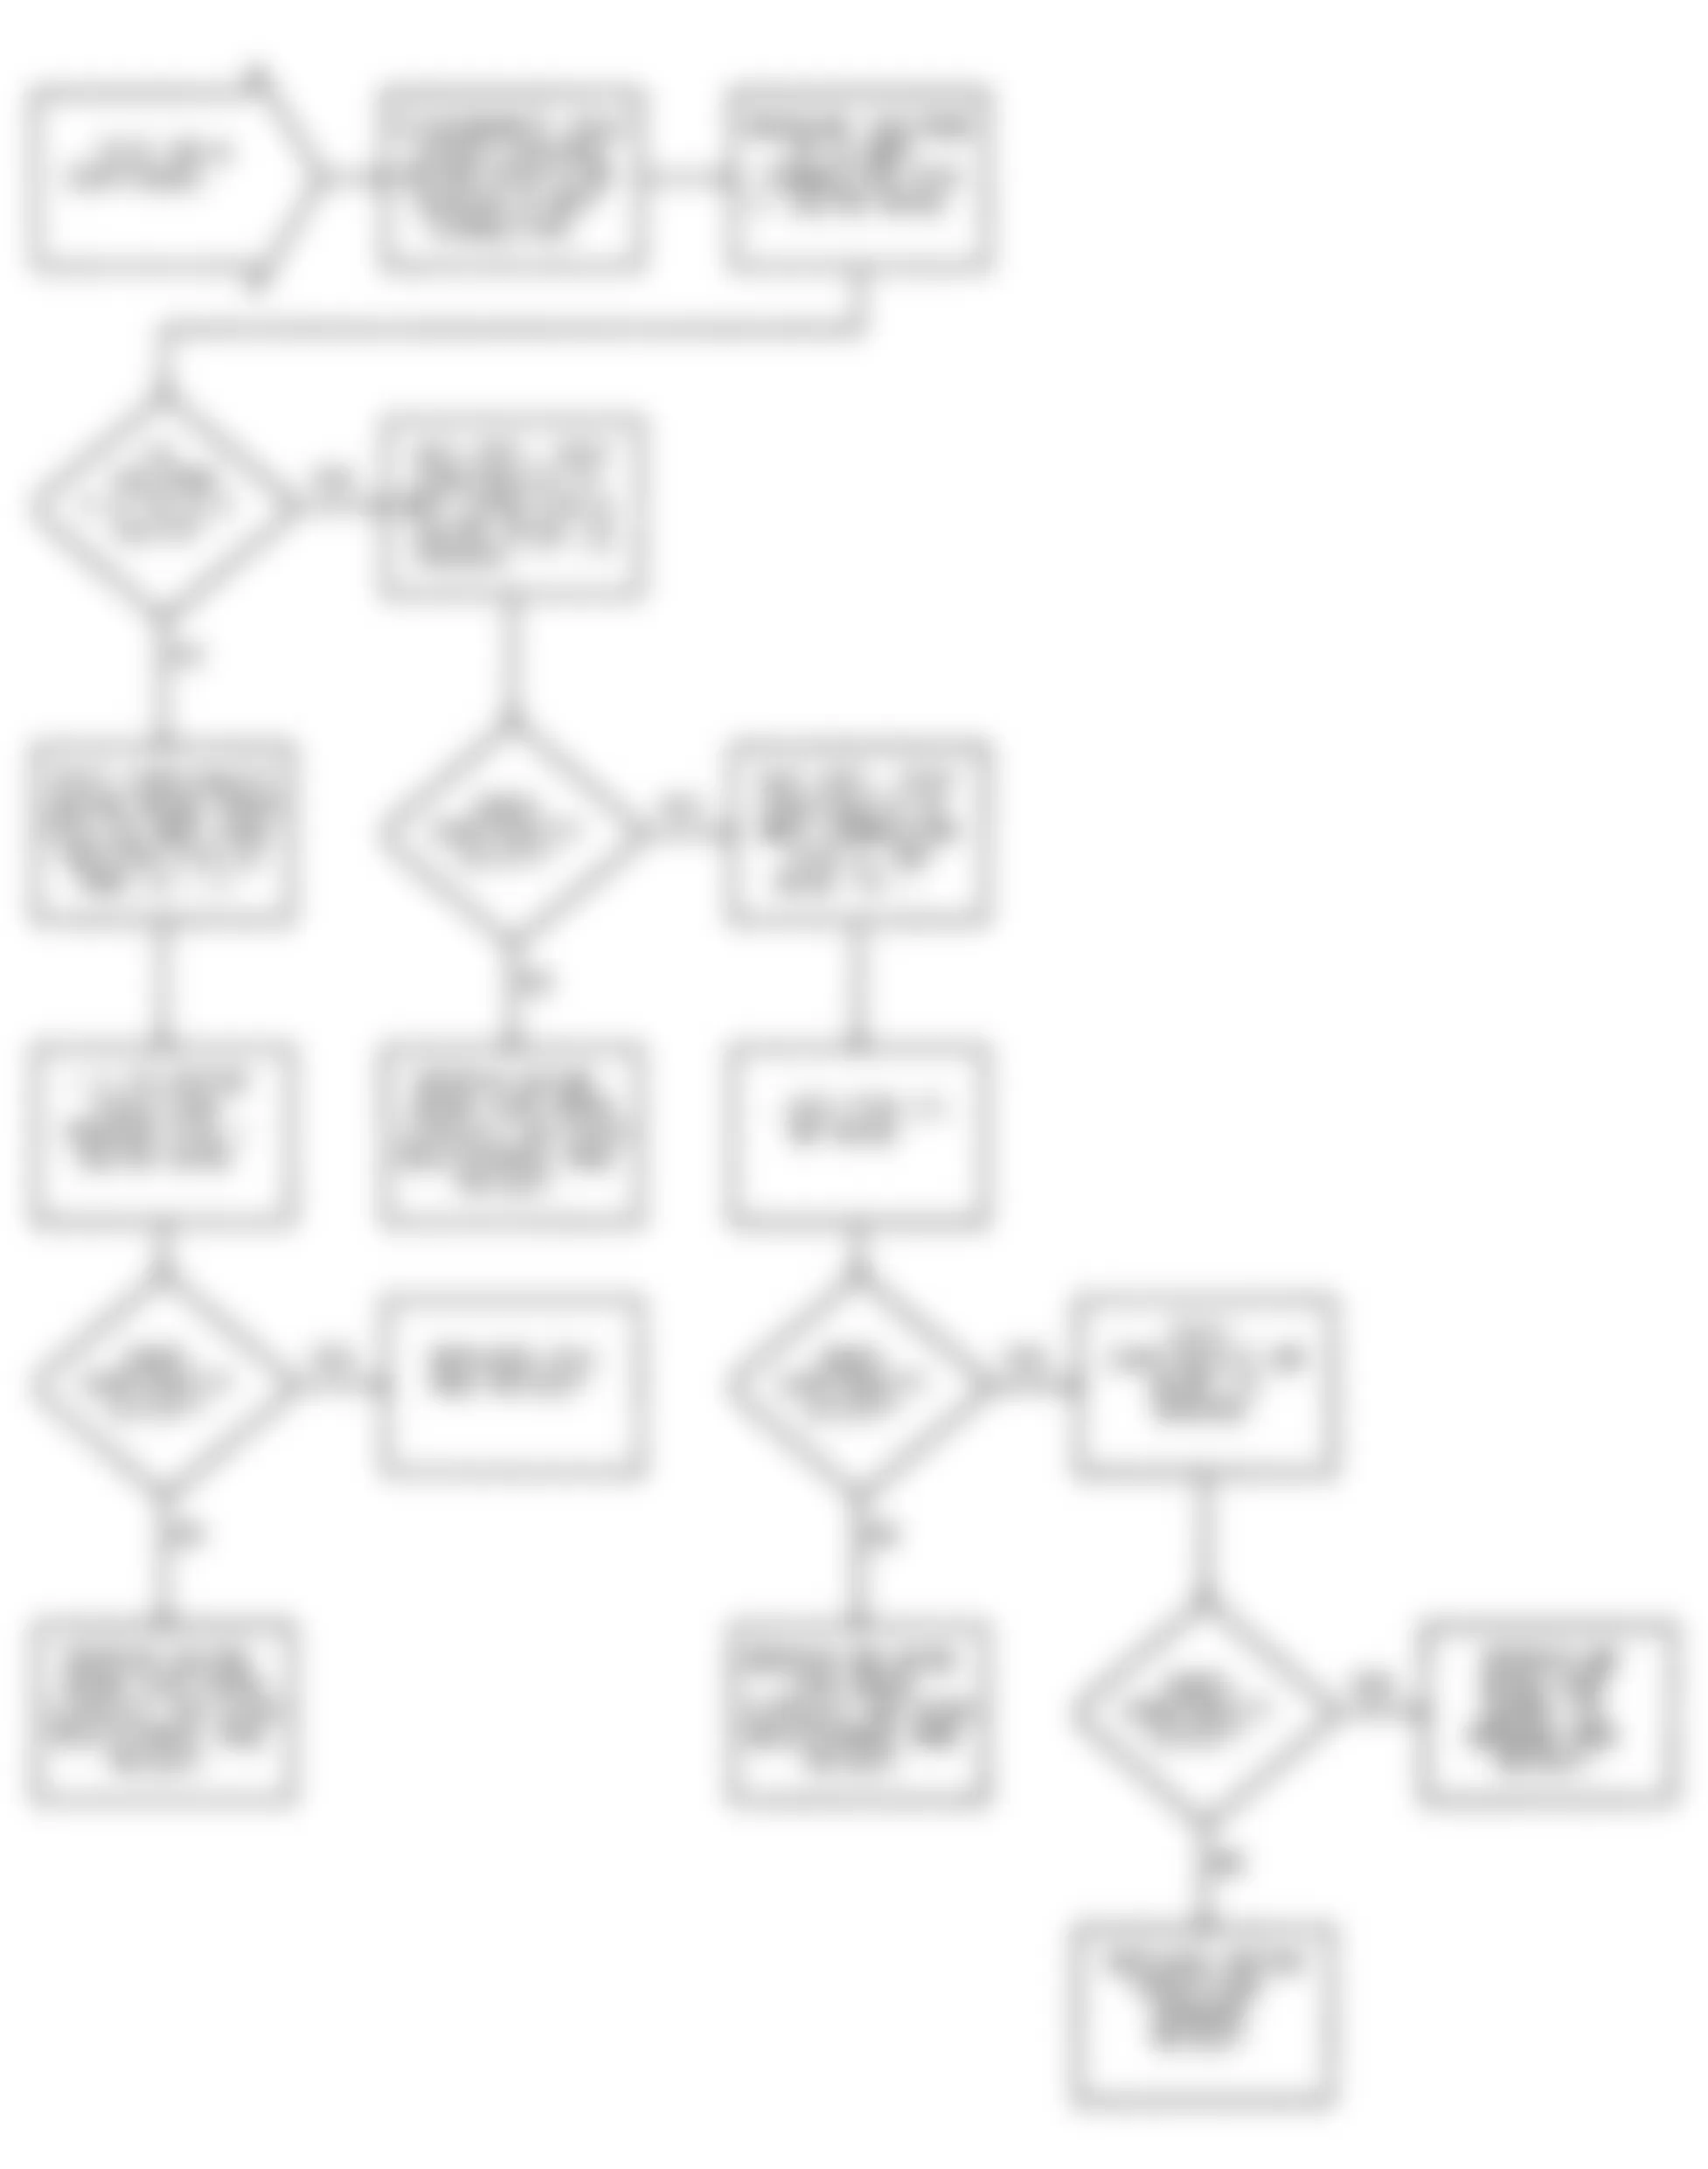
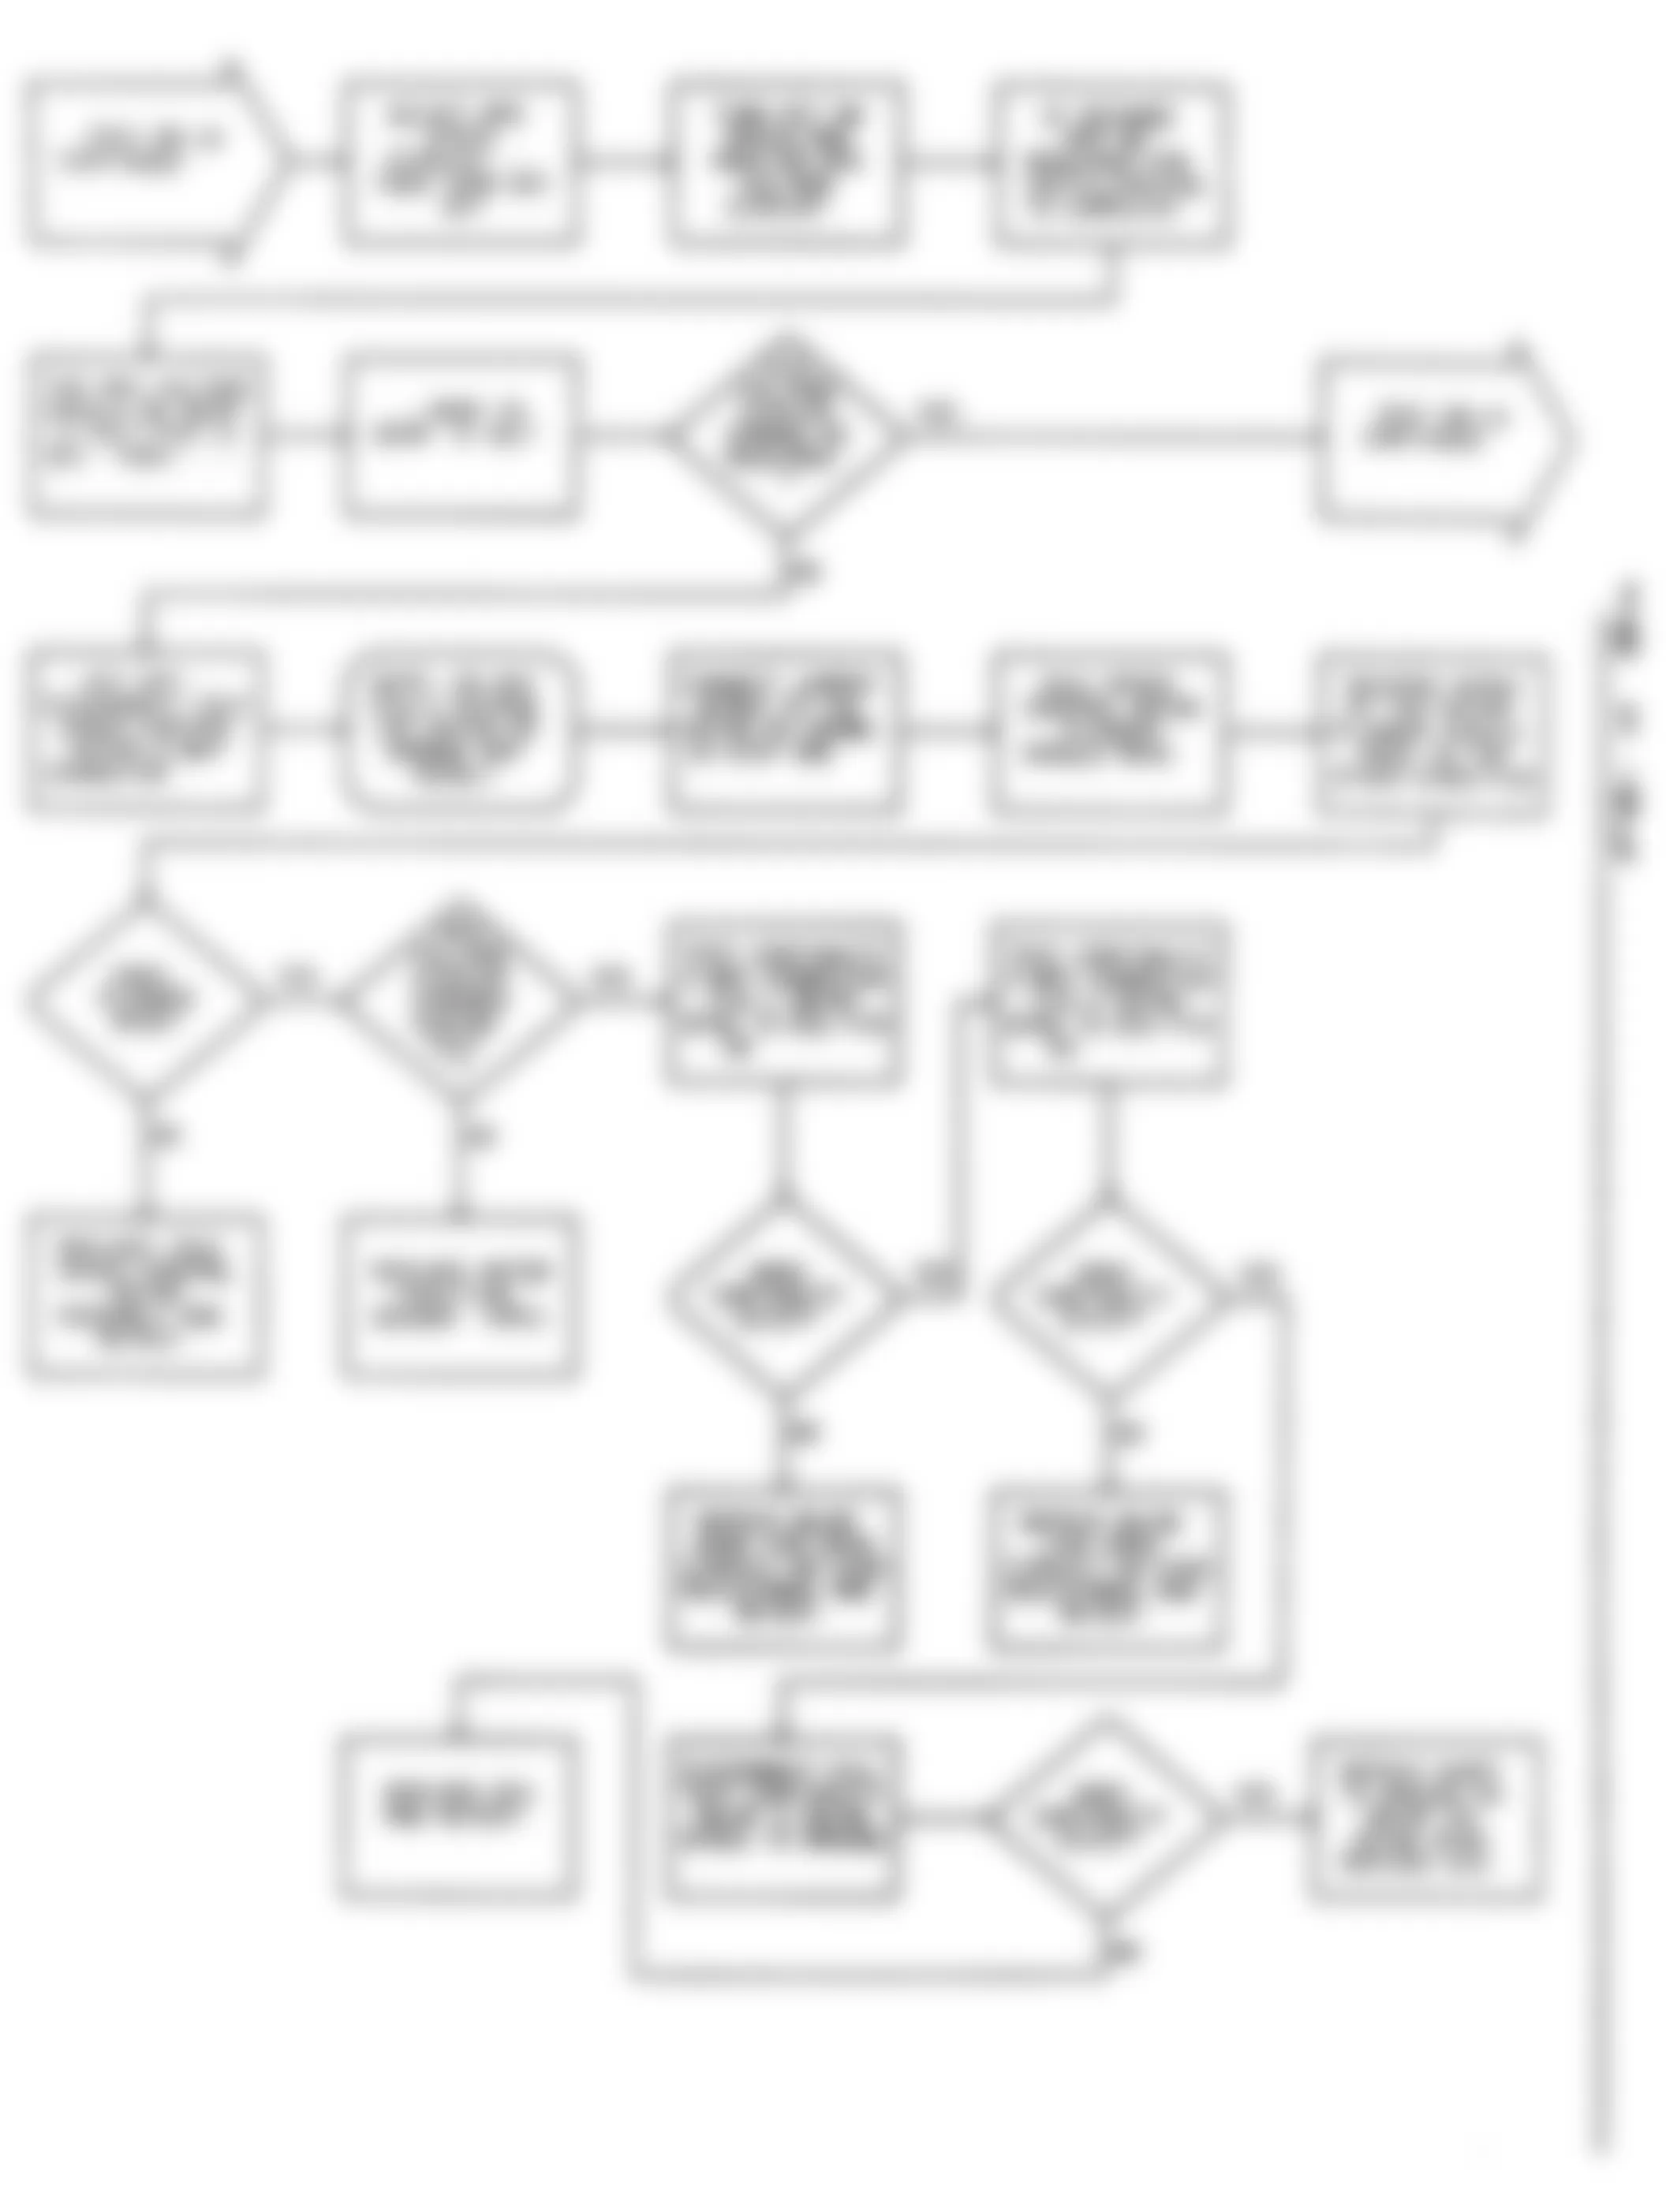
Dodge Colt GL 1992 - NS-3: TESTING FUEL SYSTEM
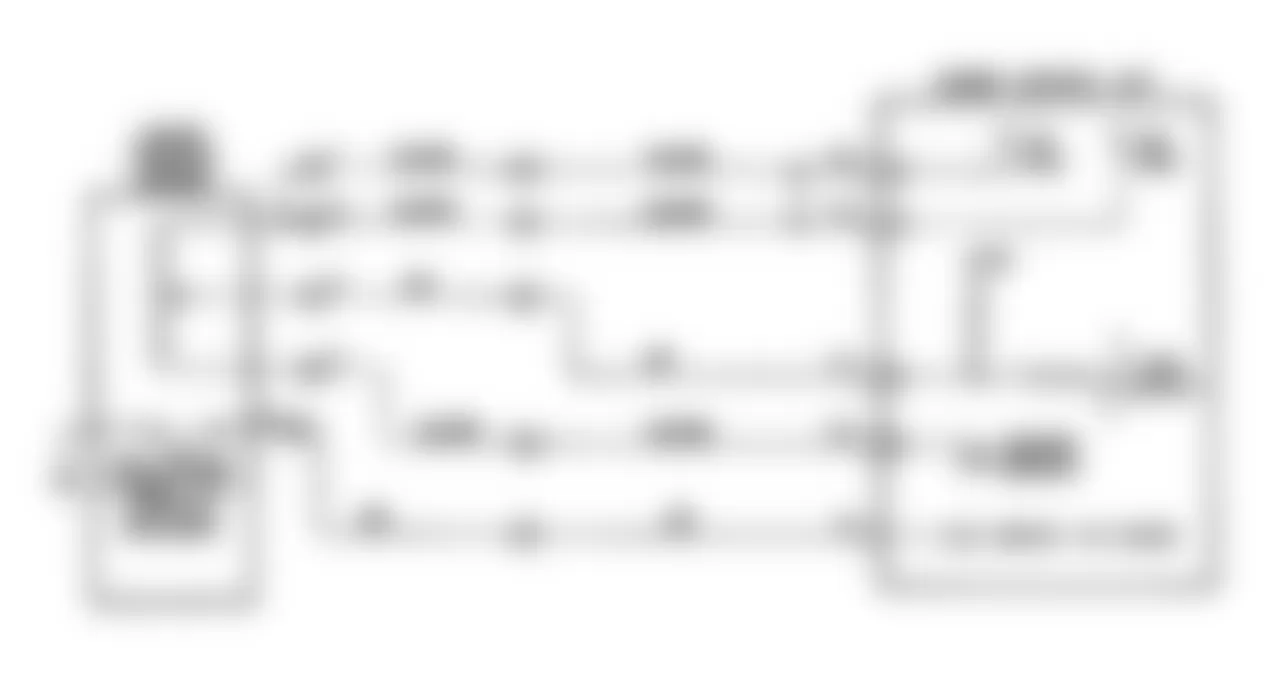
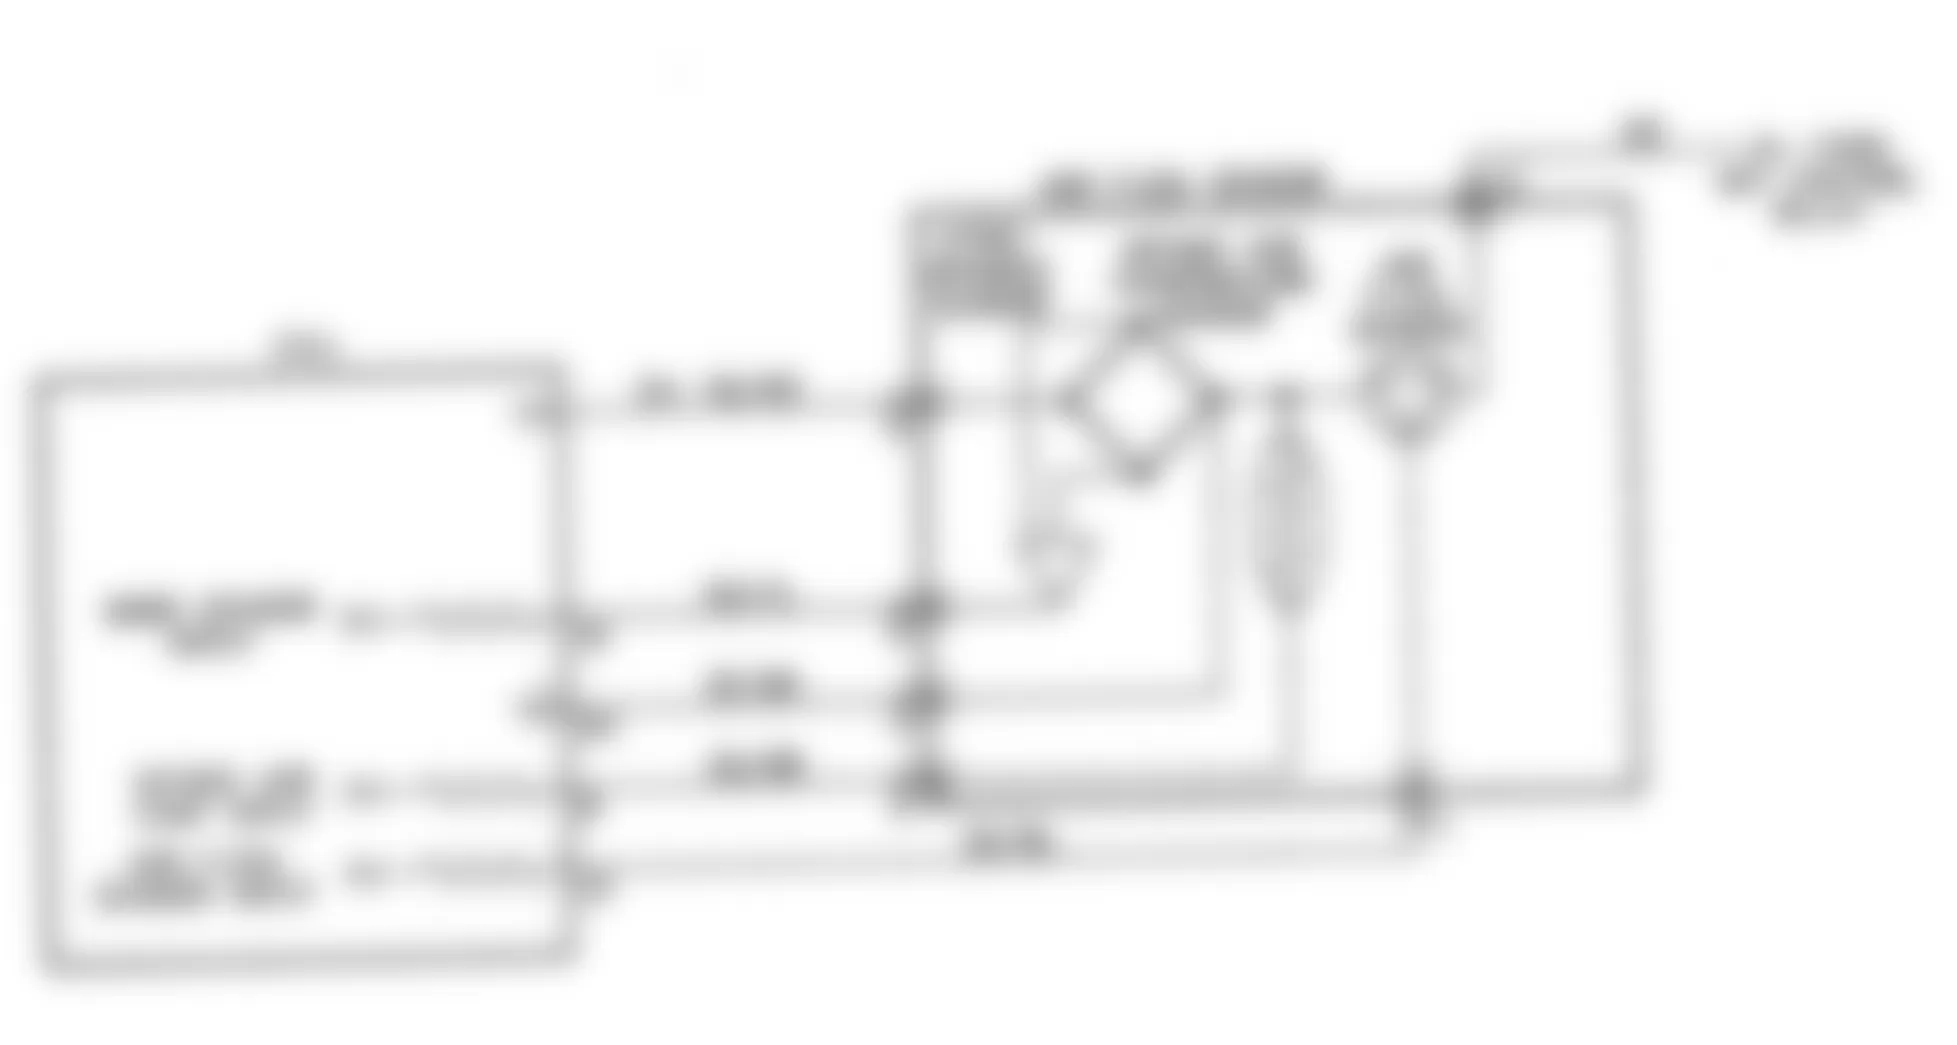
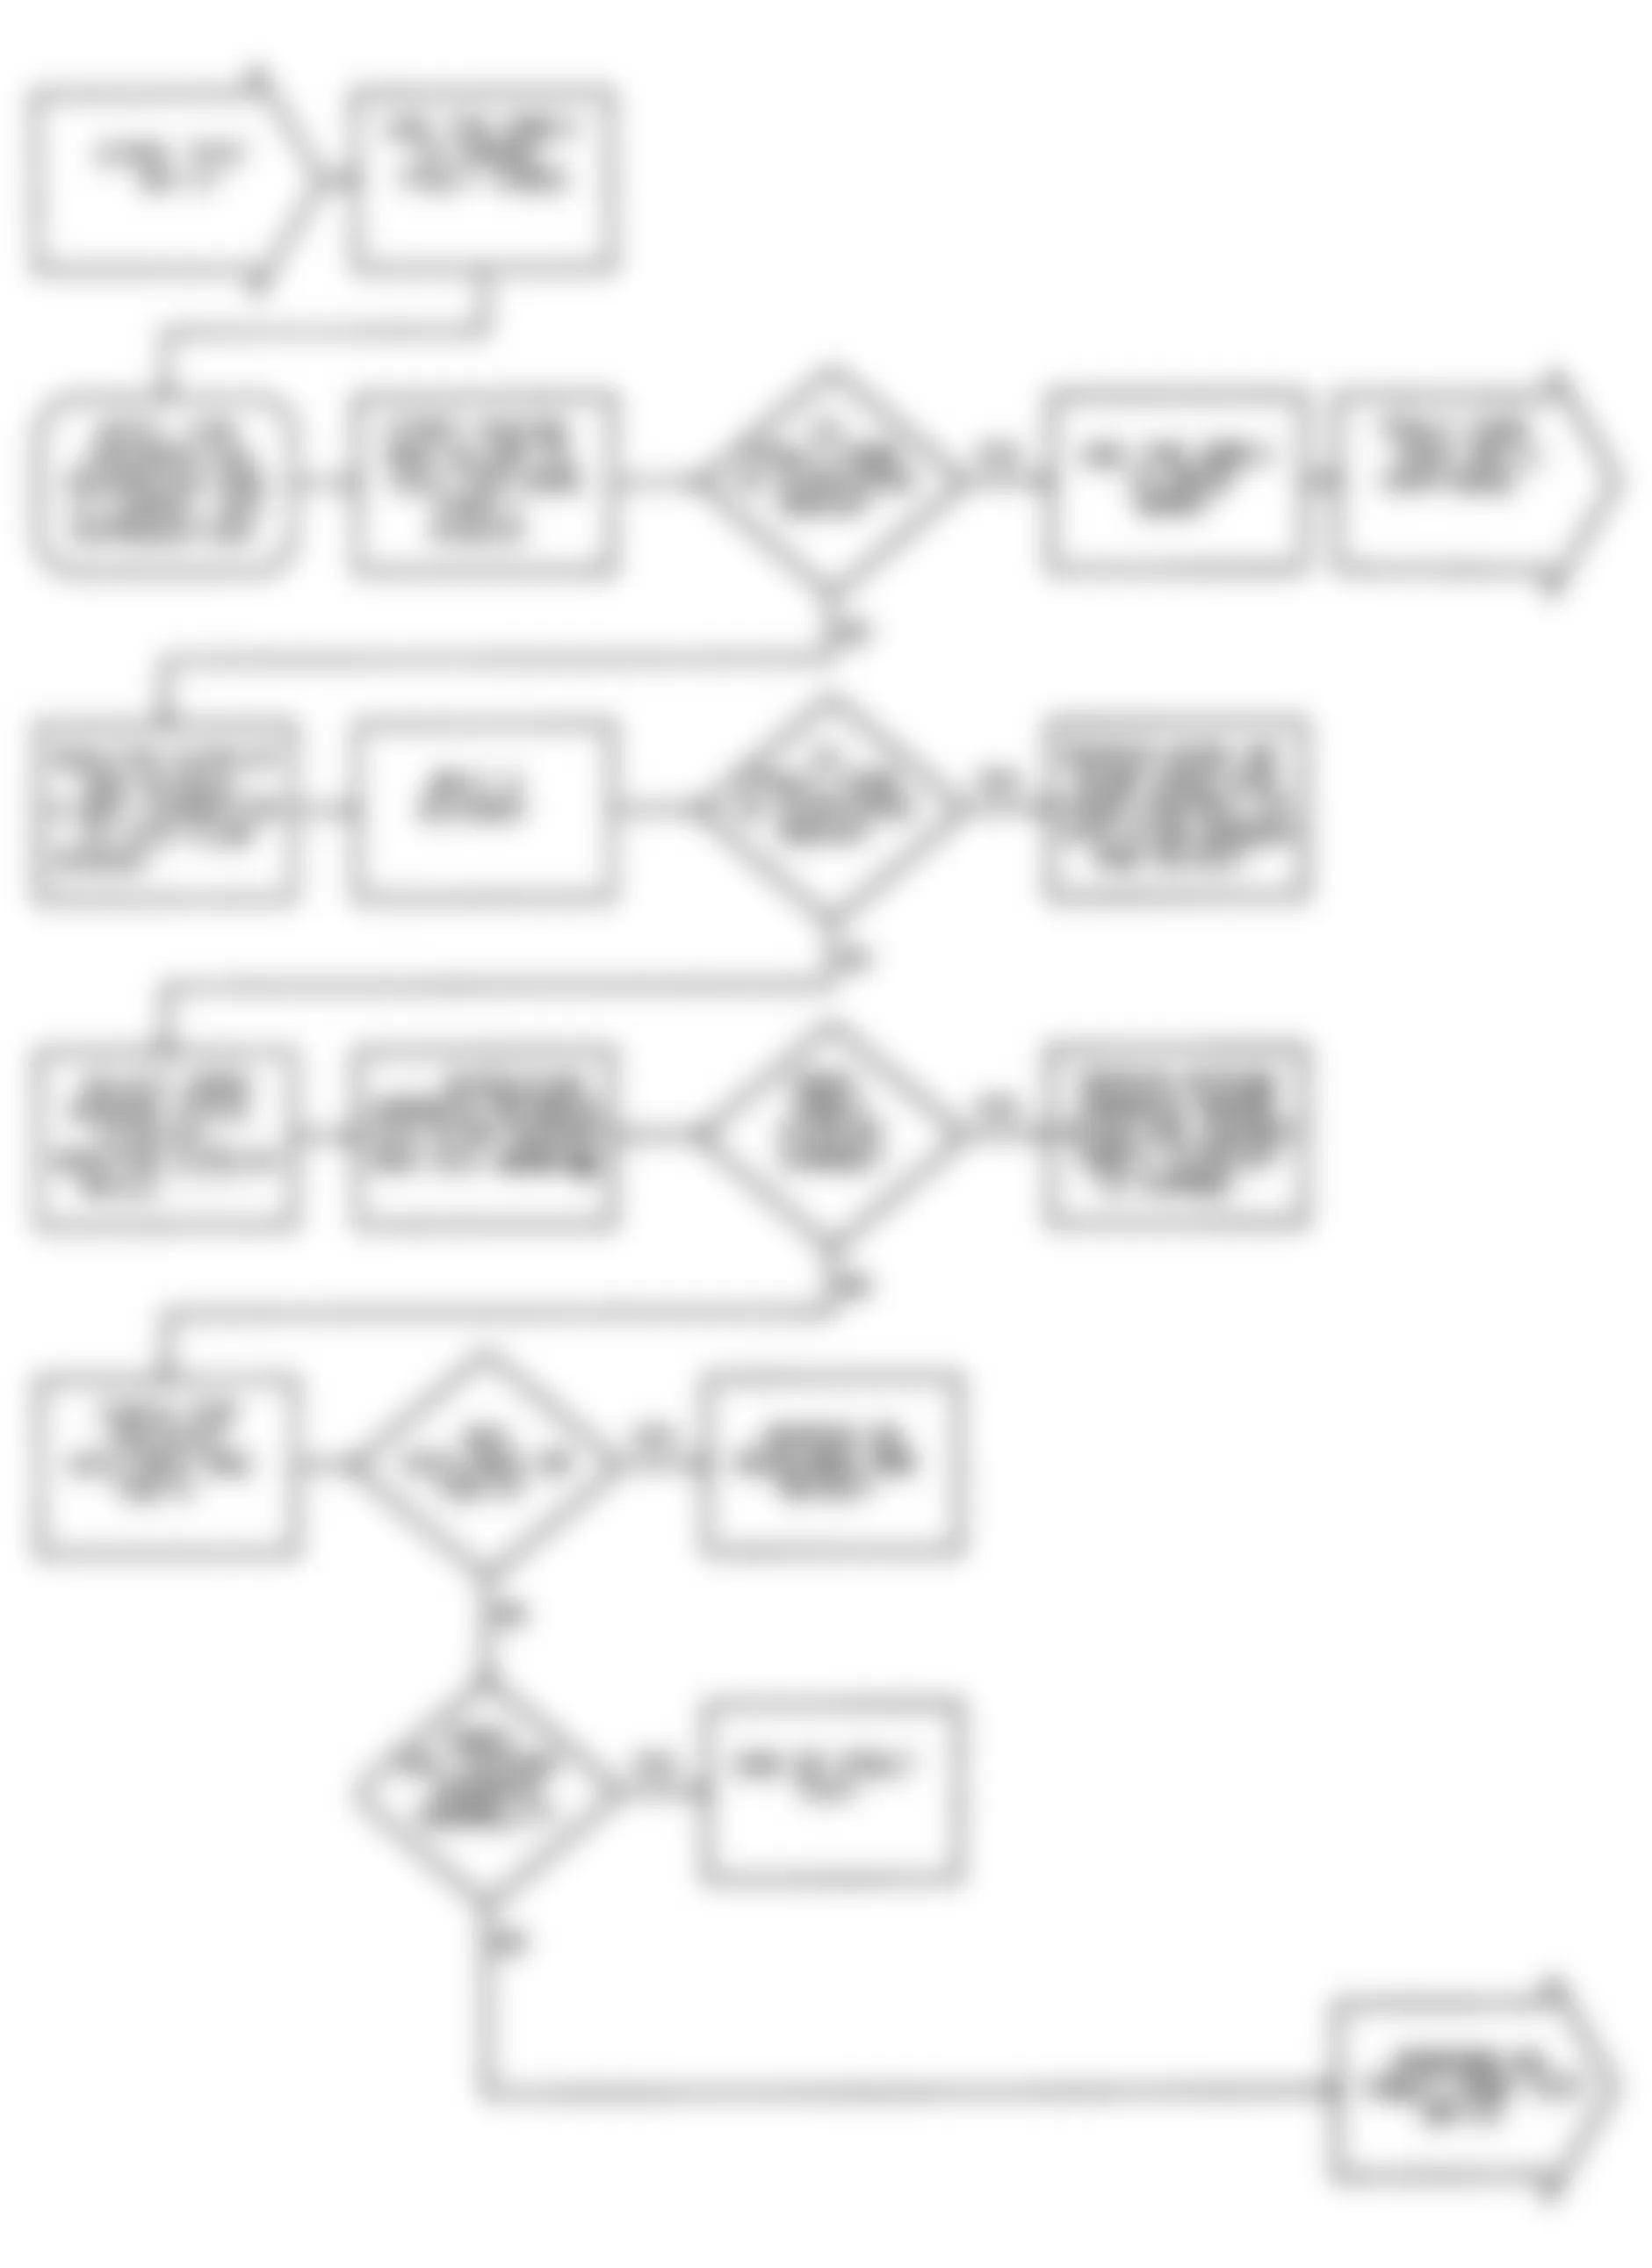
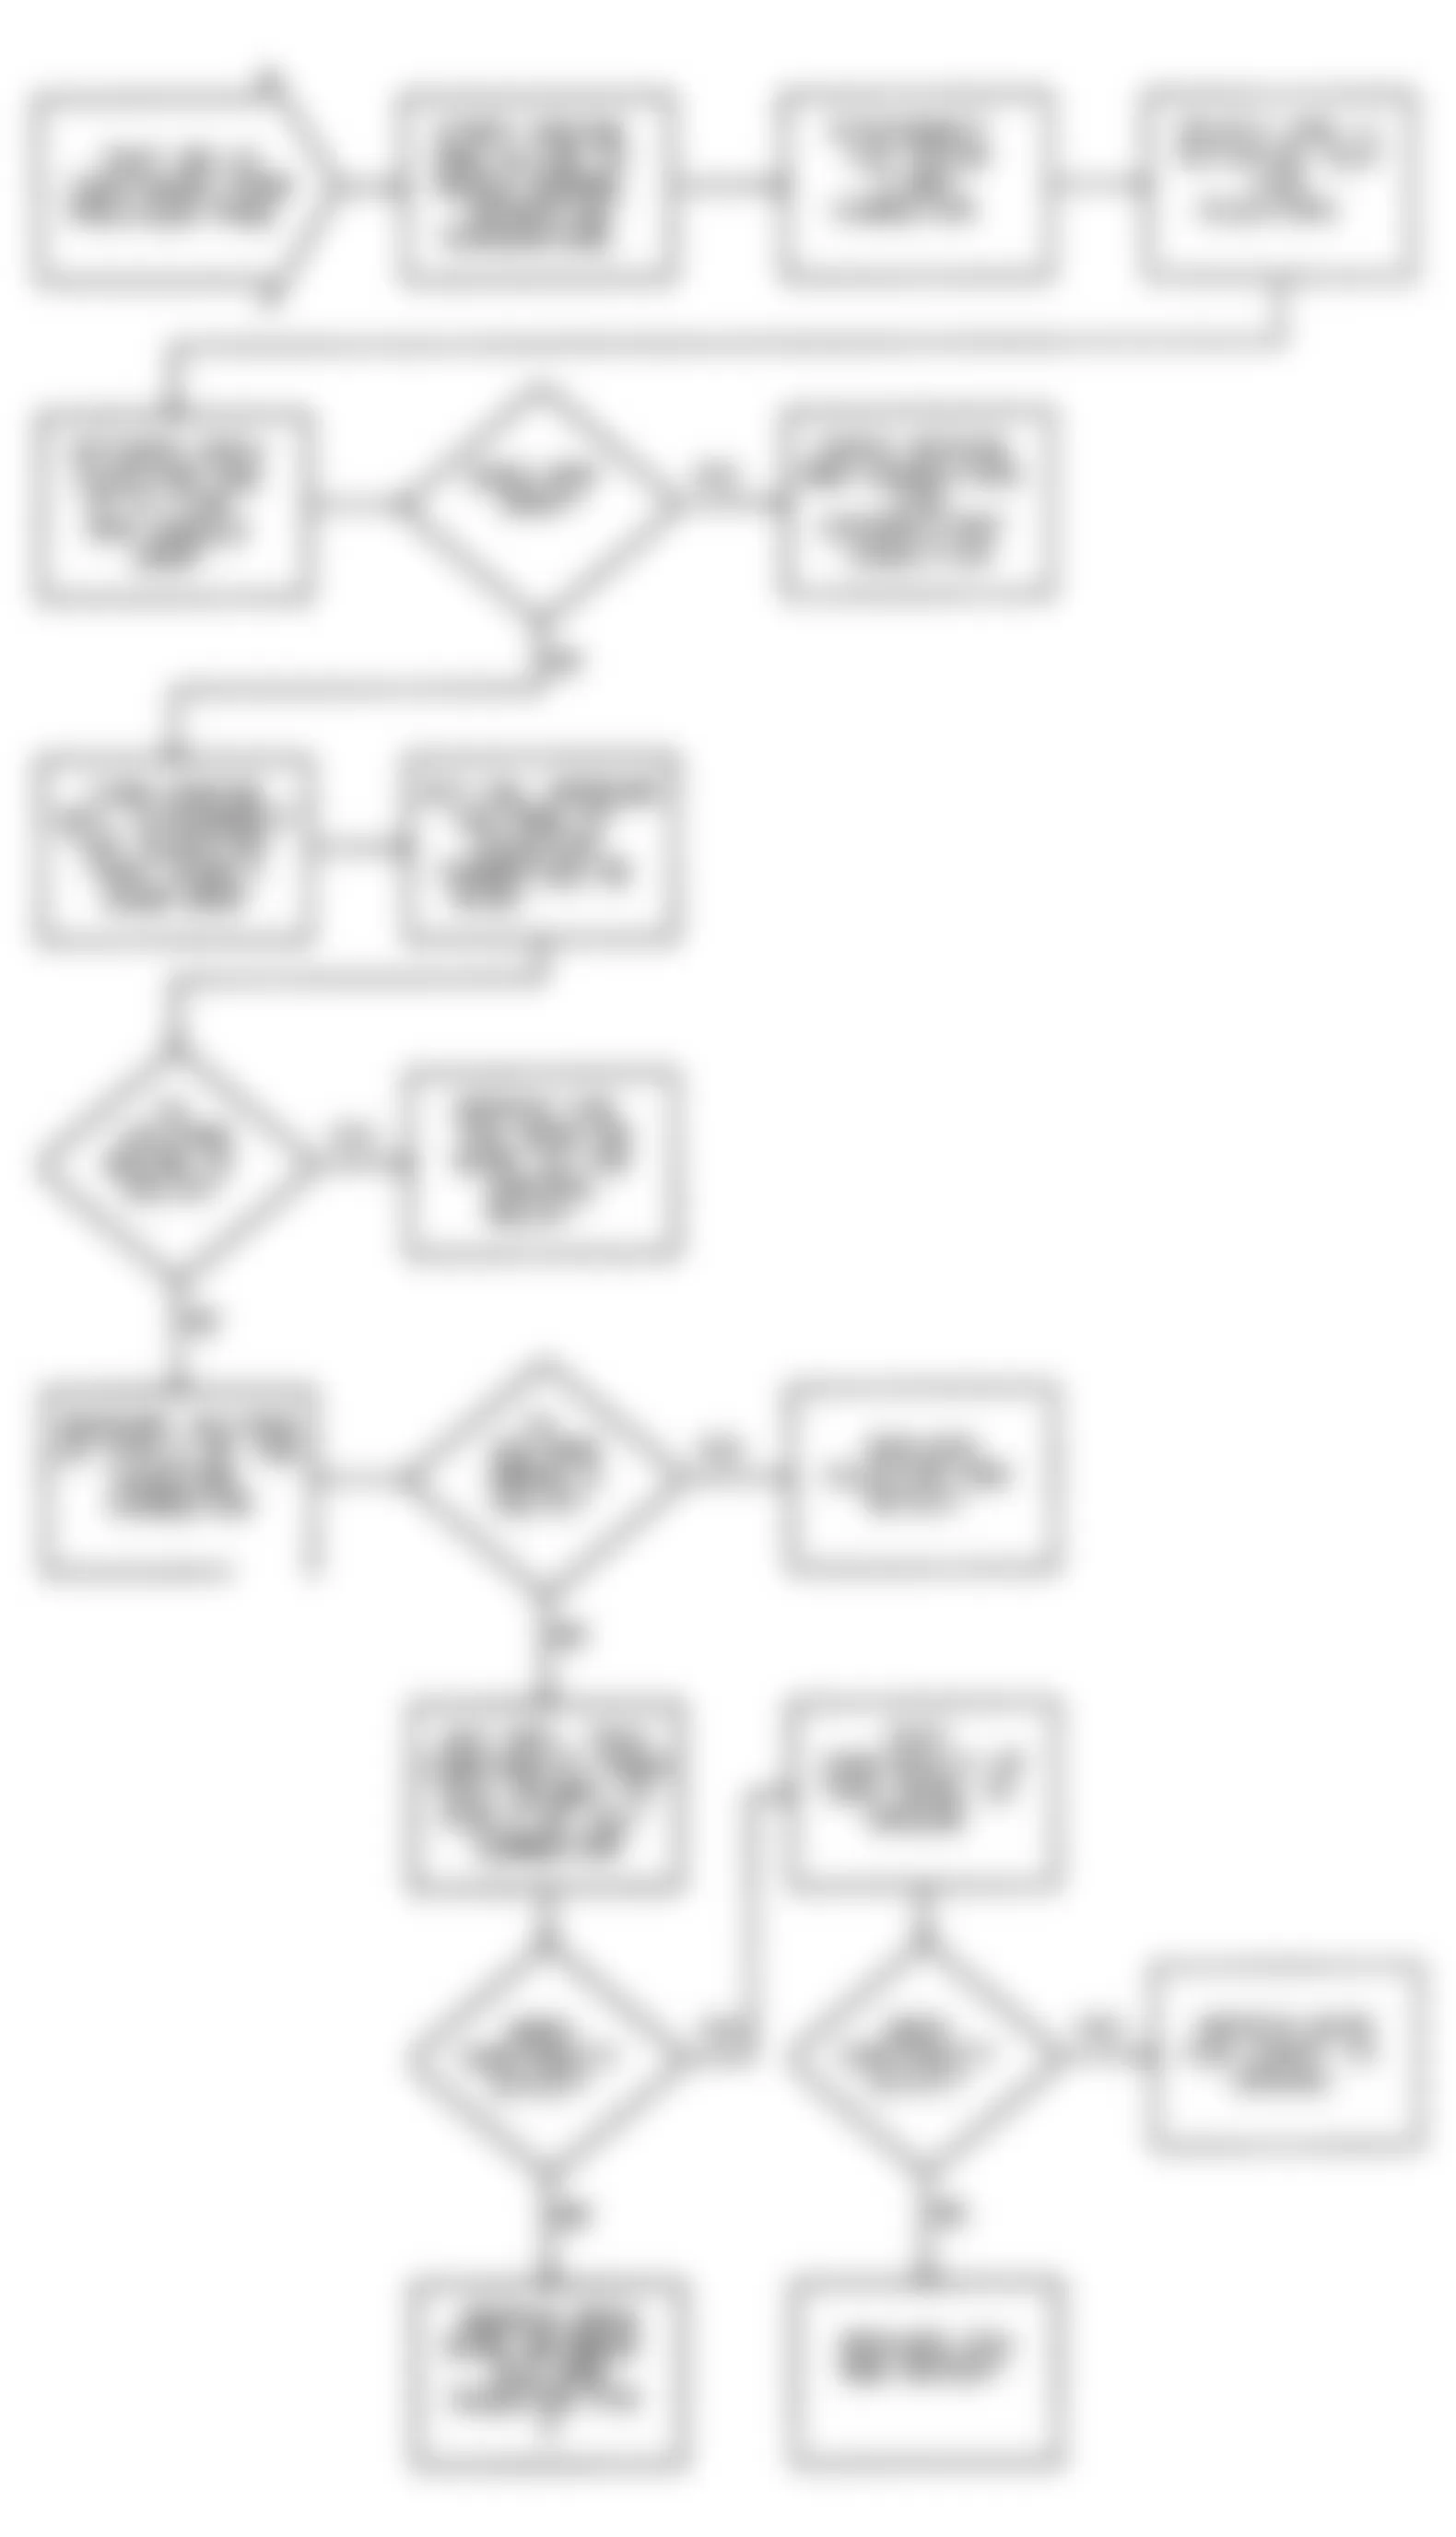
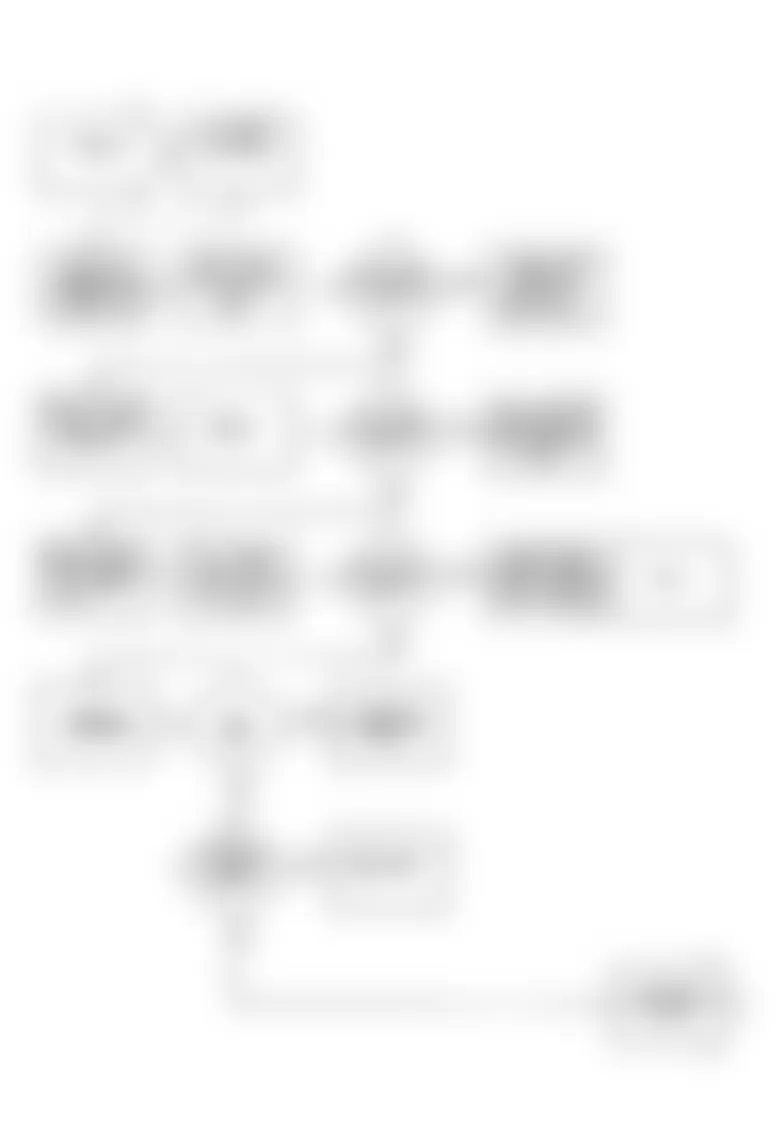
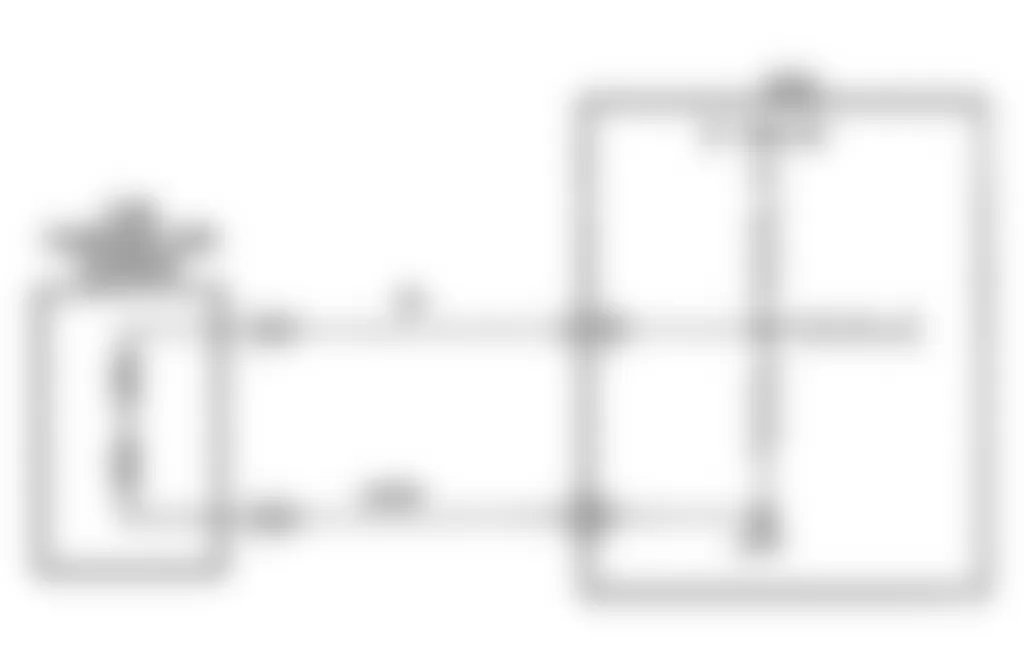
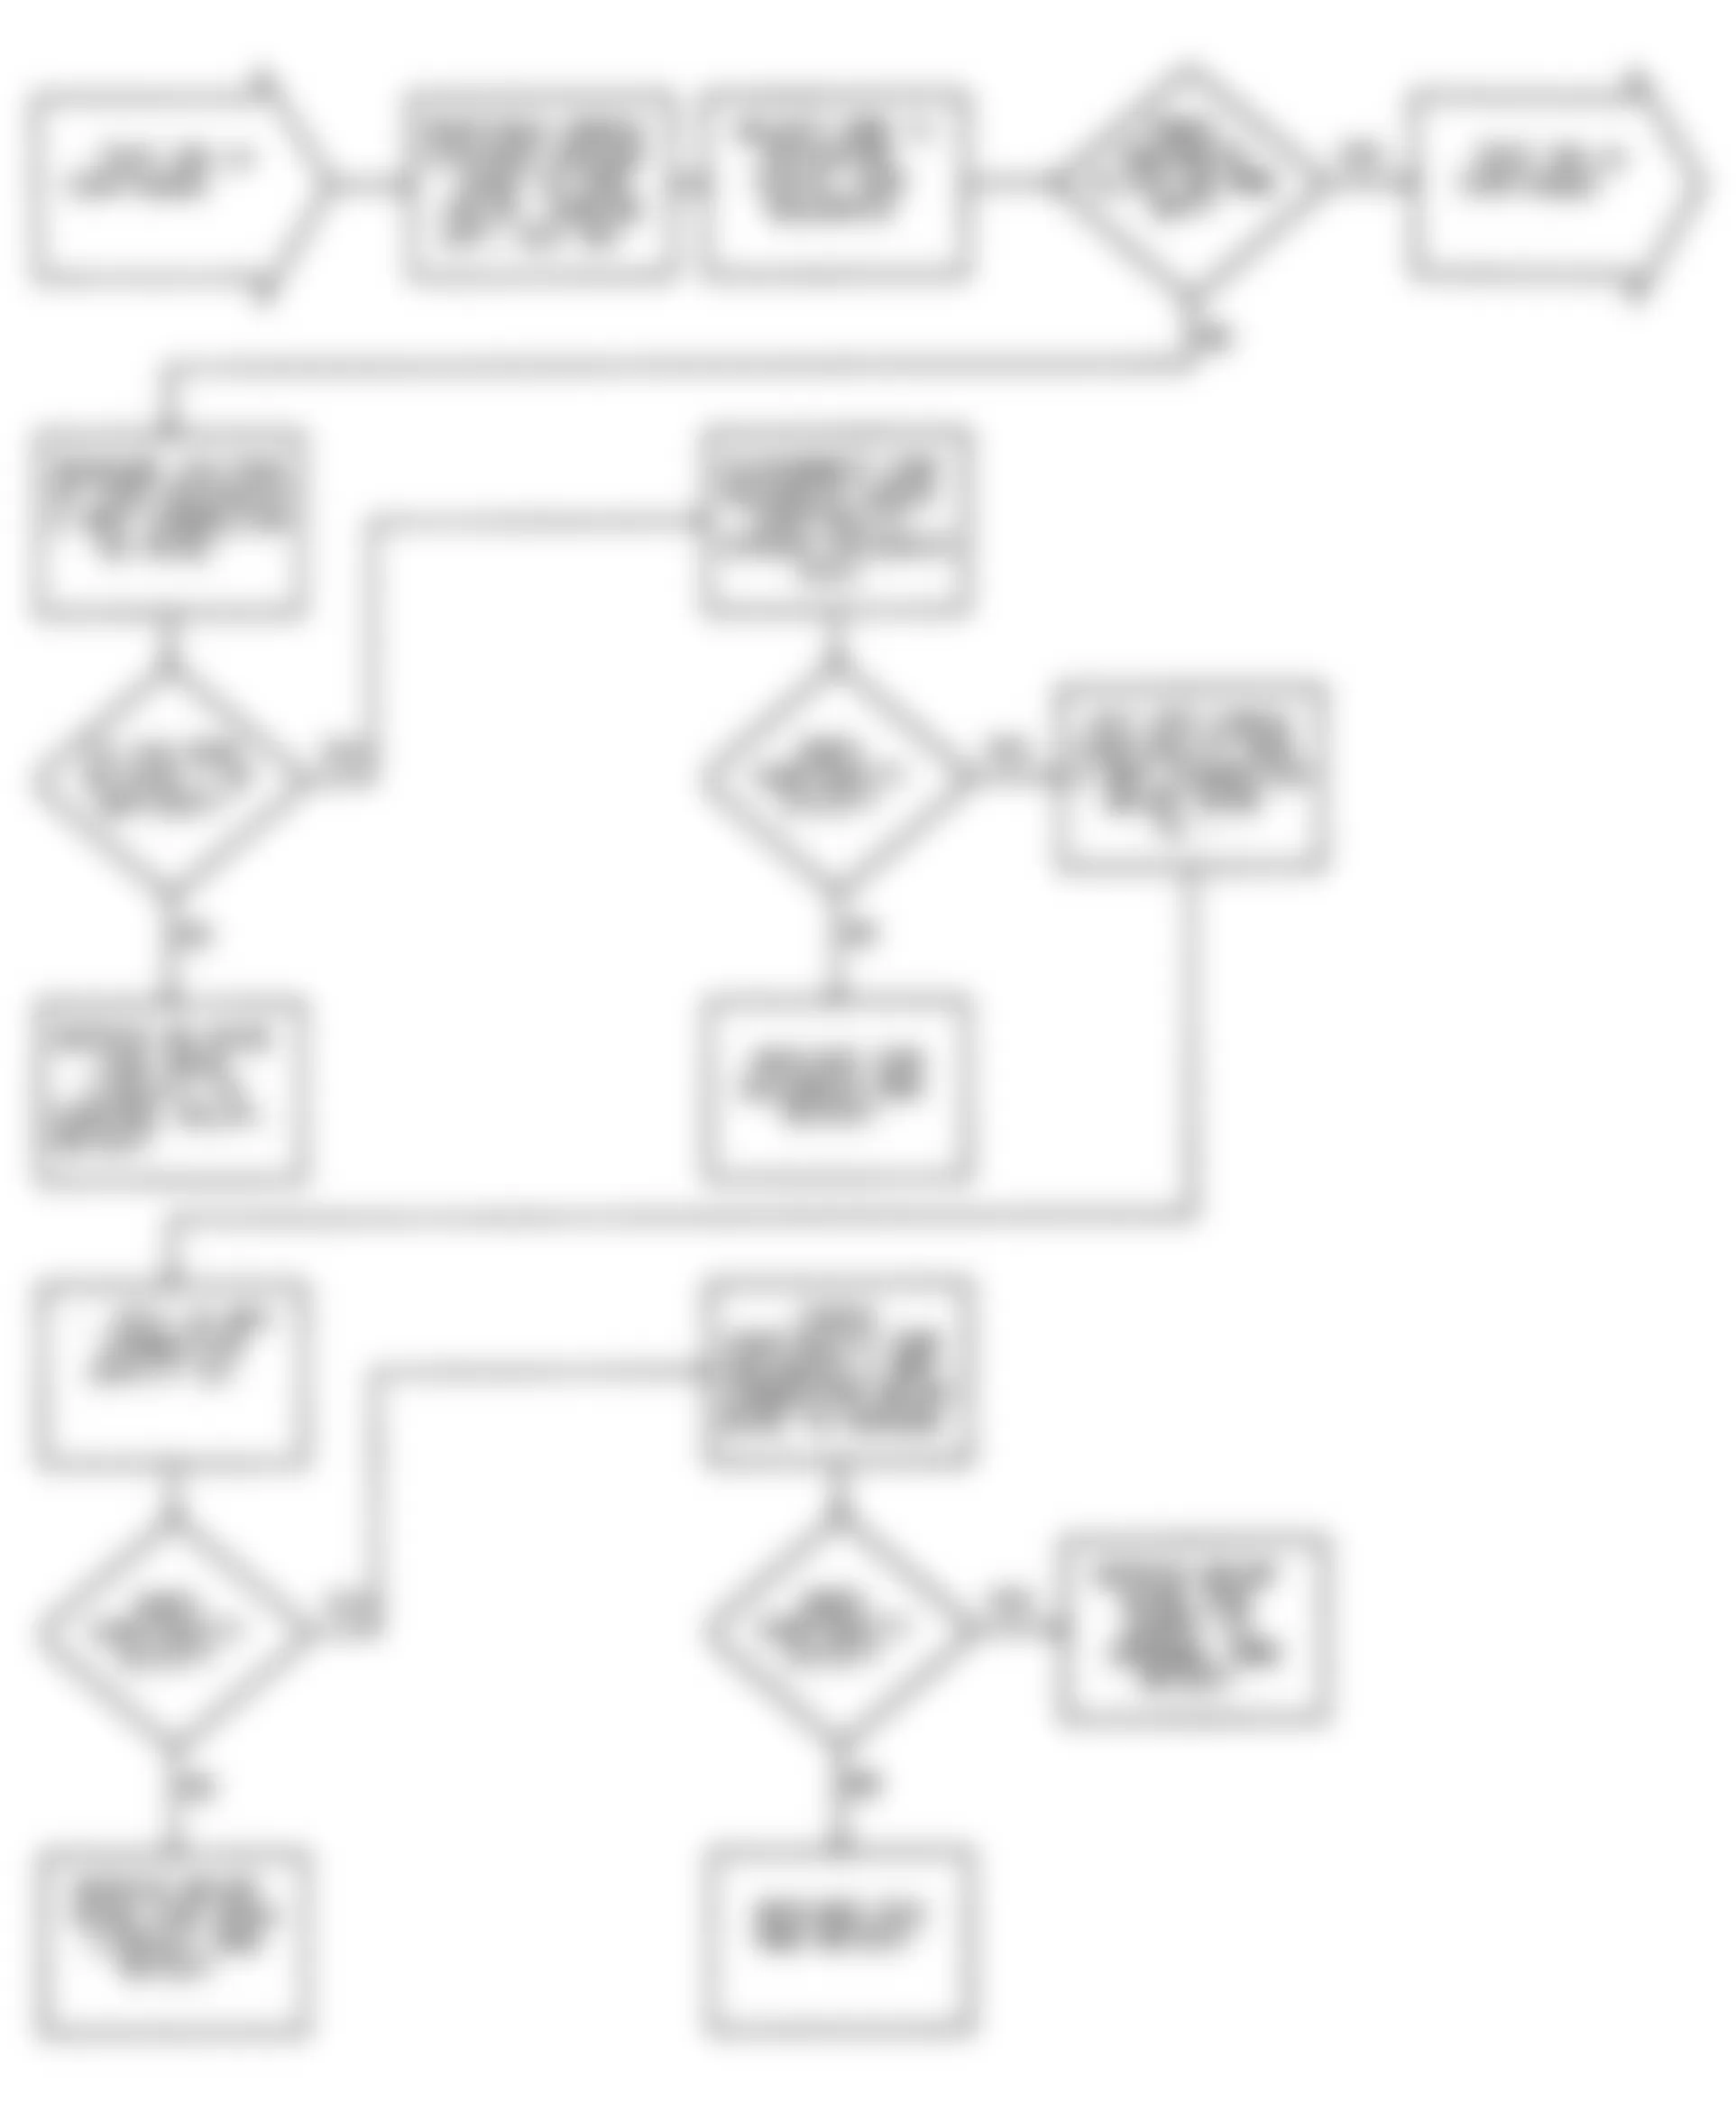
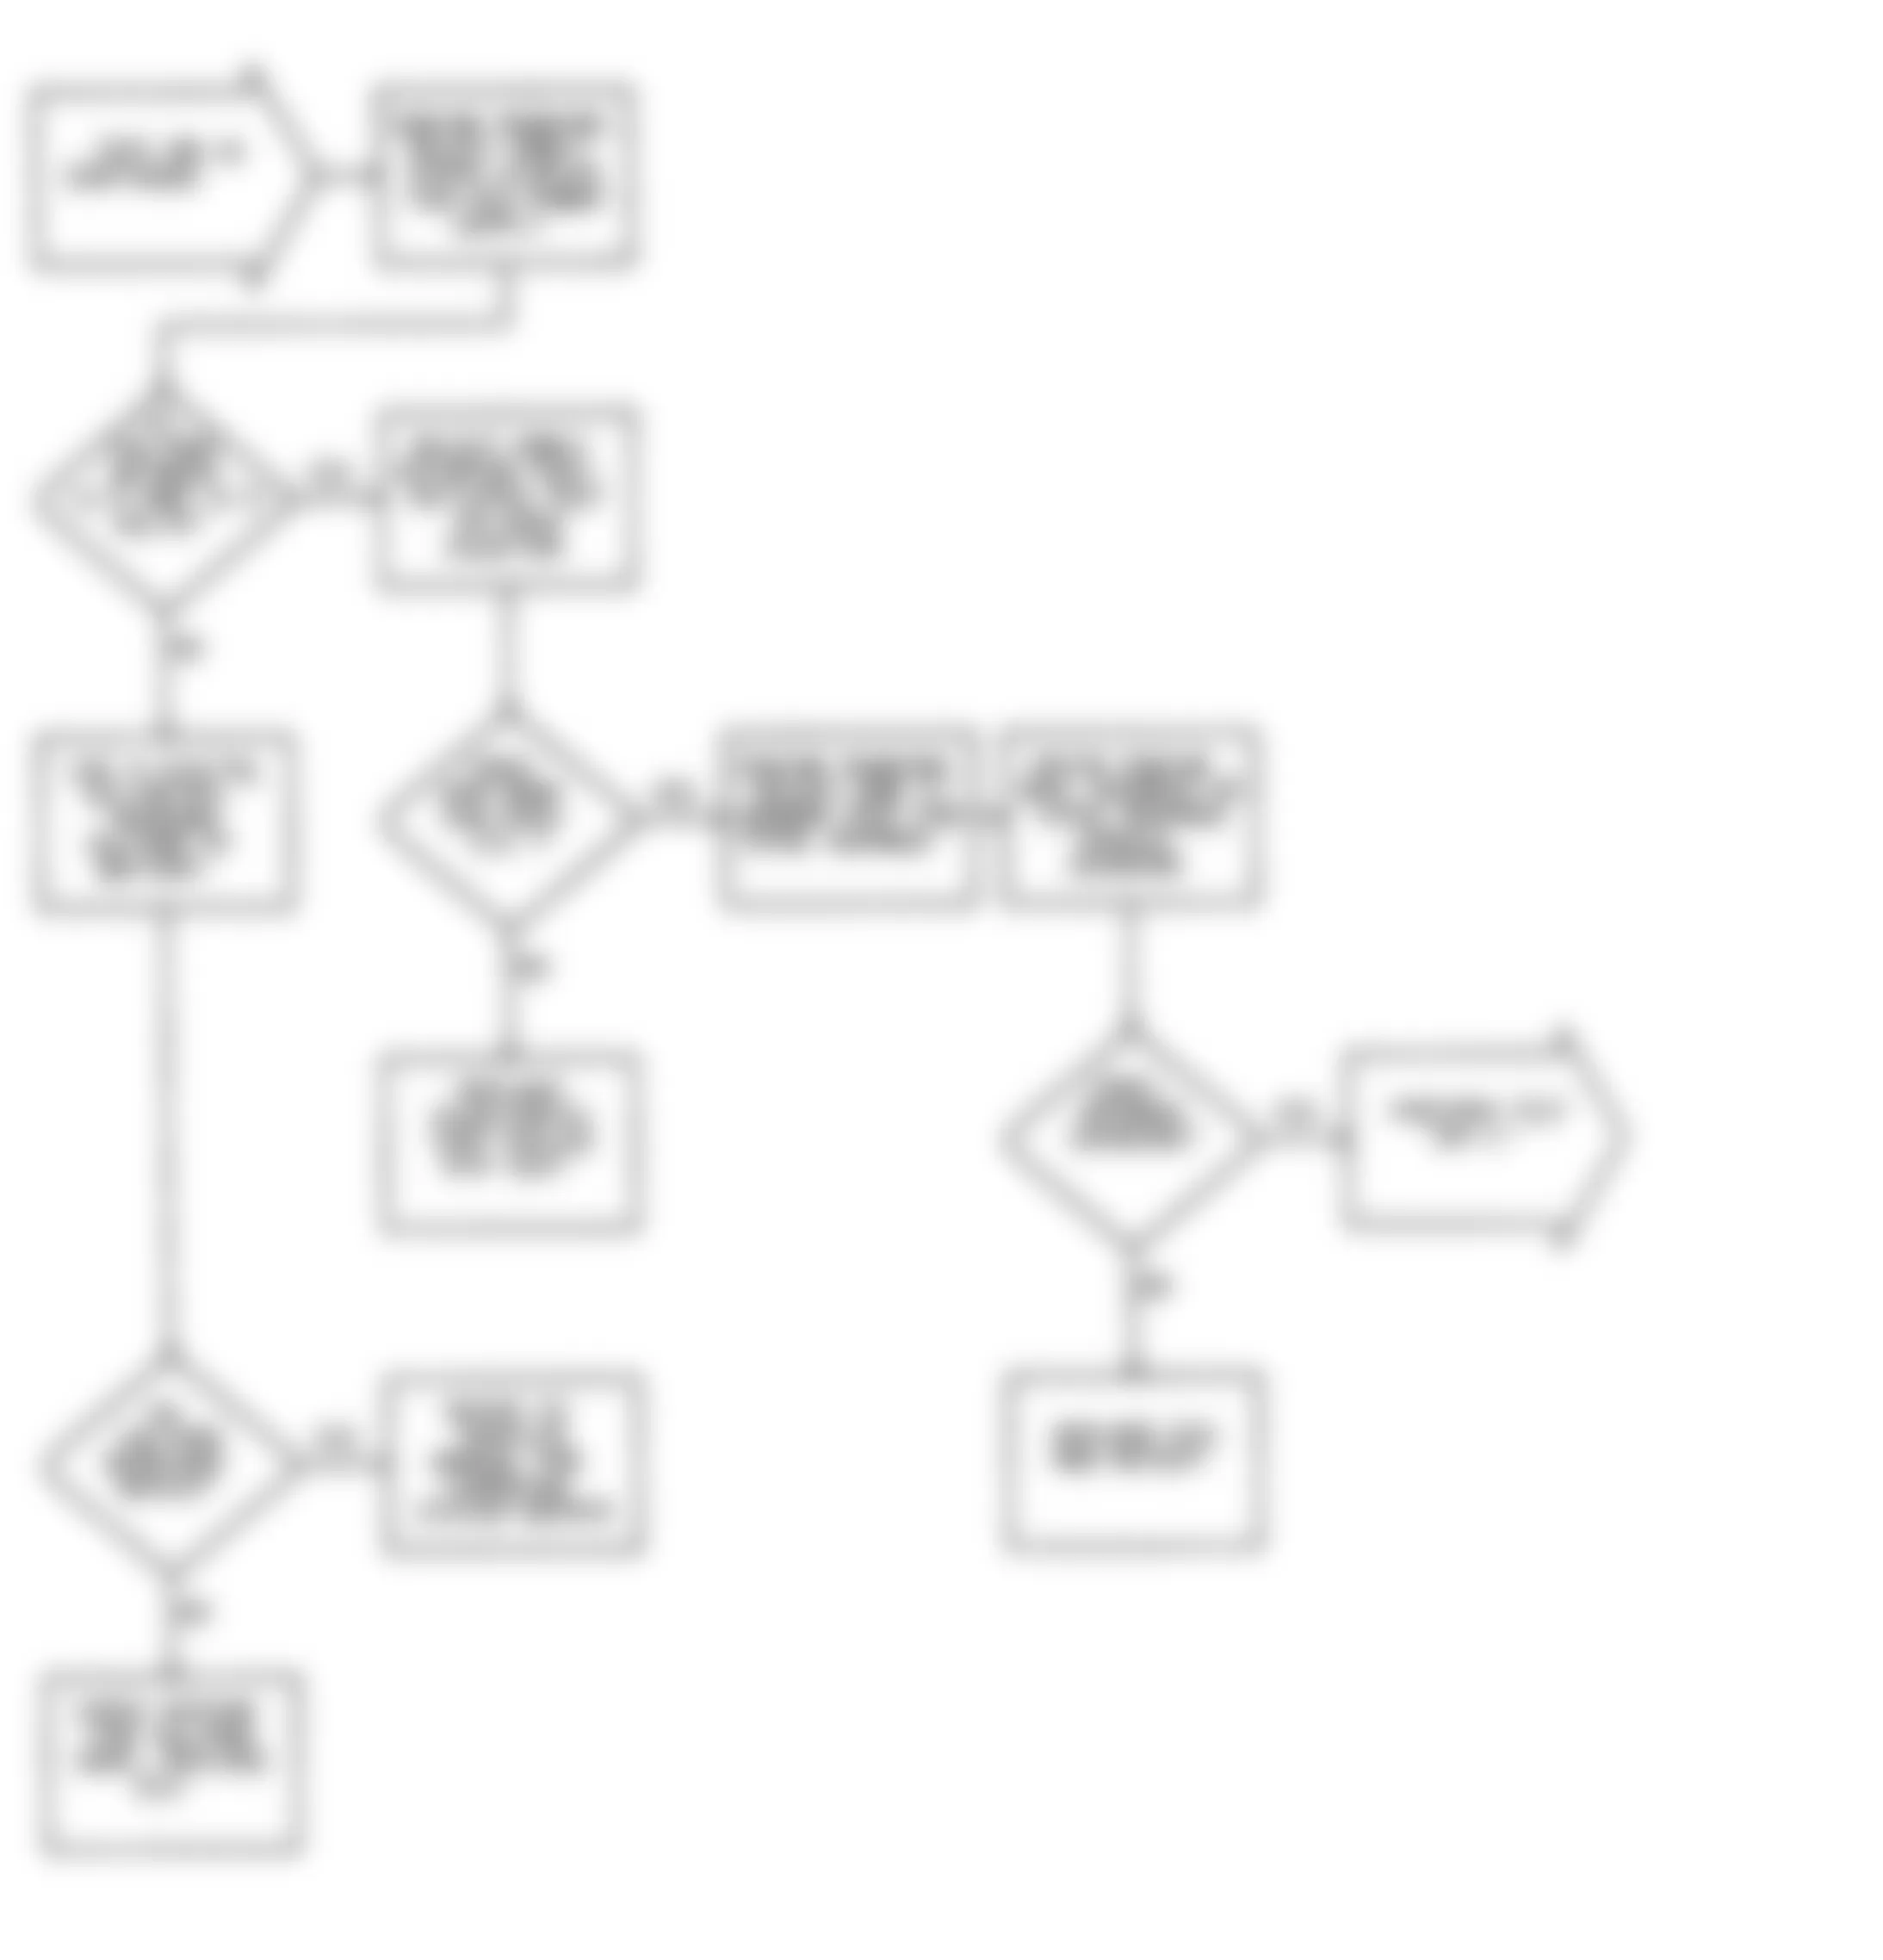
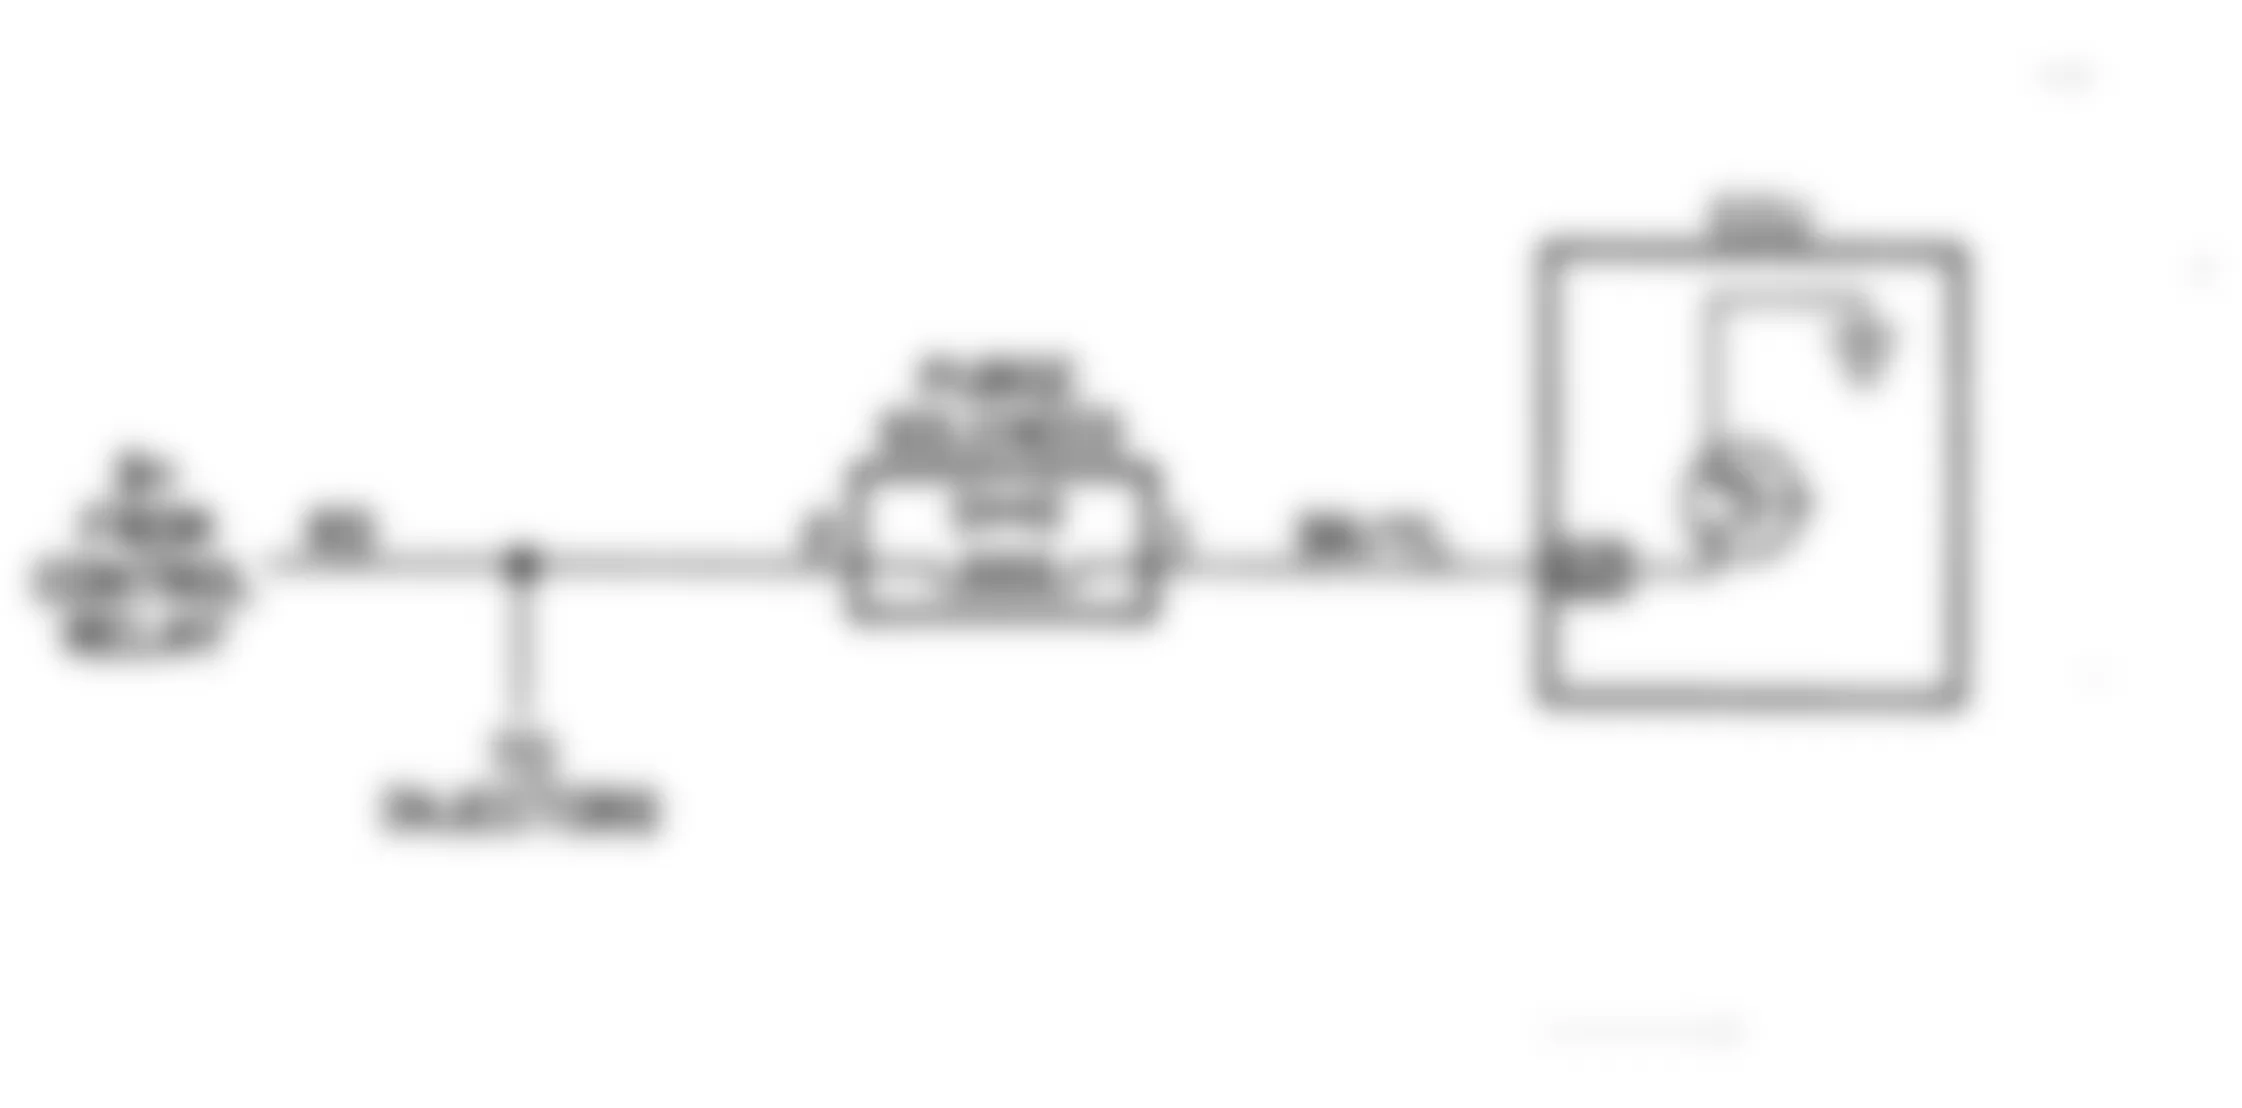
Fig. 15: Dodge Colt GL 1992 - Component Locations - No Start Test 3 Schematic Testing Fuel System
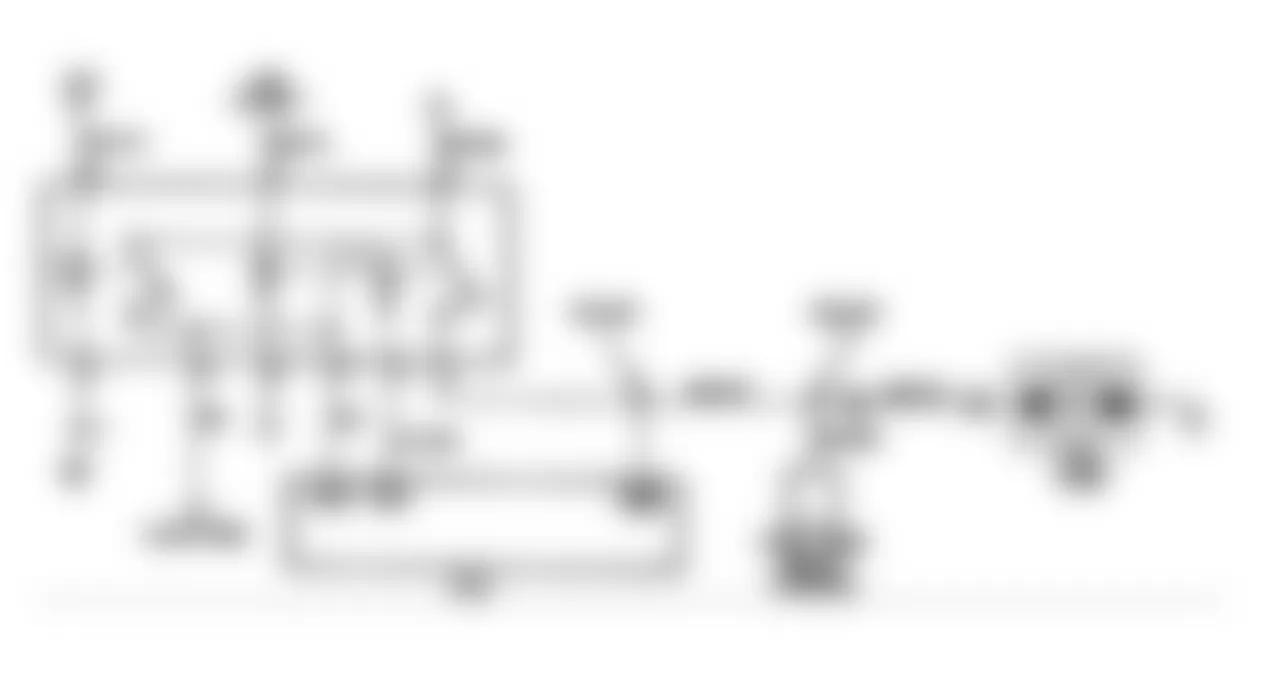
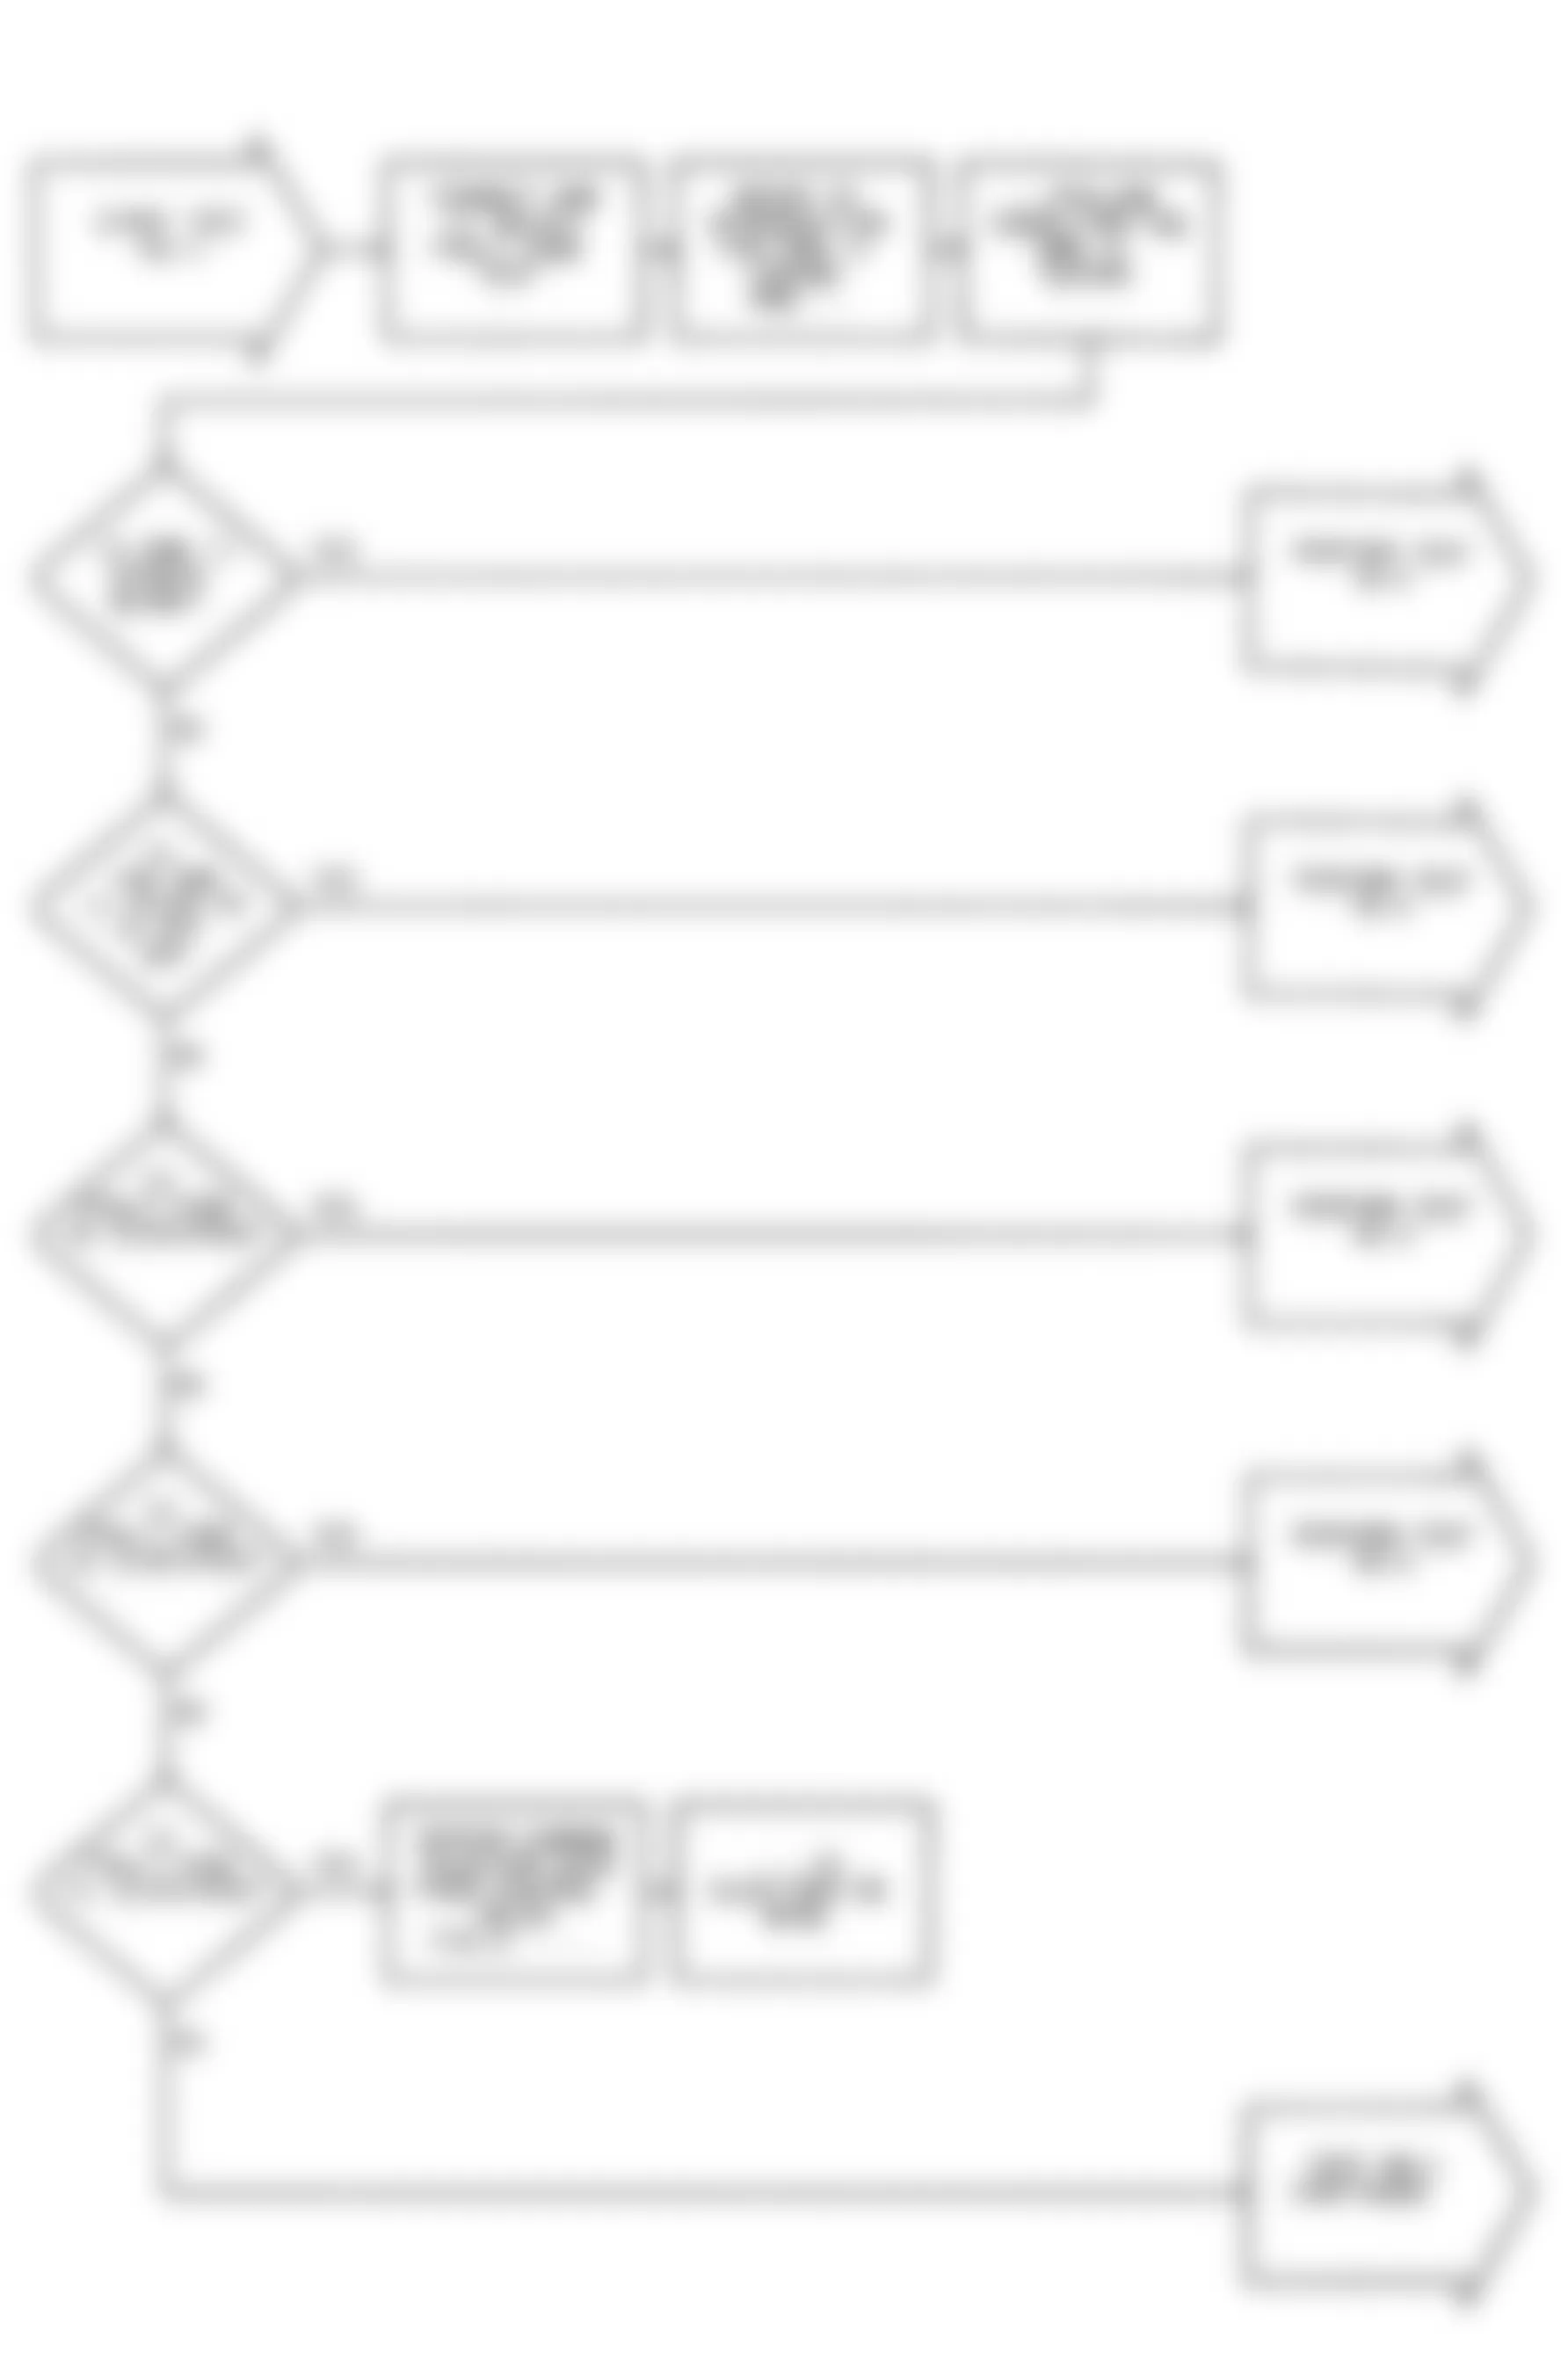
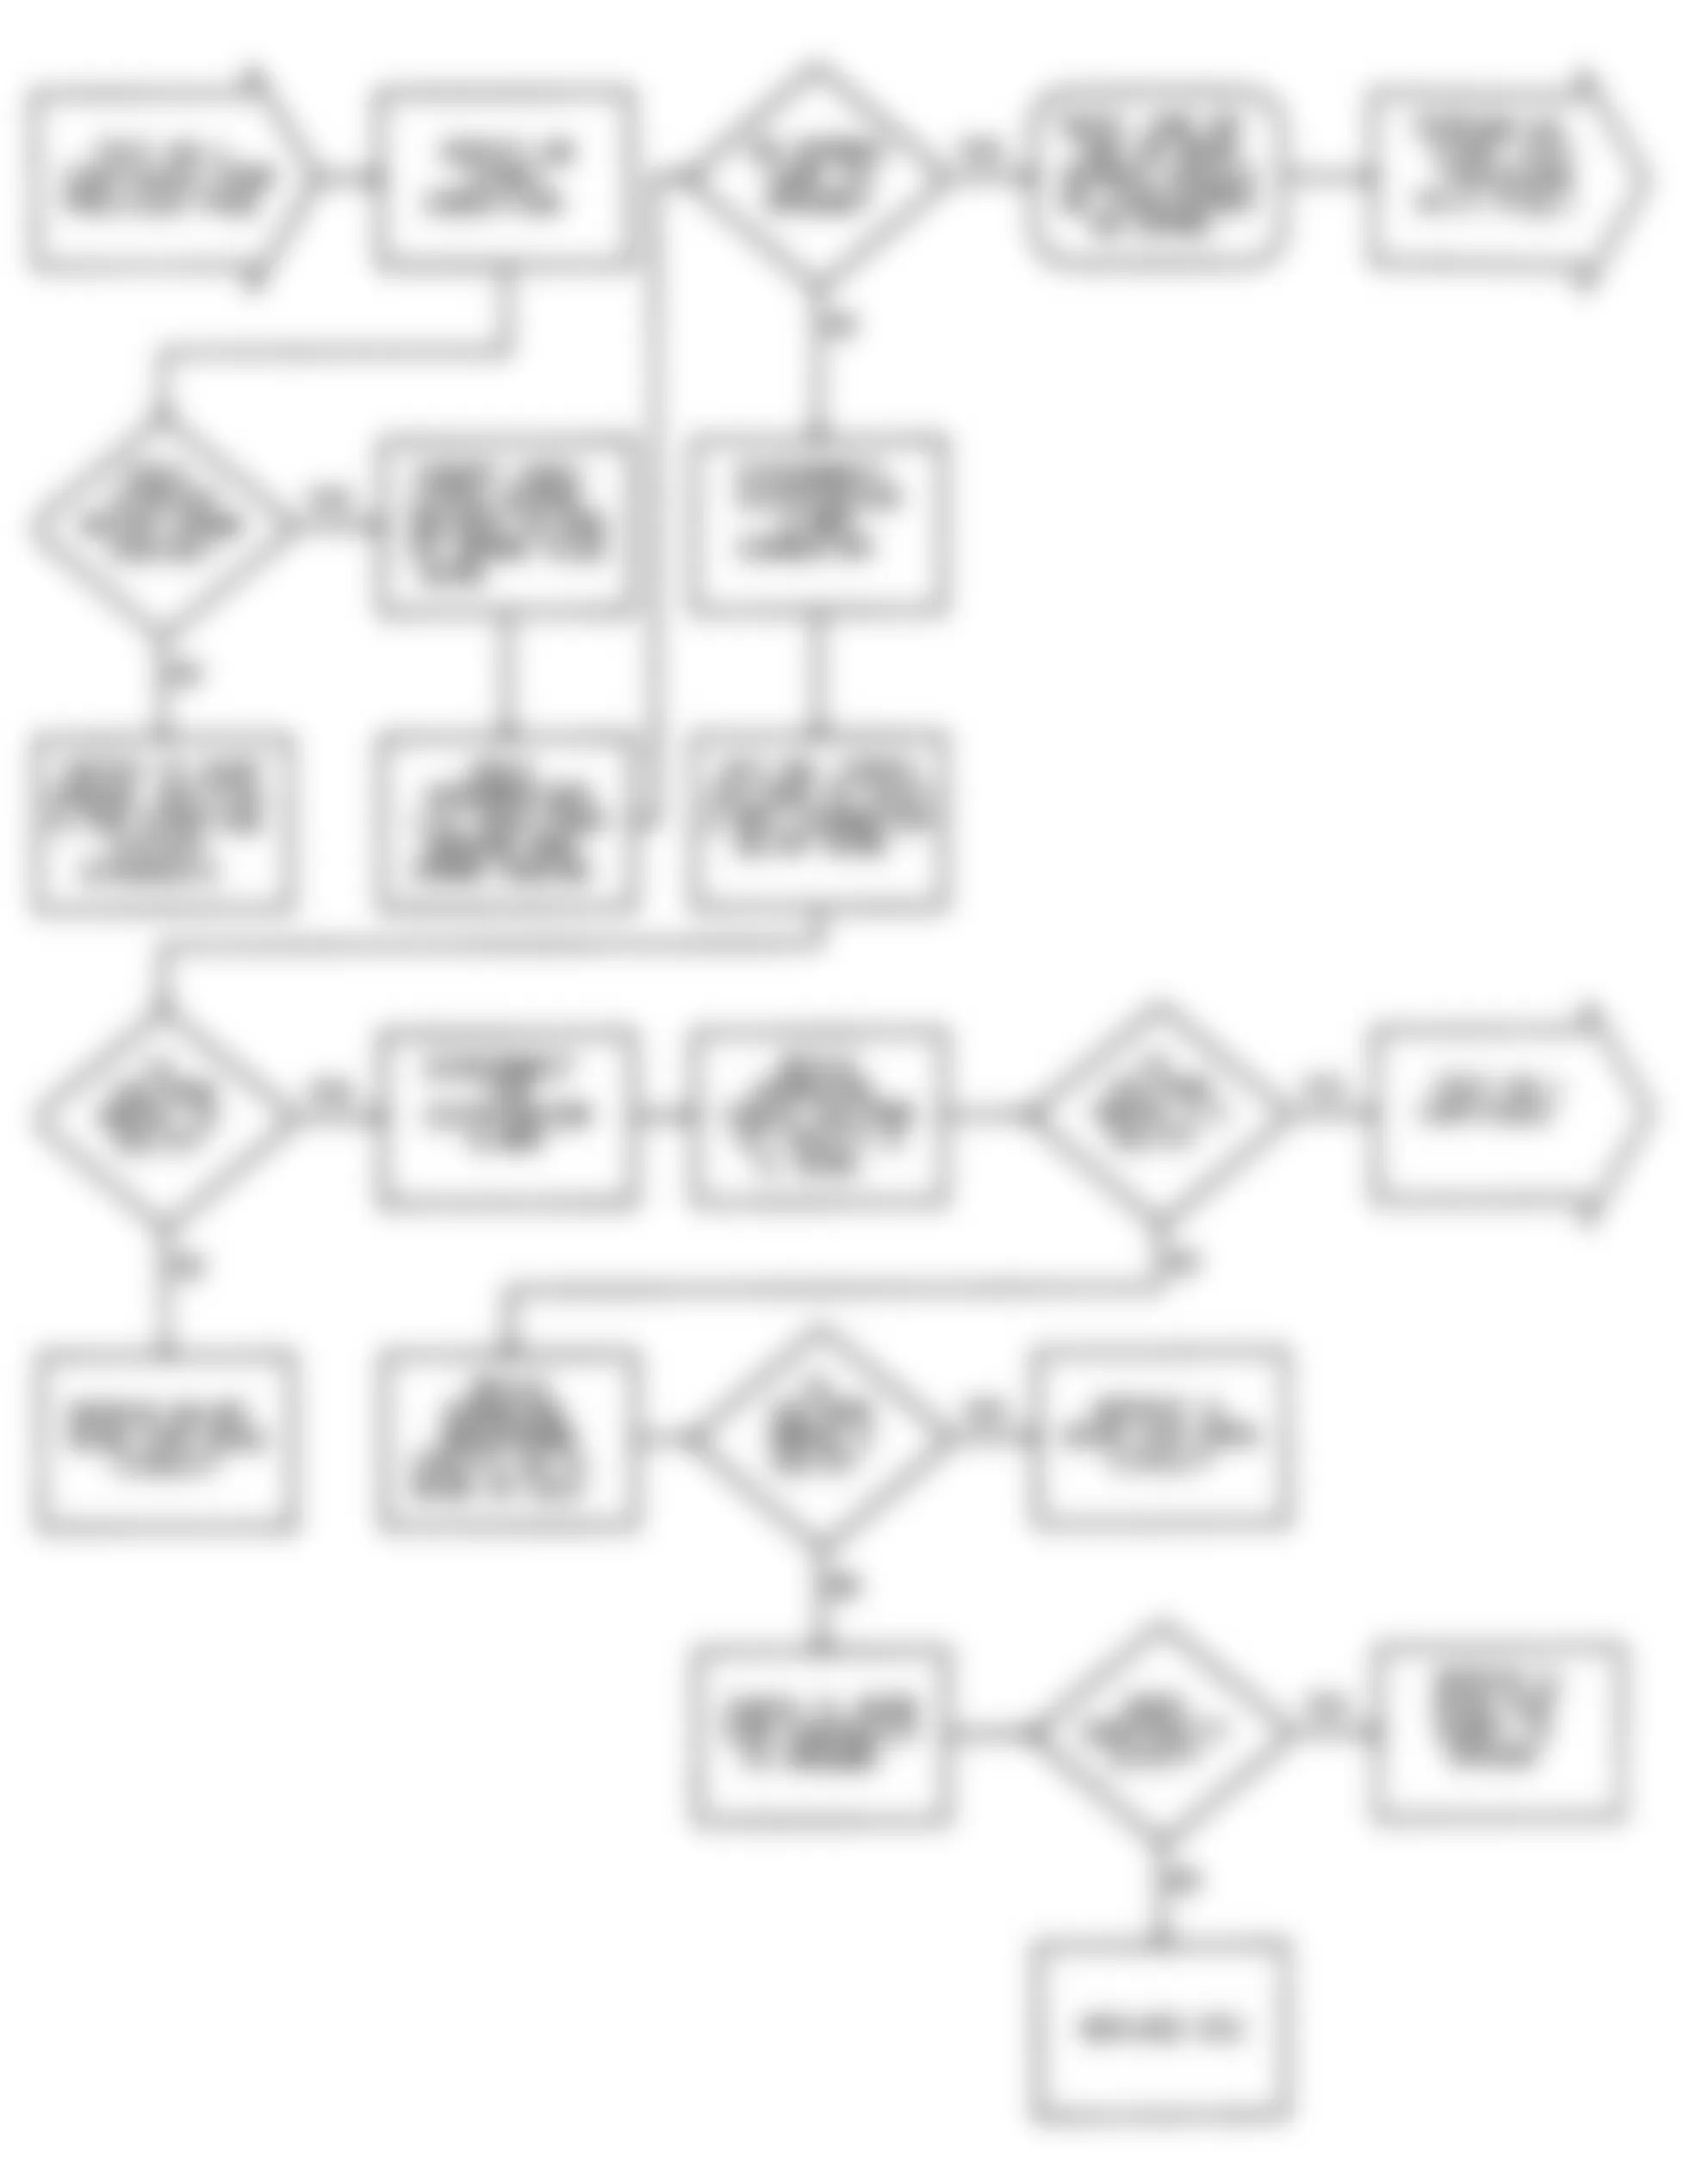
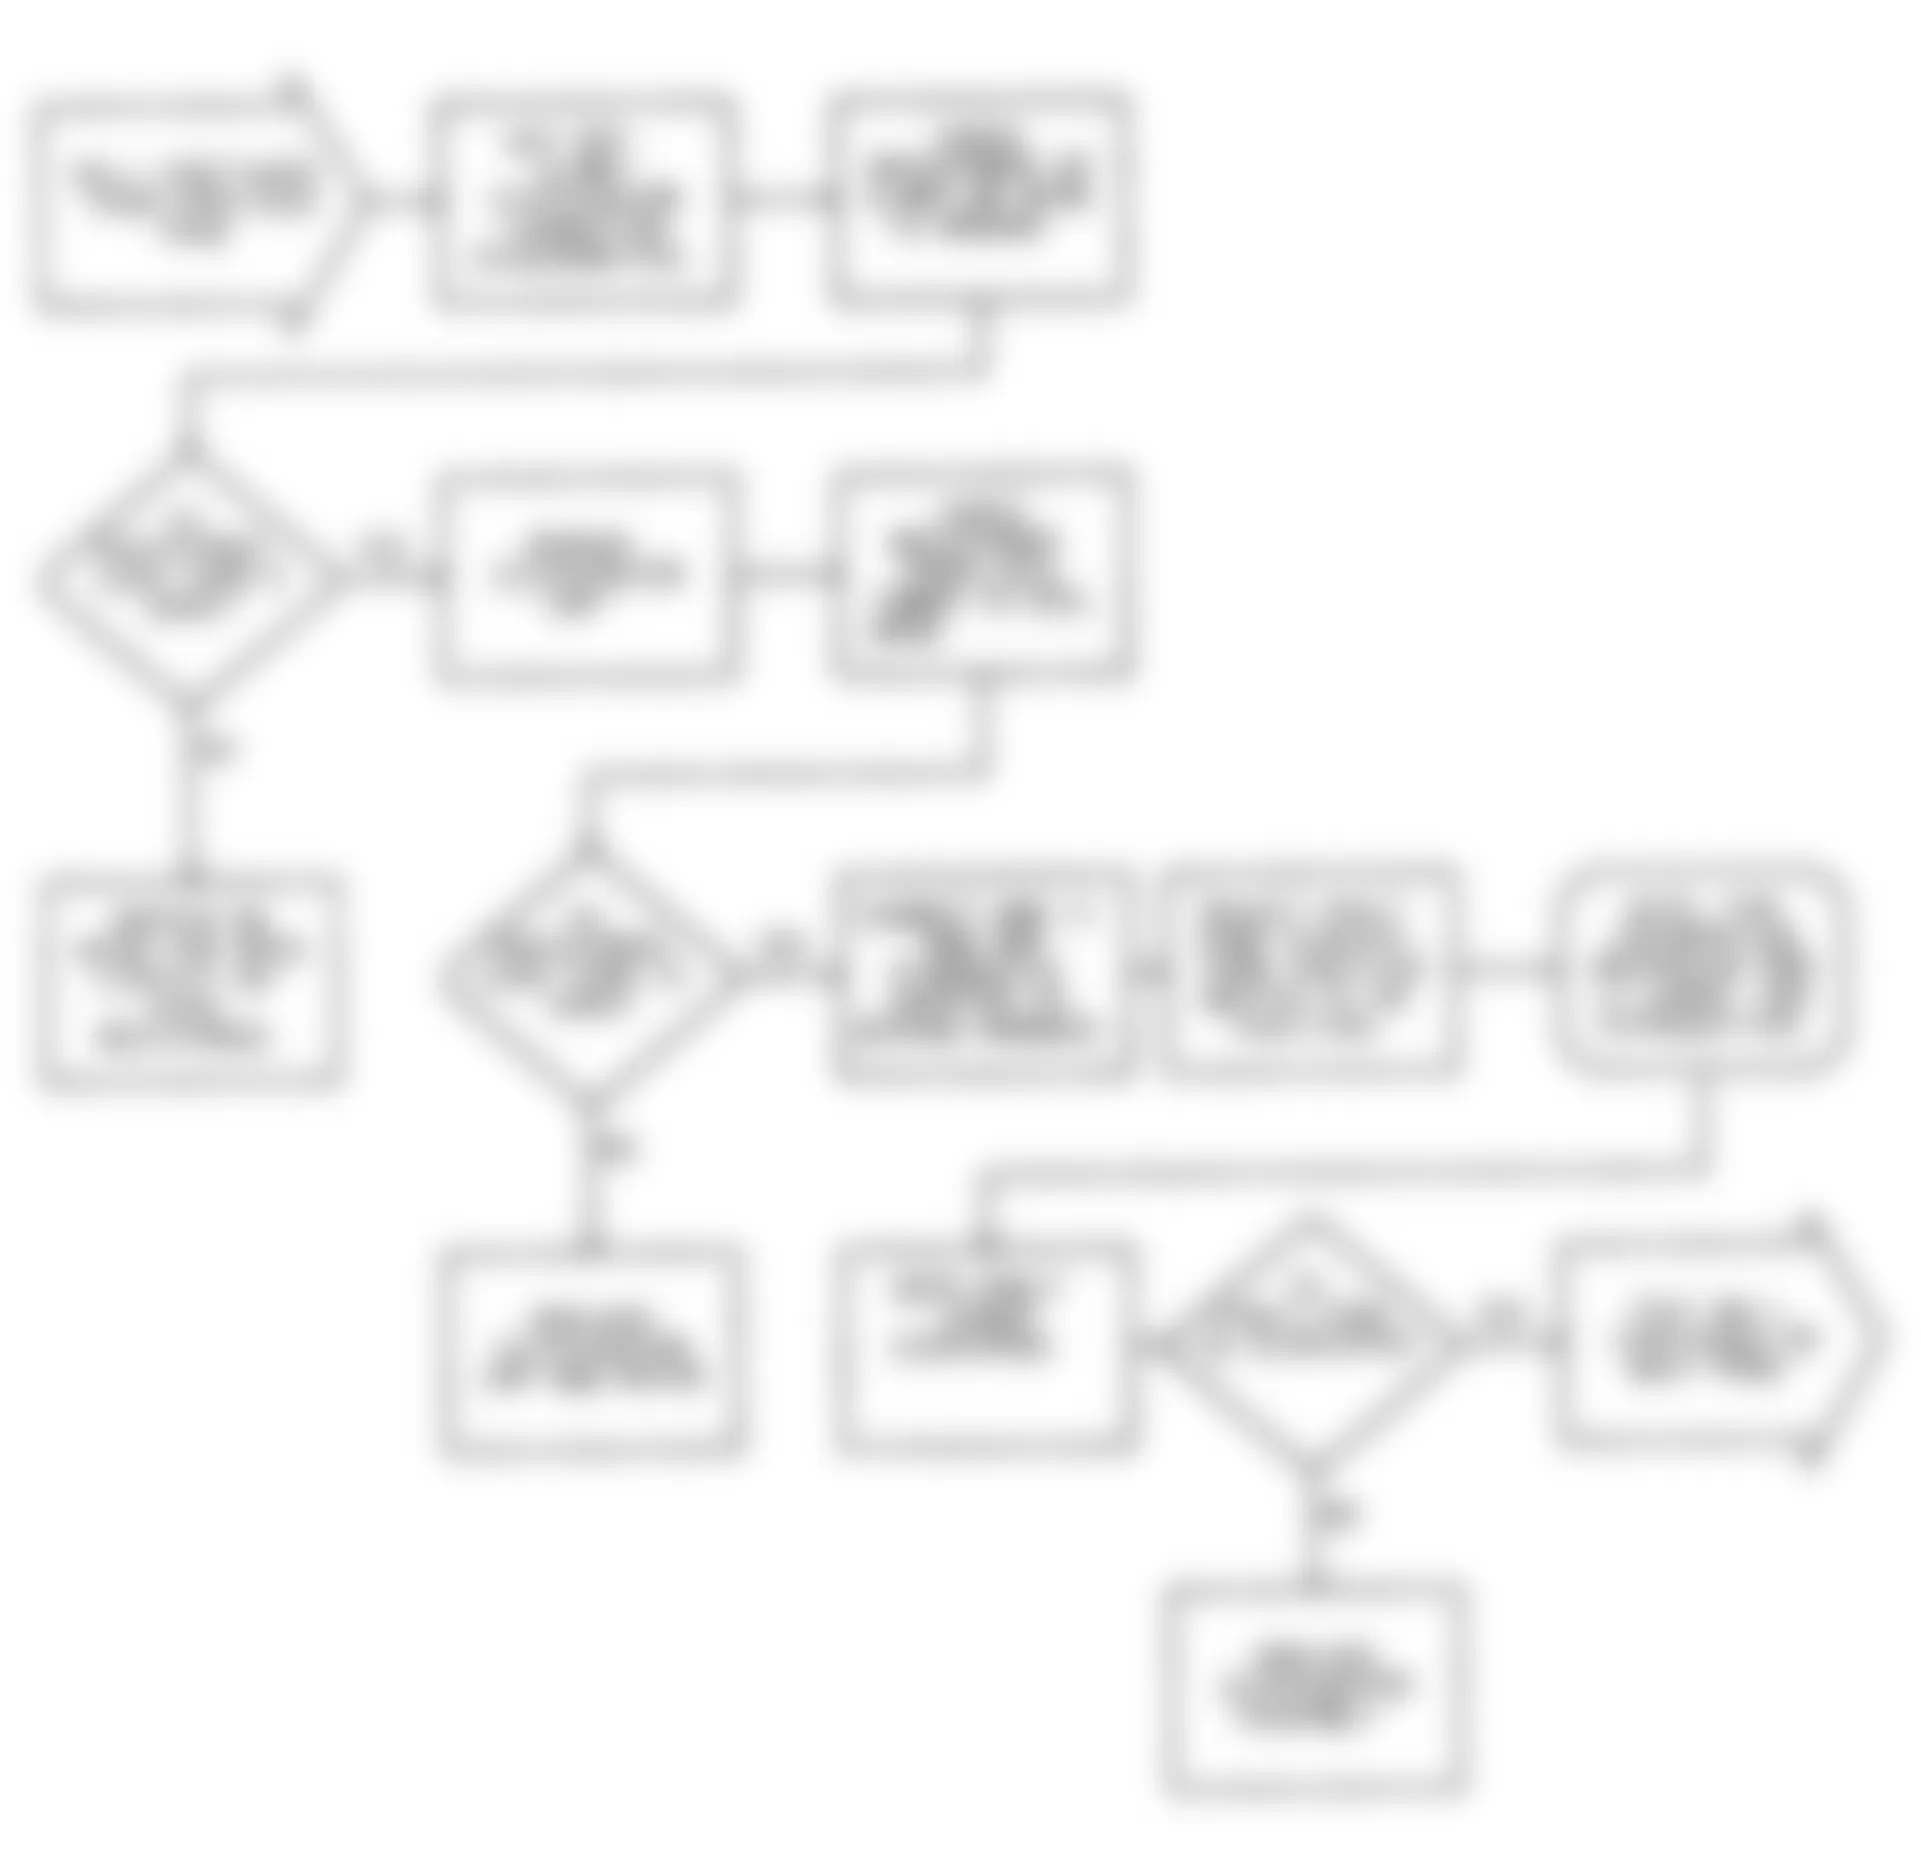
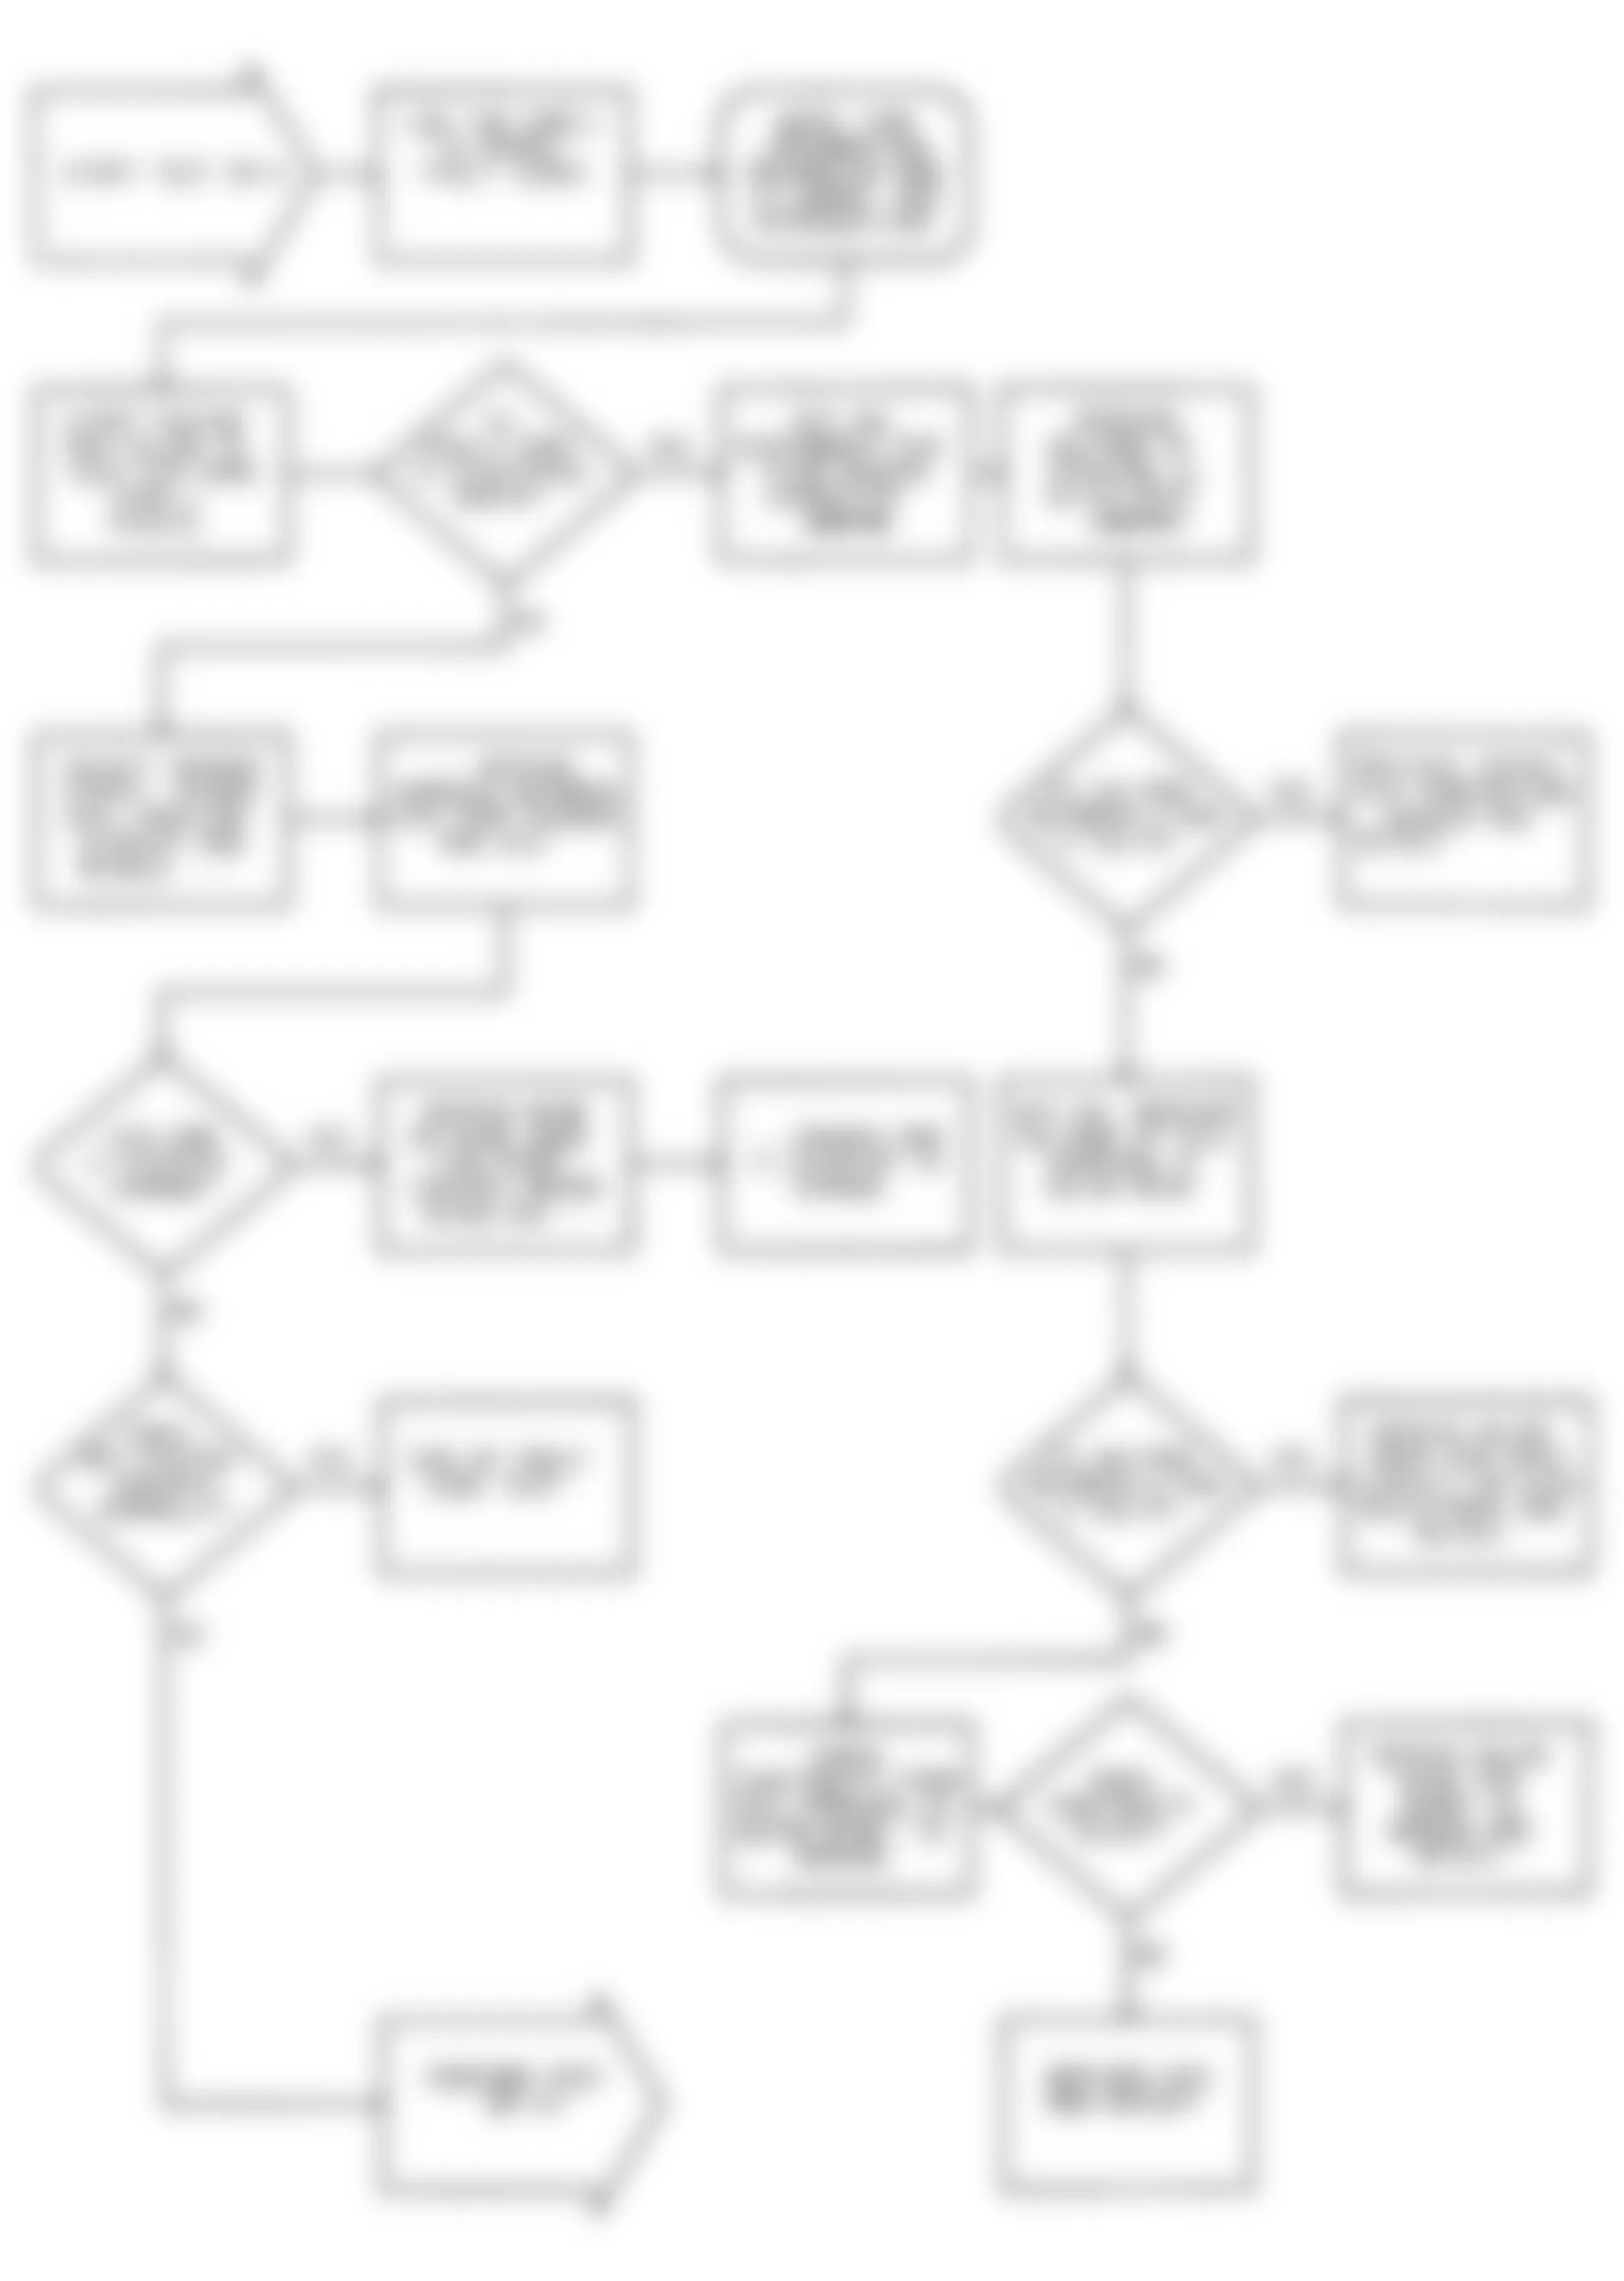
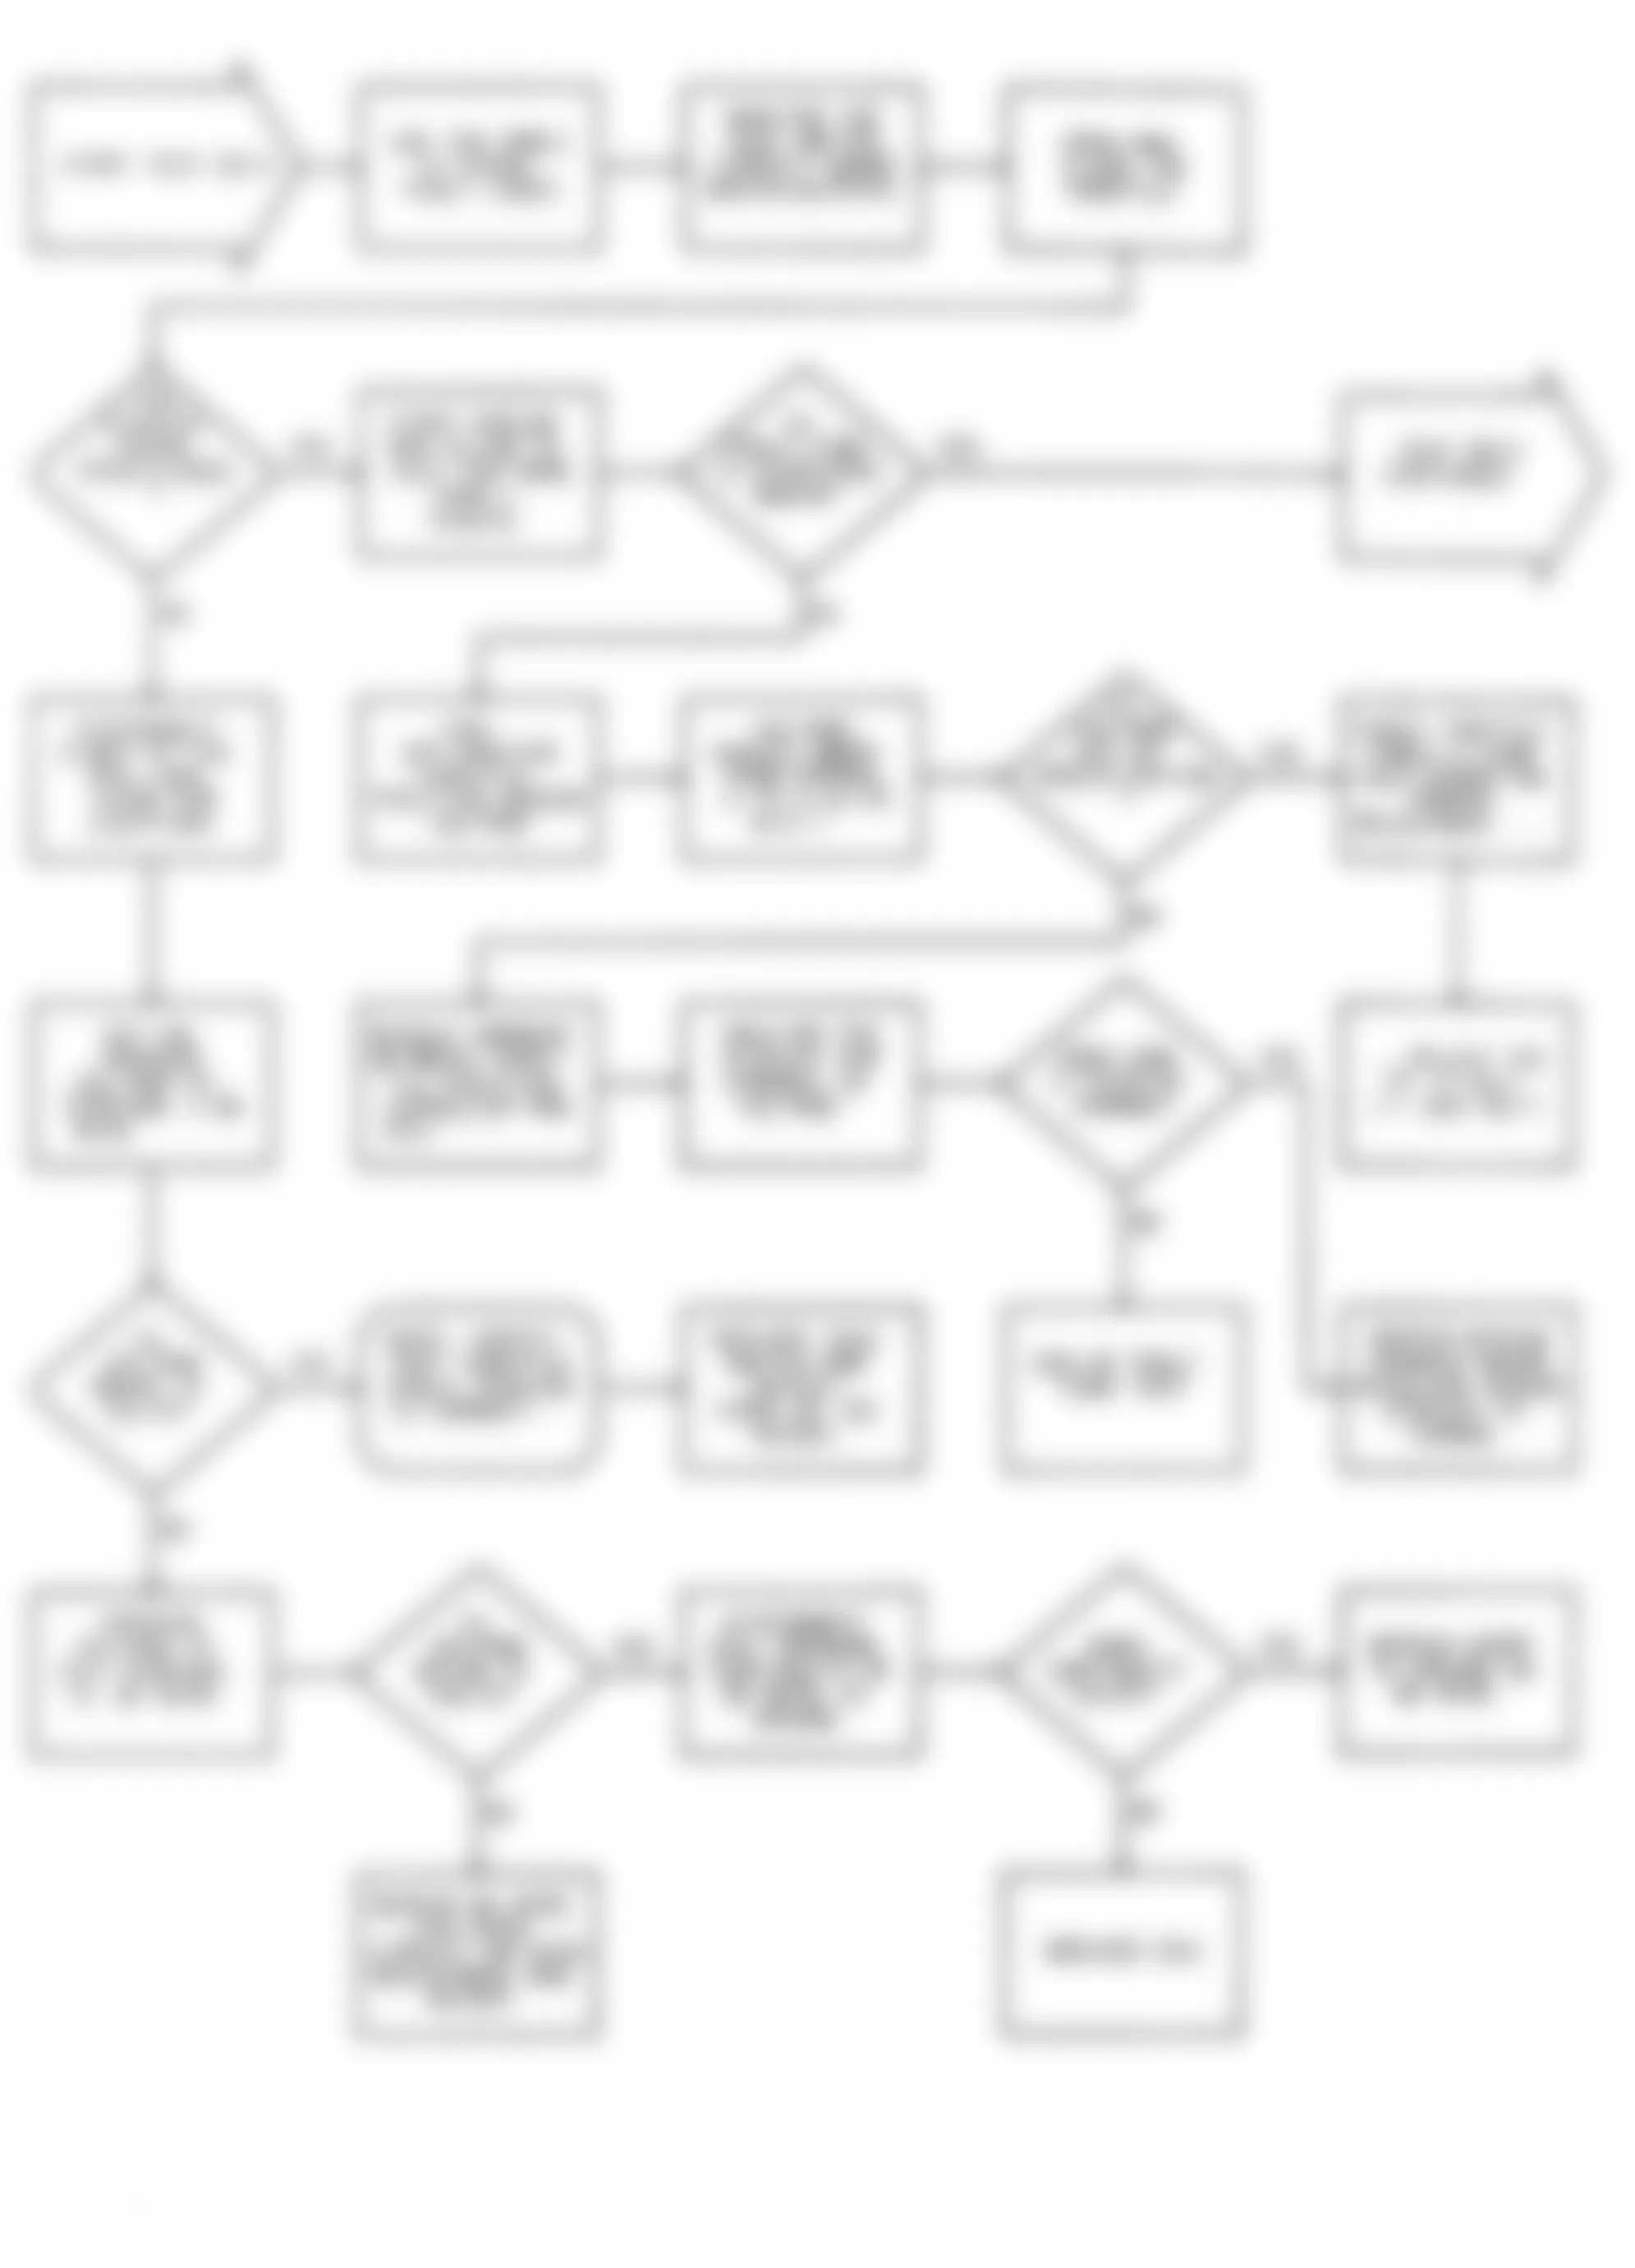
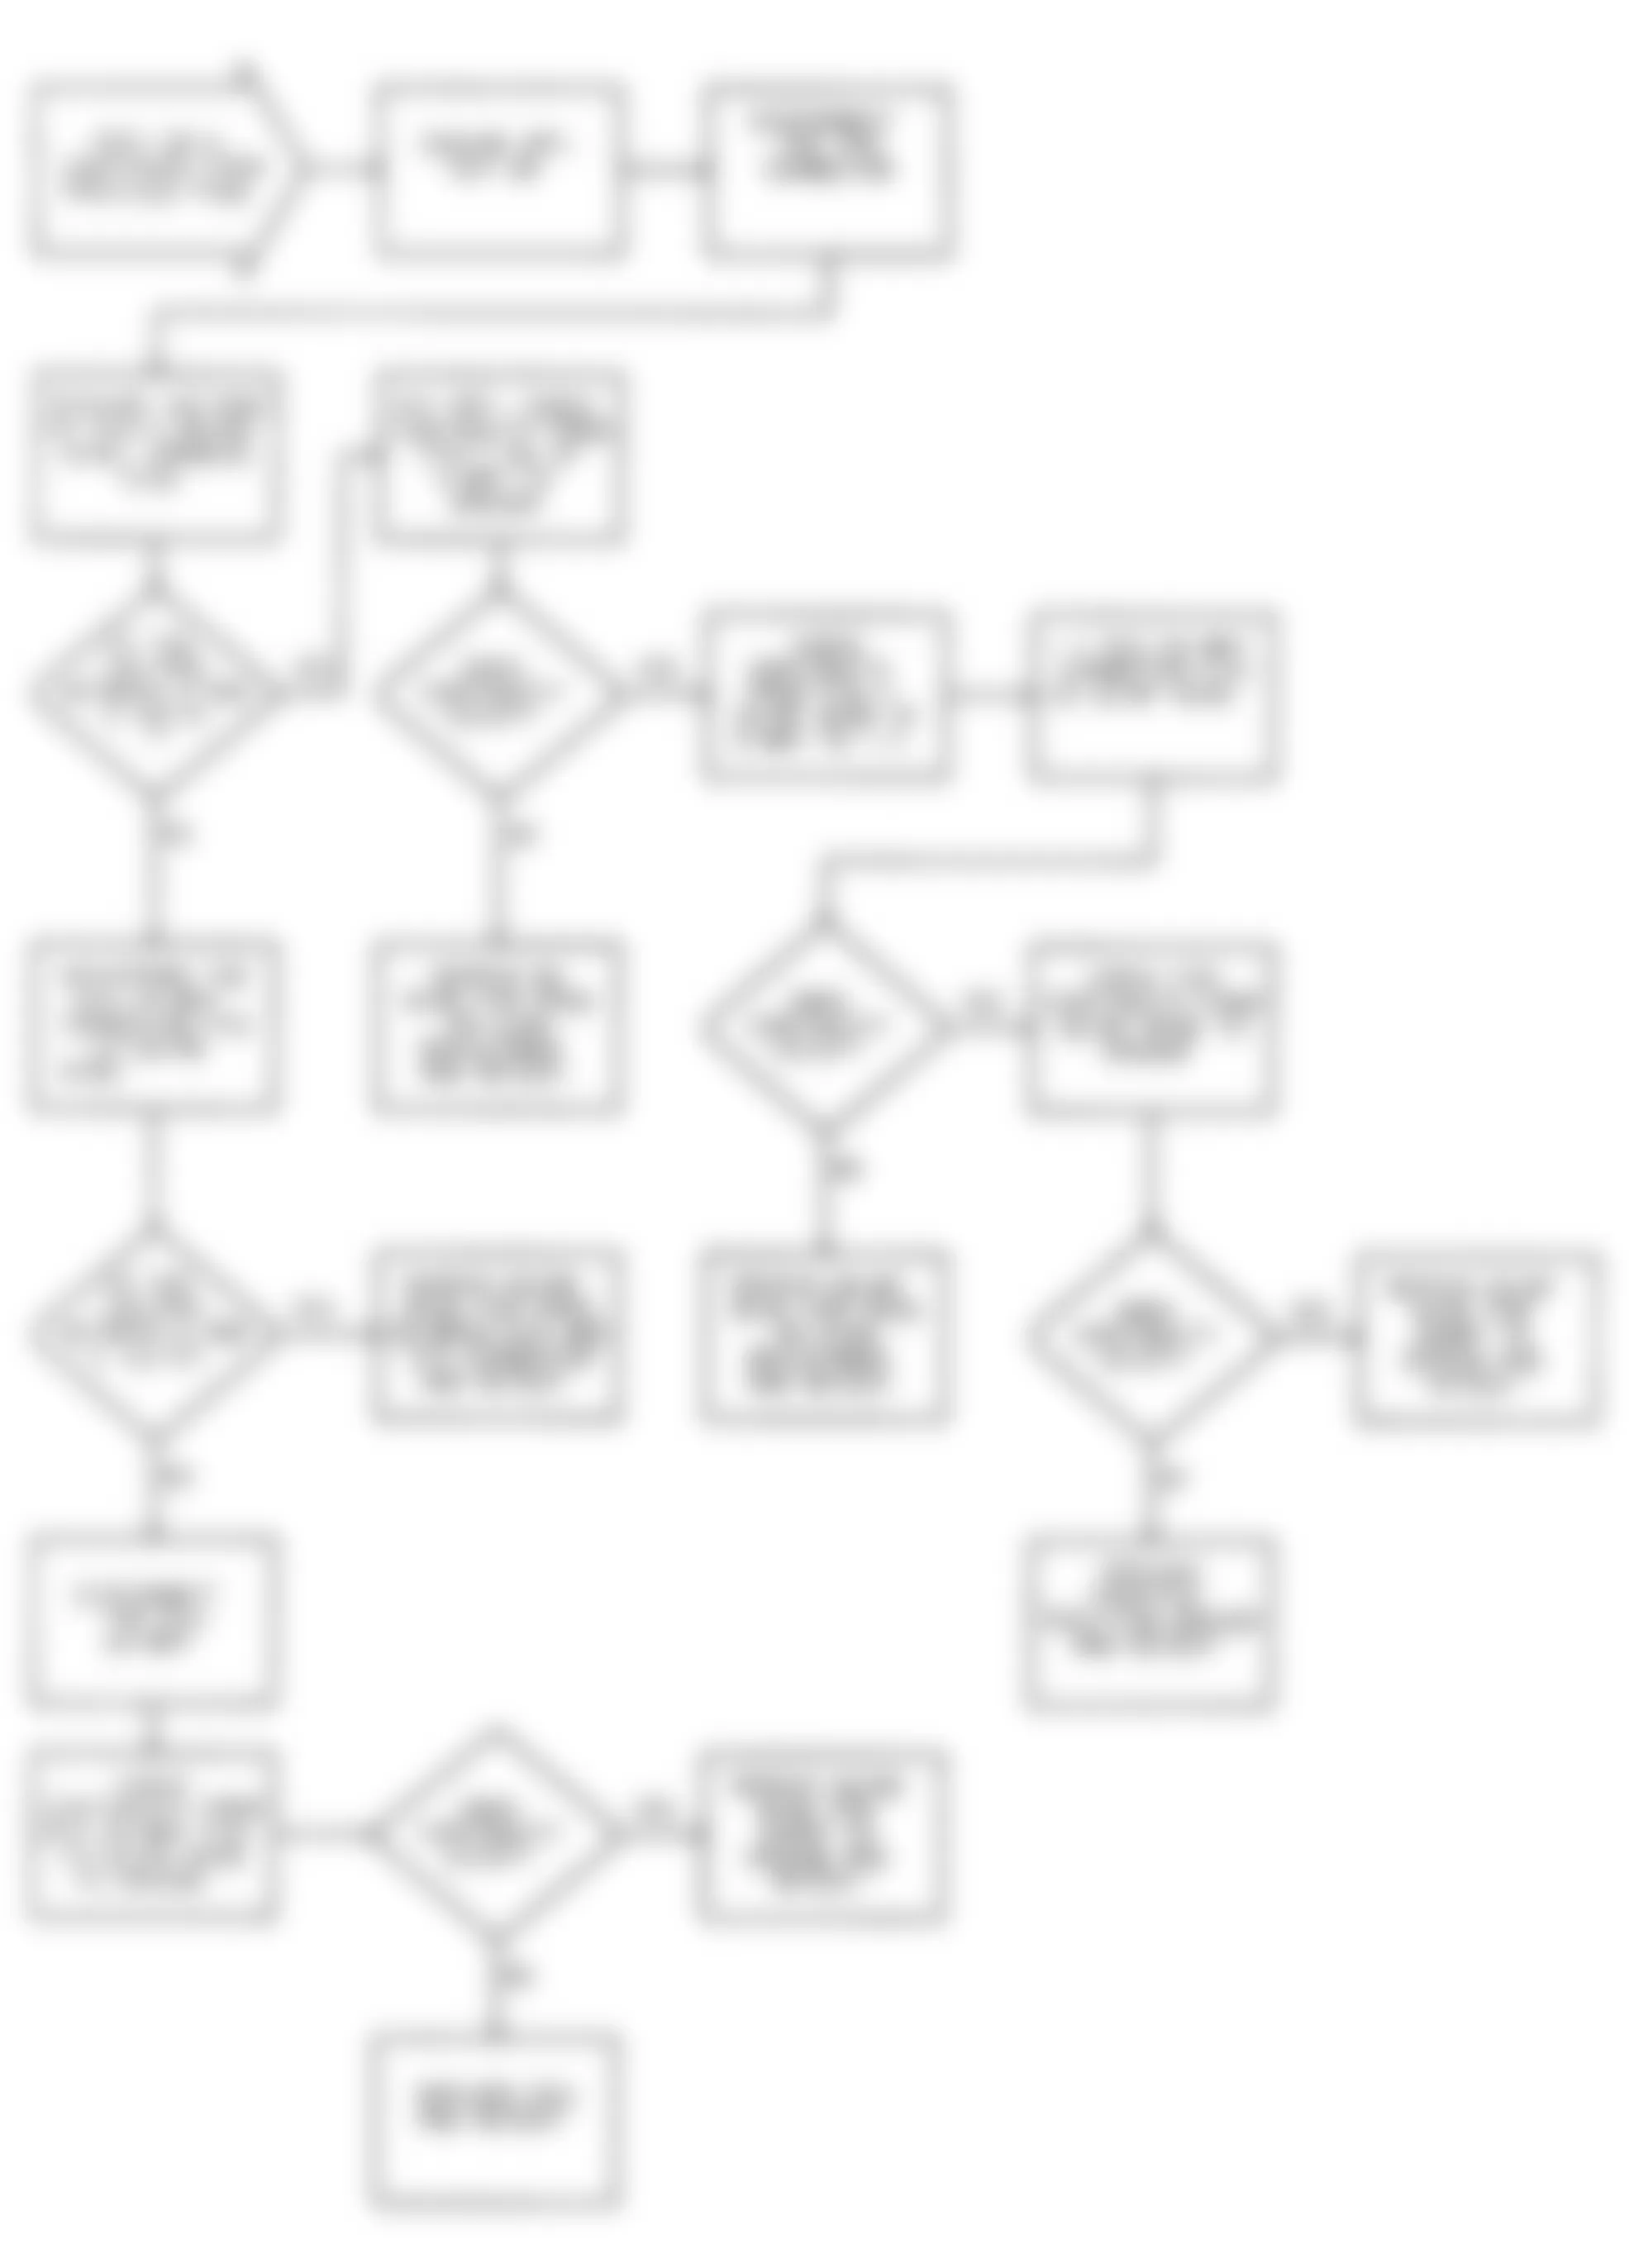
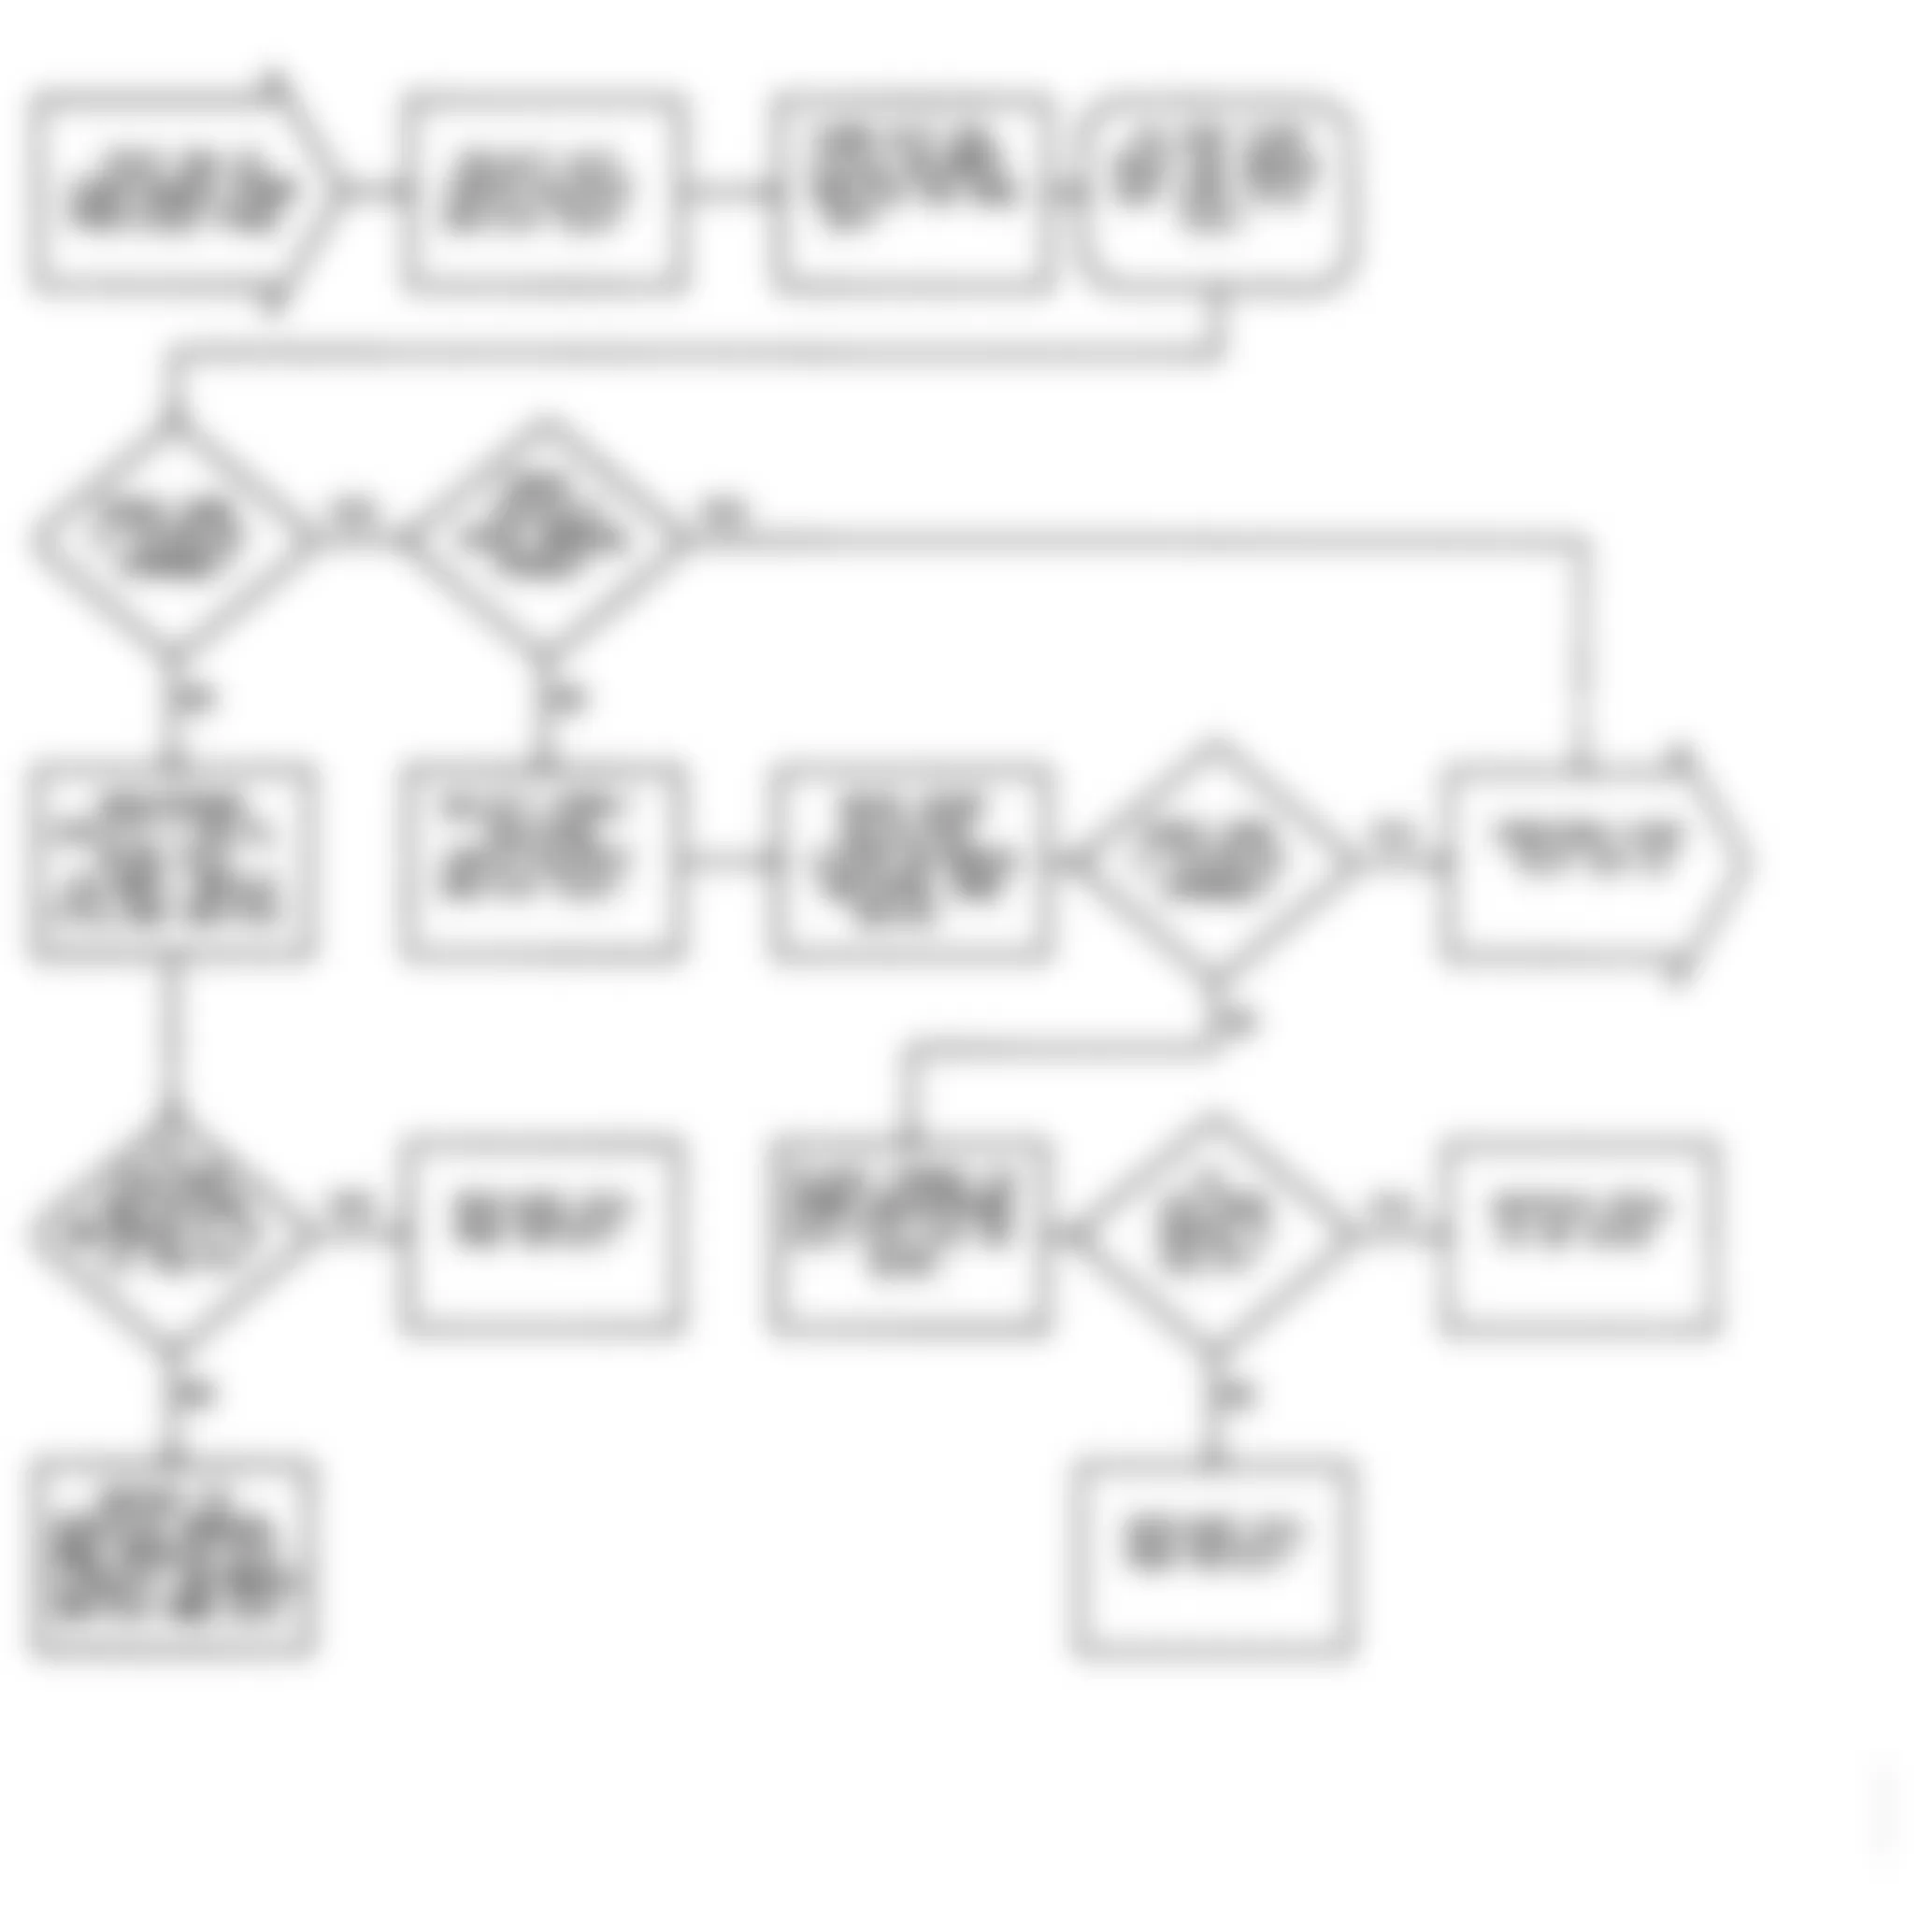
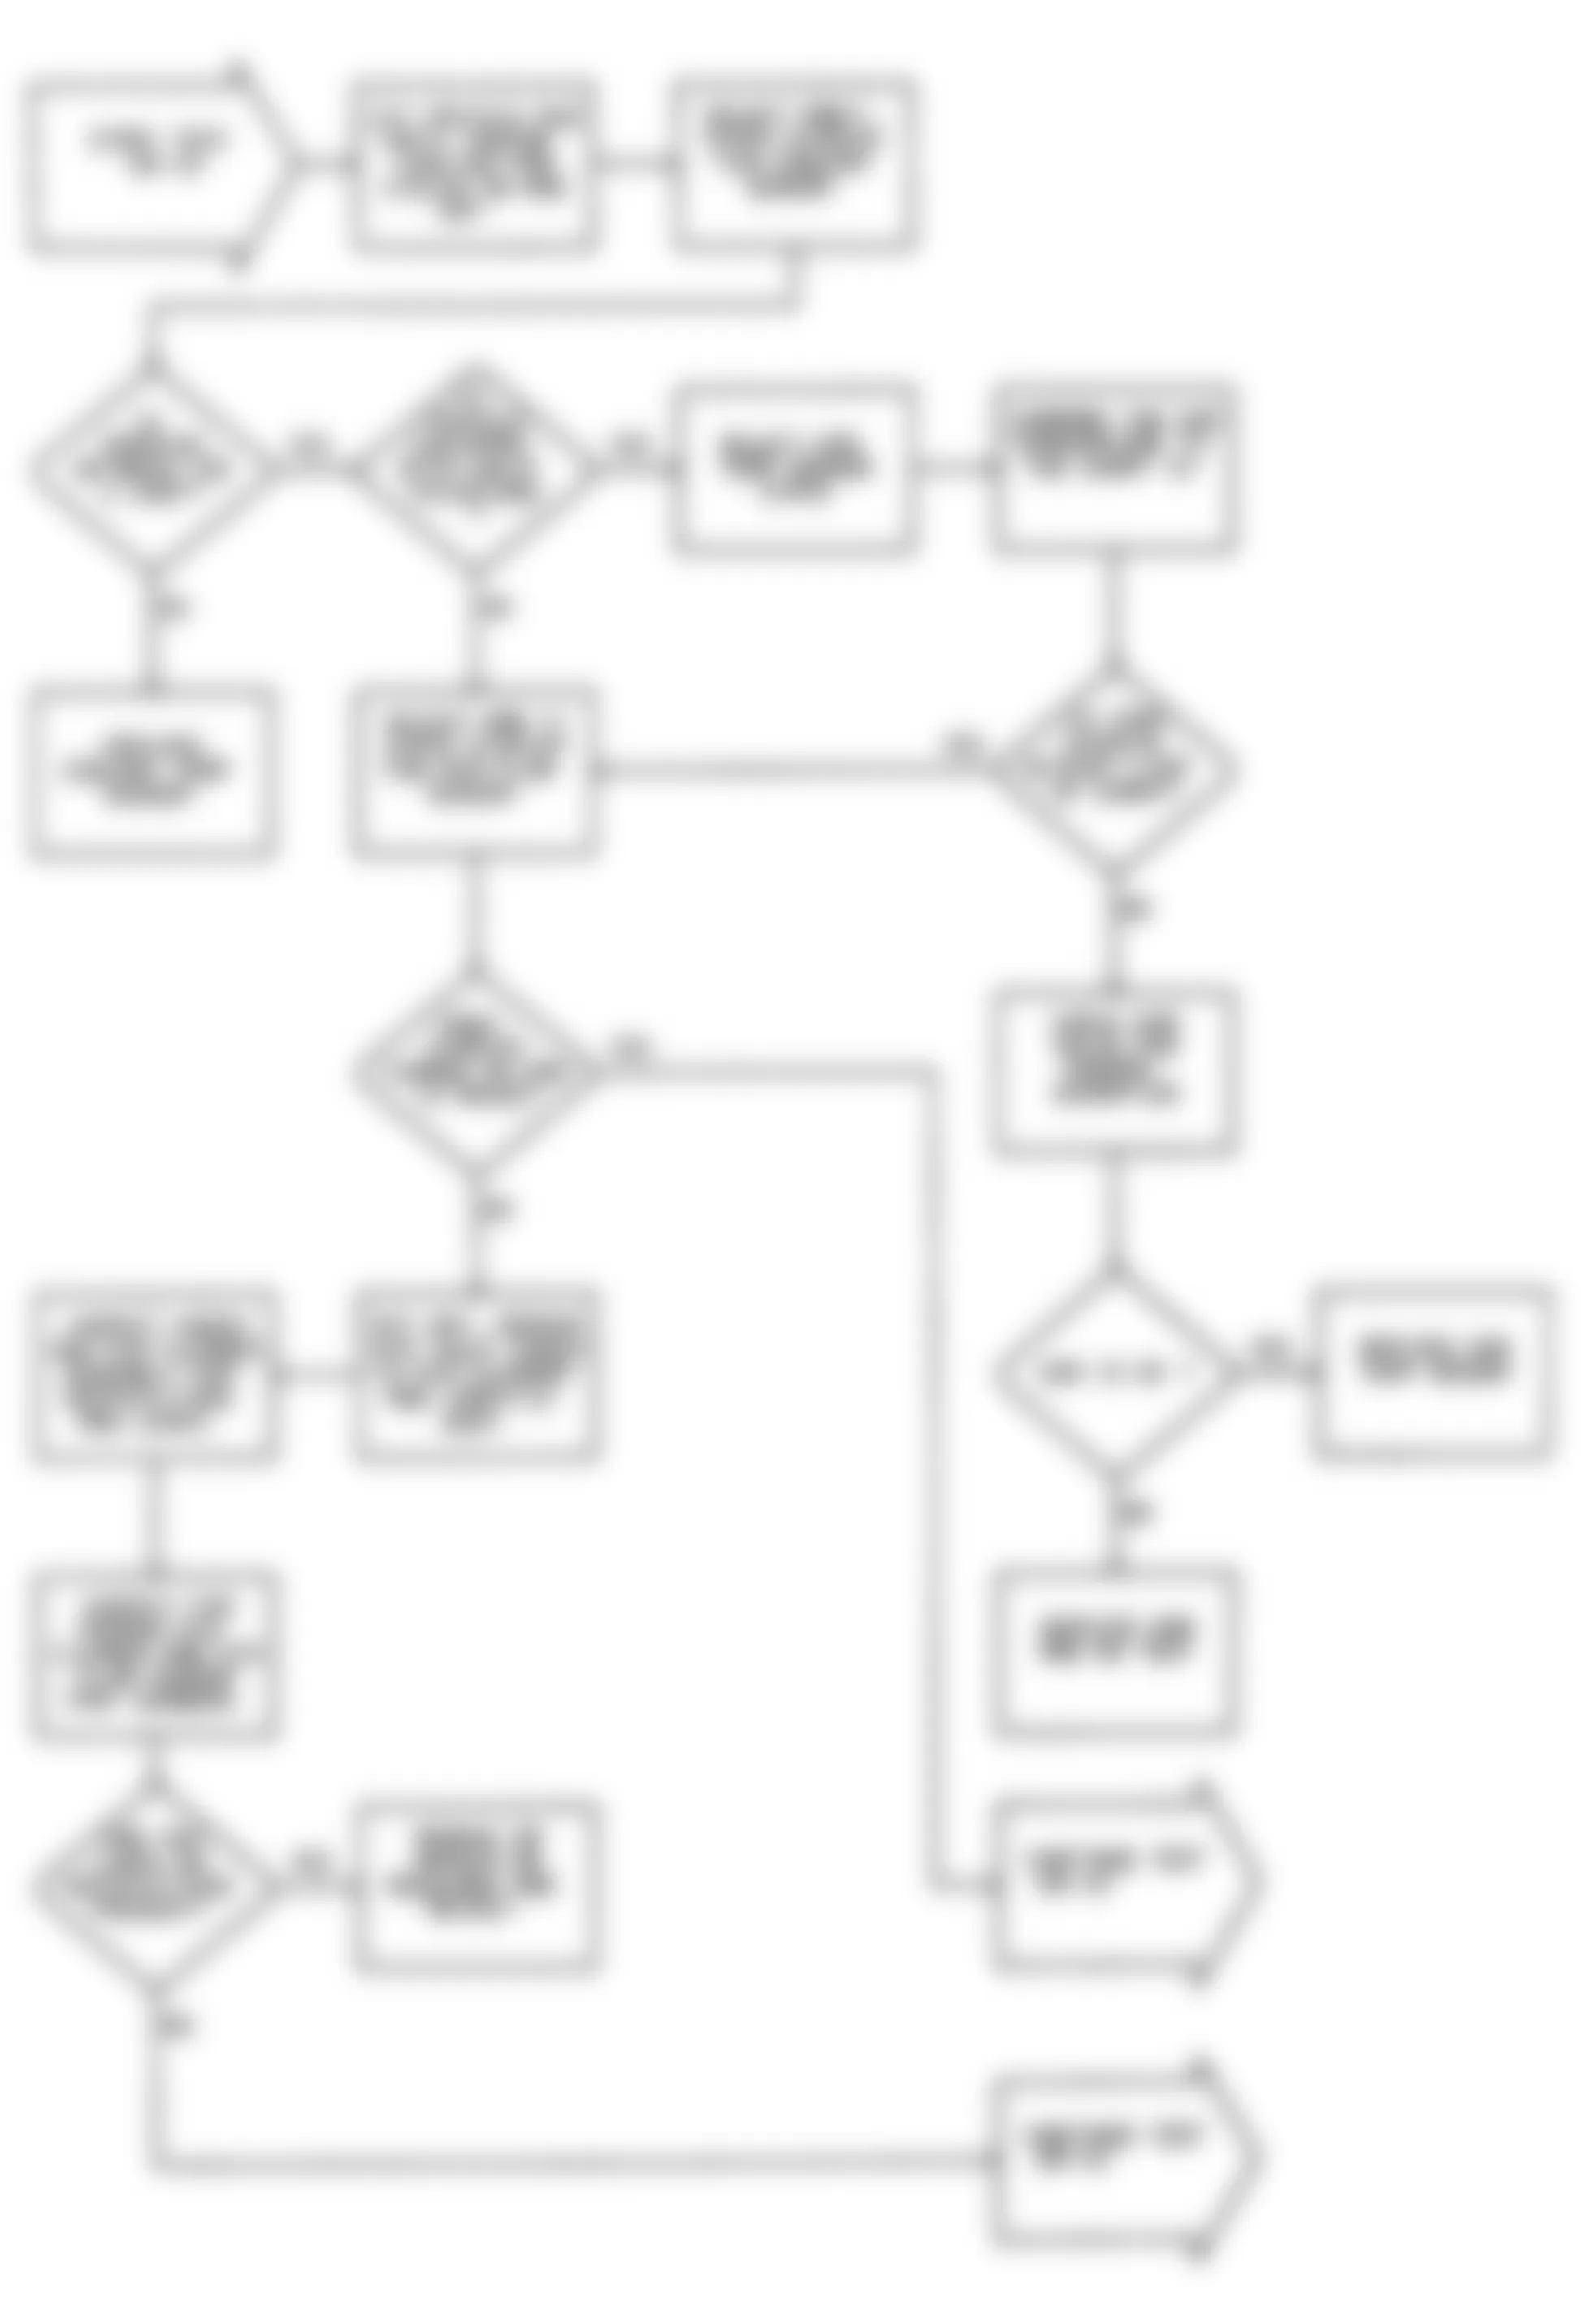
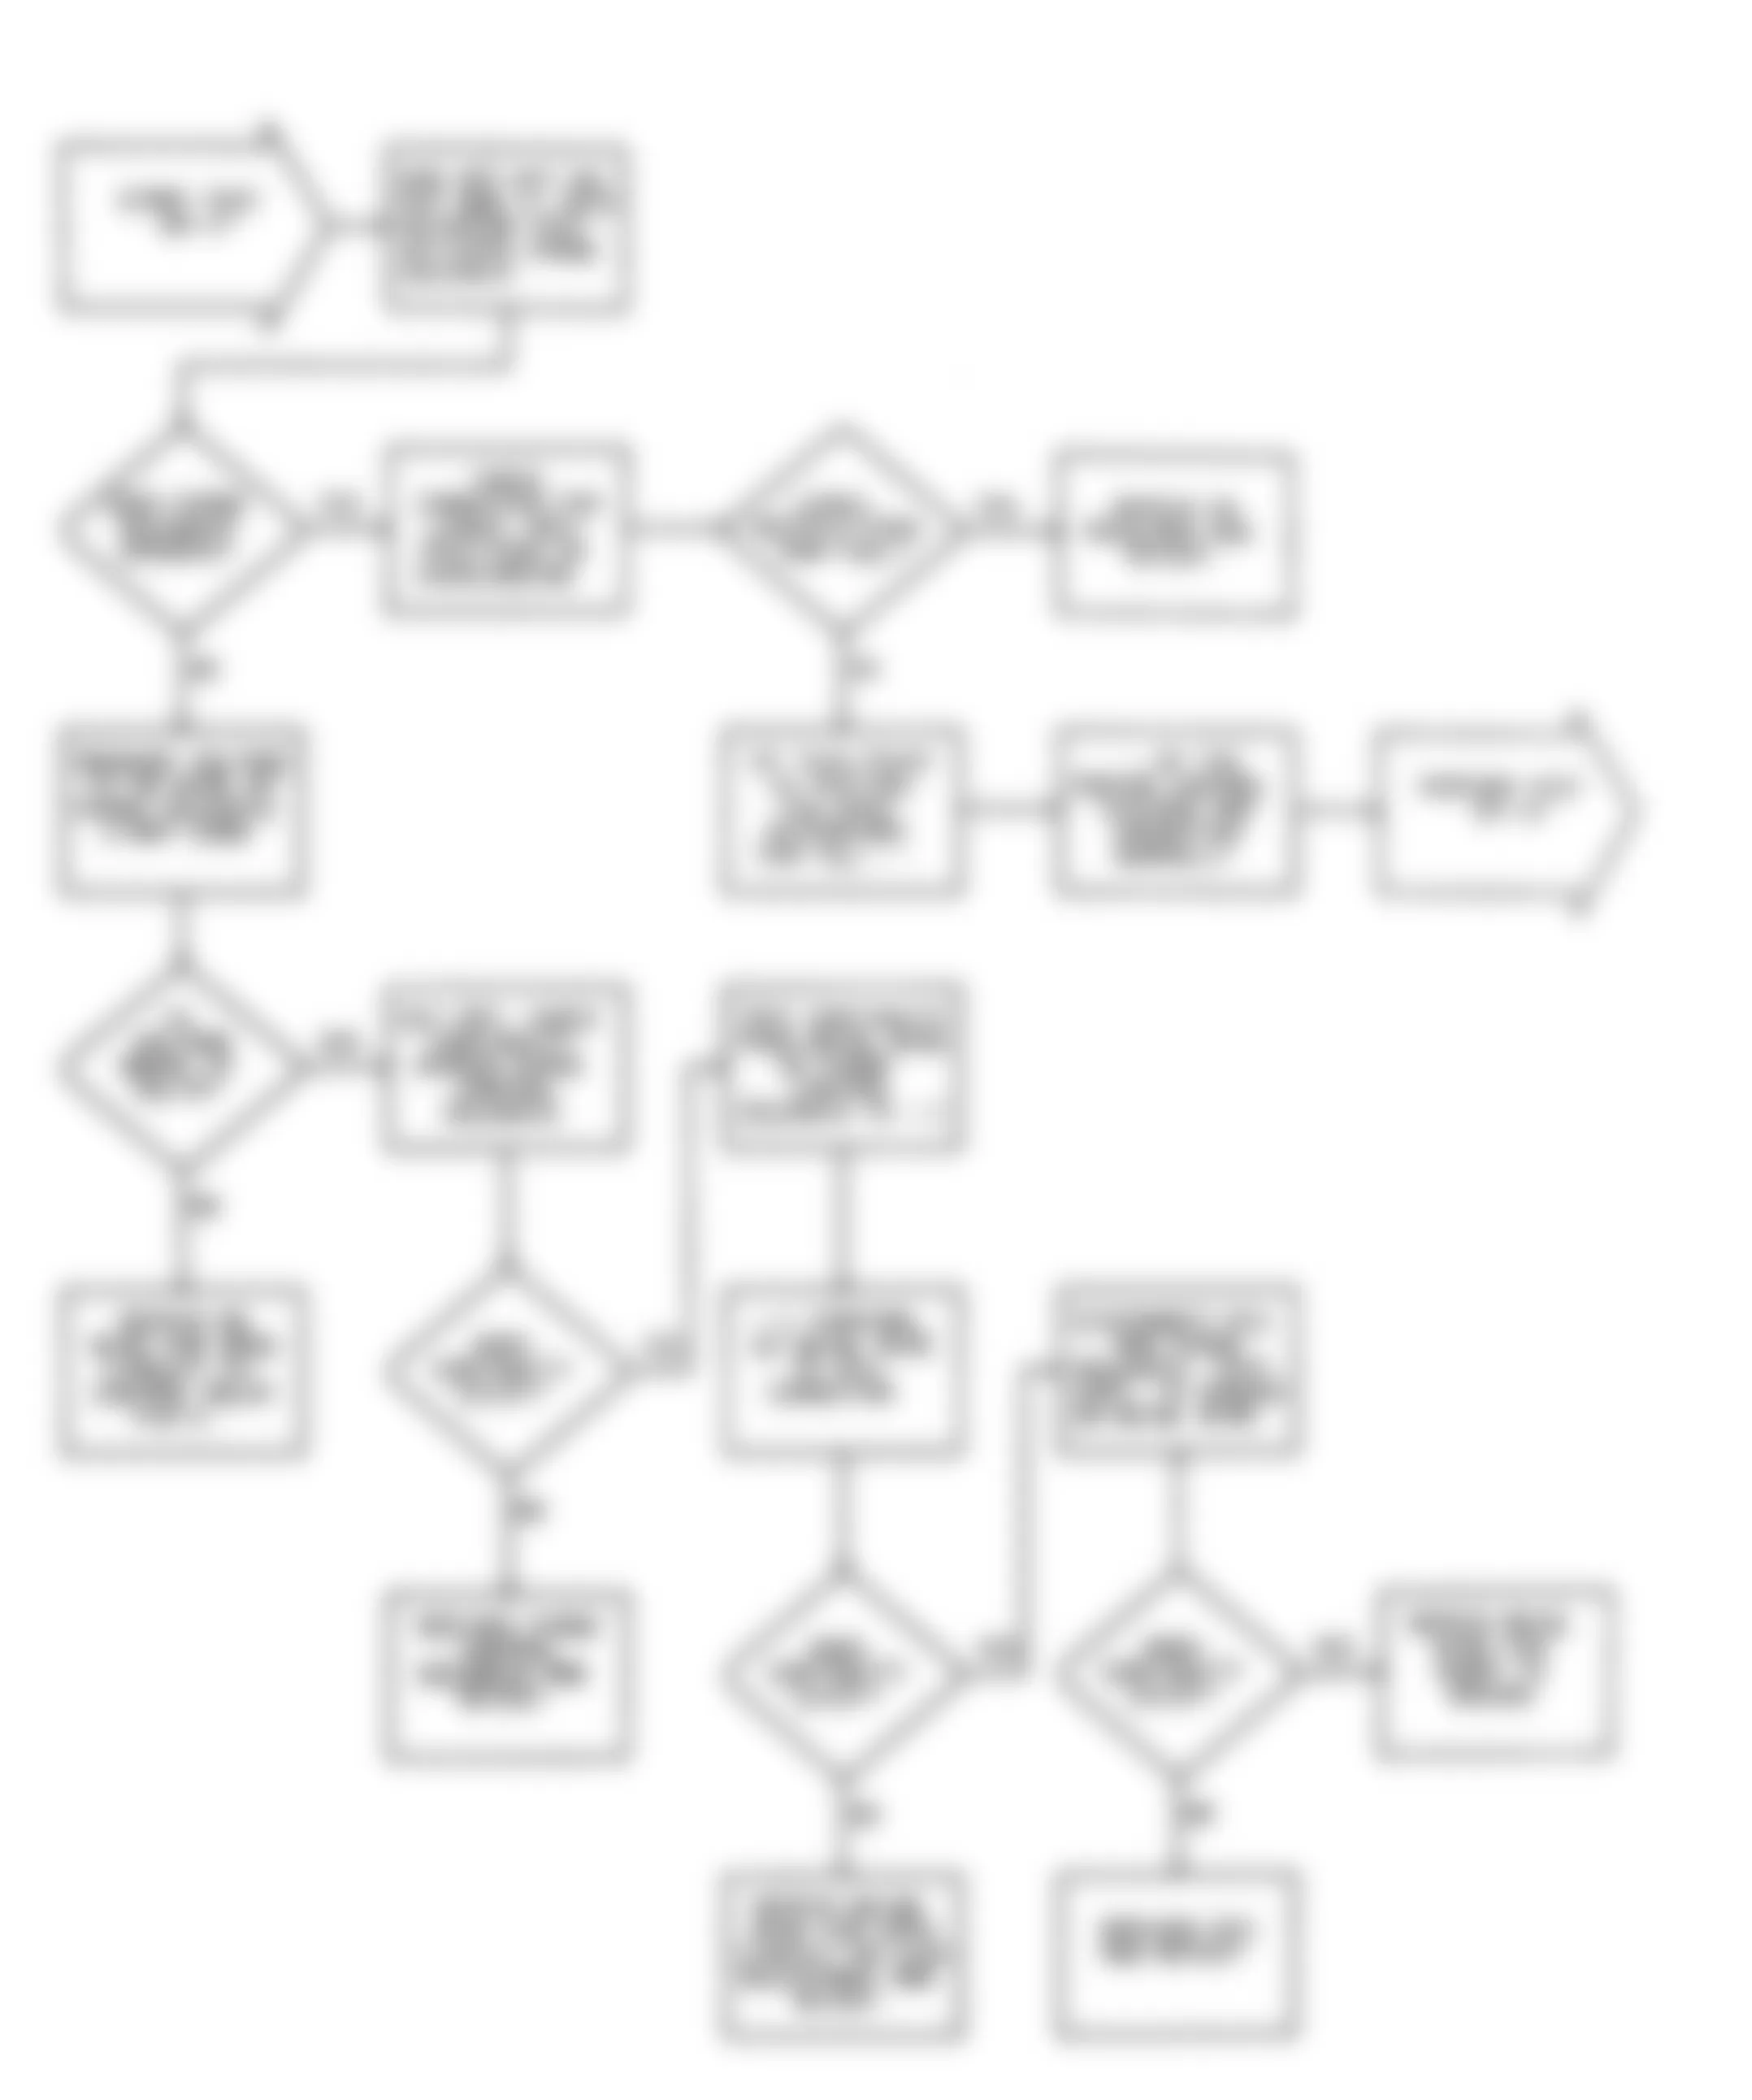
Fig. 16: Dodge Colt GL 1992 - Component Locations - No Start Test 3 Flow Chart Testing Fuel System
Dodge Colt GL 1992 - NS-4: CHECKING IGNITION SYSTEM

Dodge Colt GL 1992 - NS-5: TESTING CRANK ANGLE SENSOR

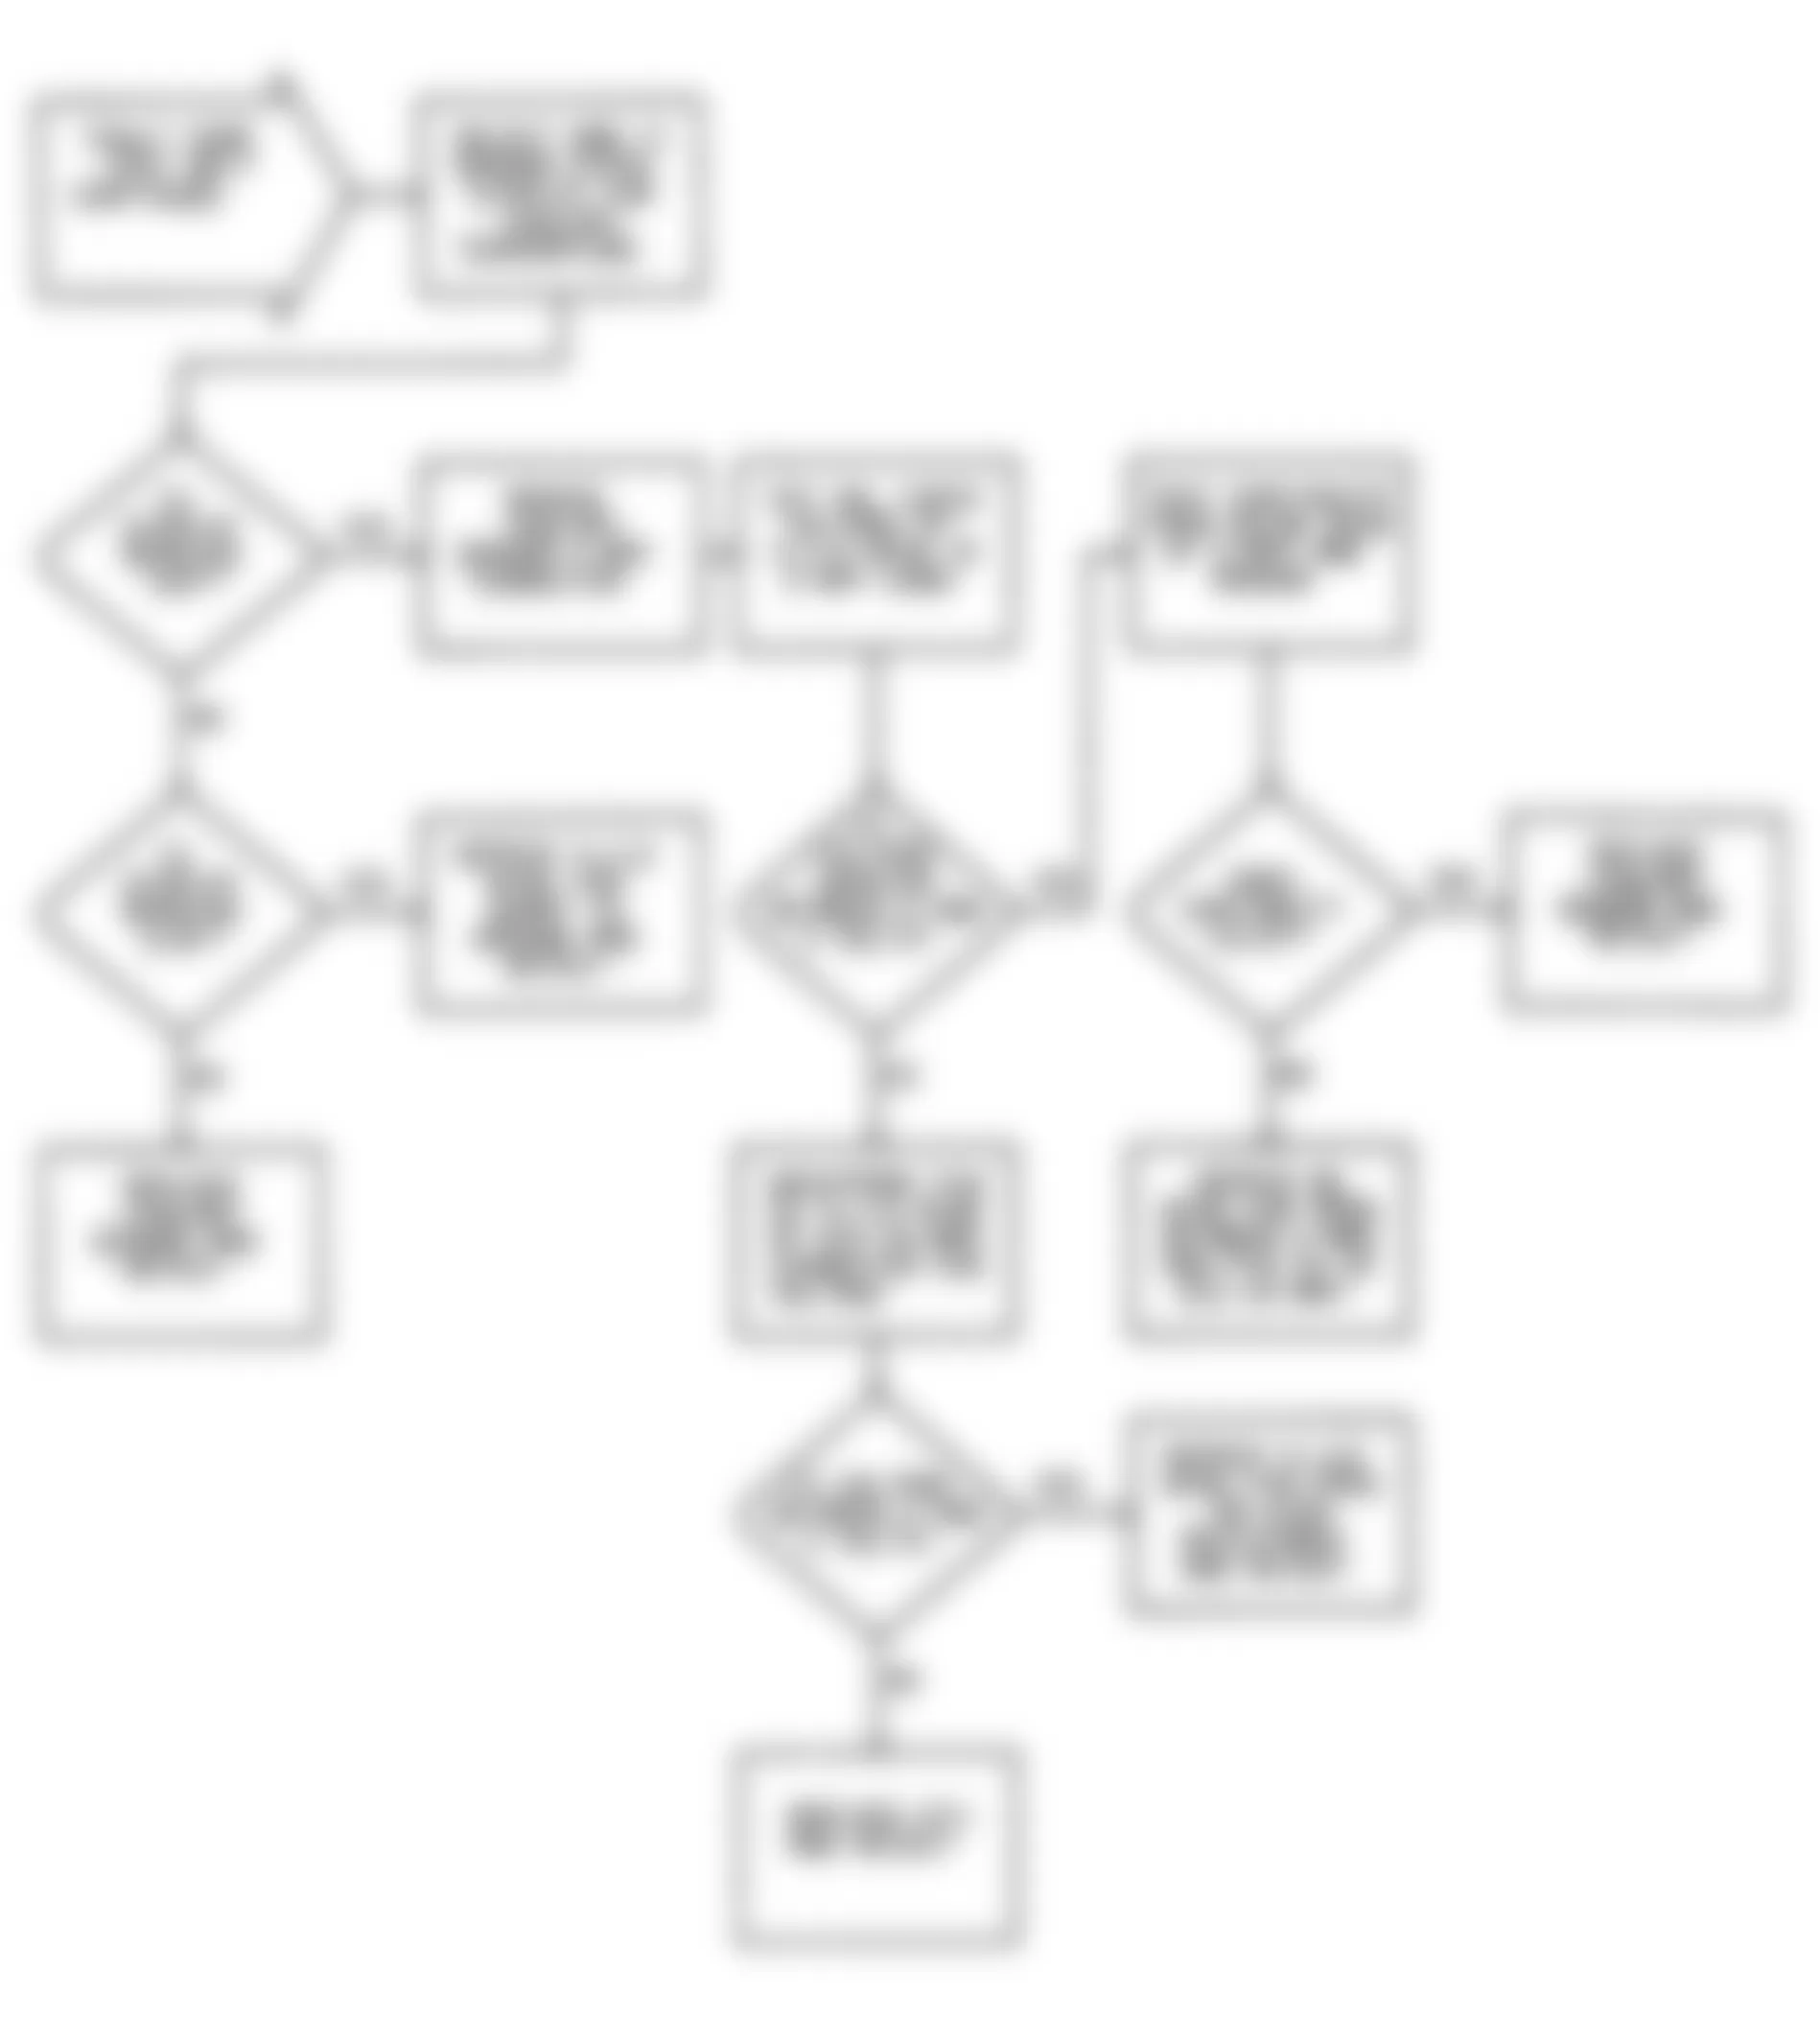
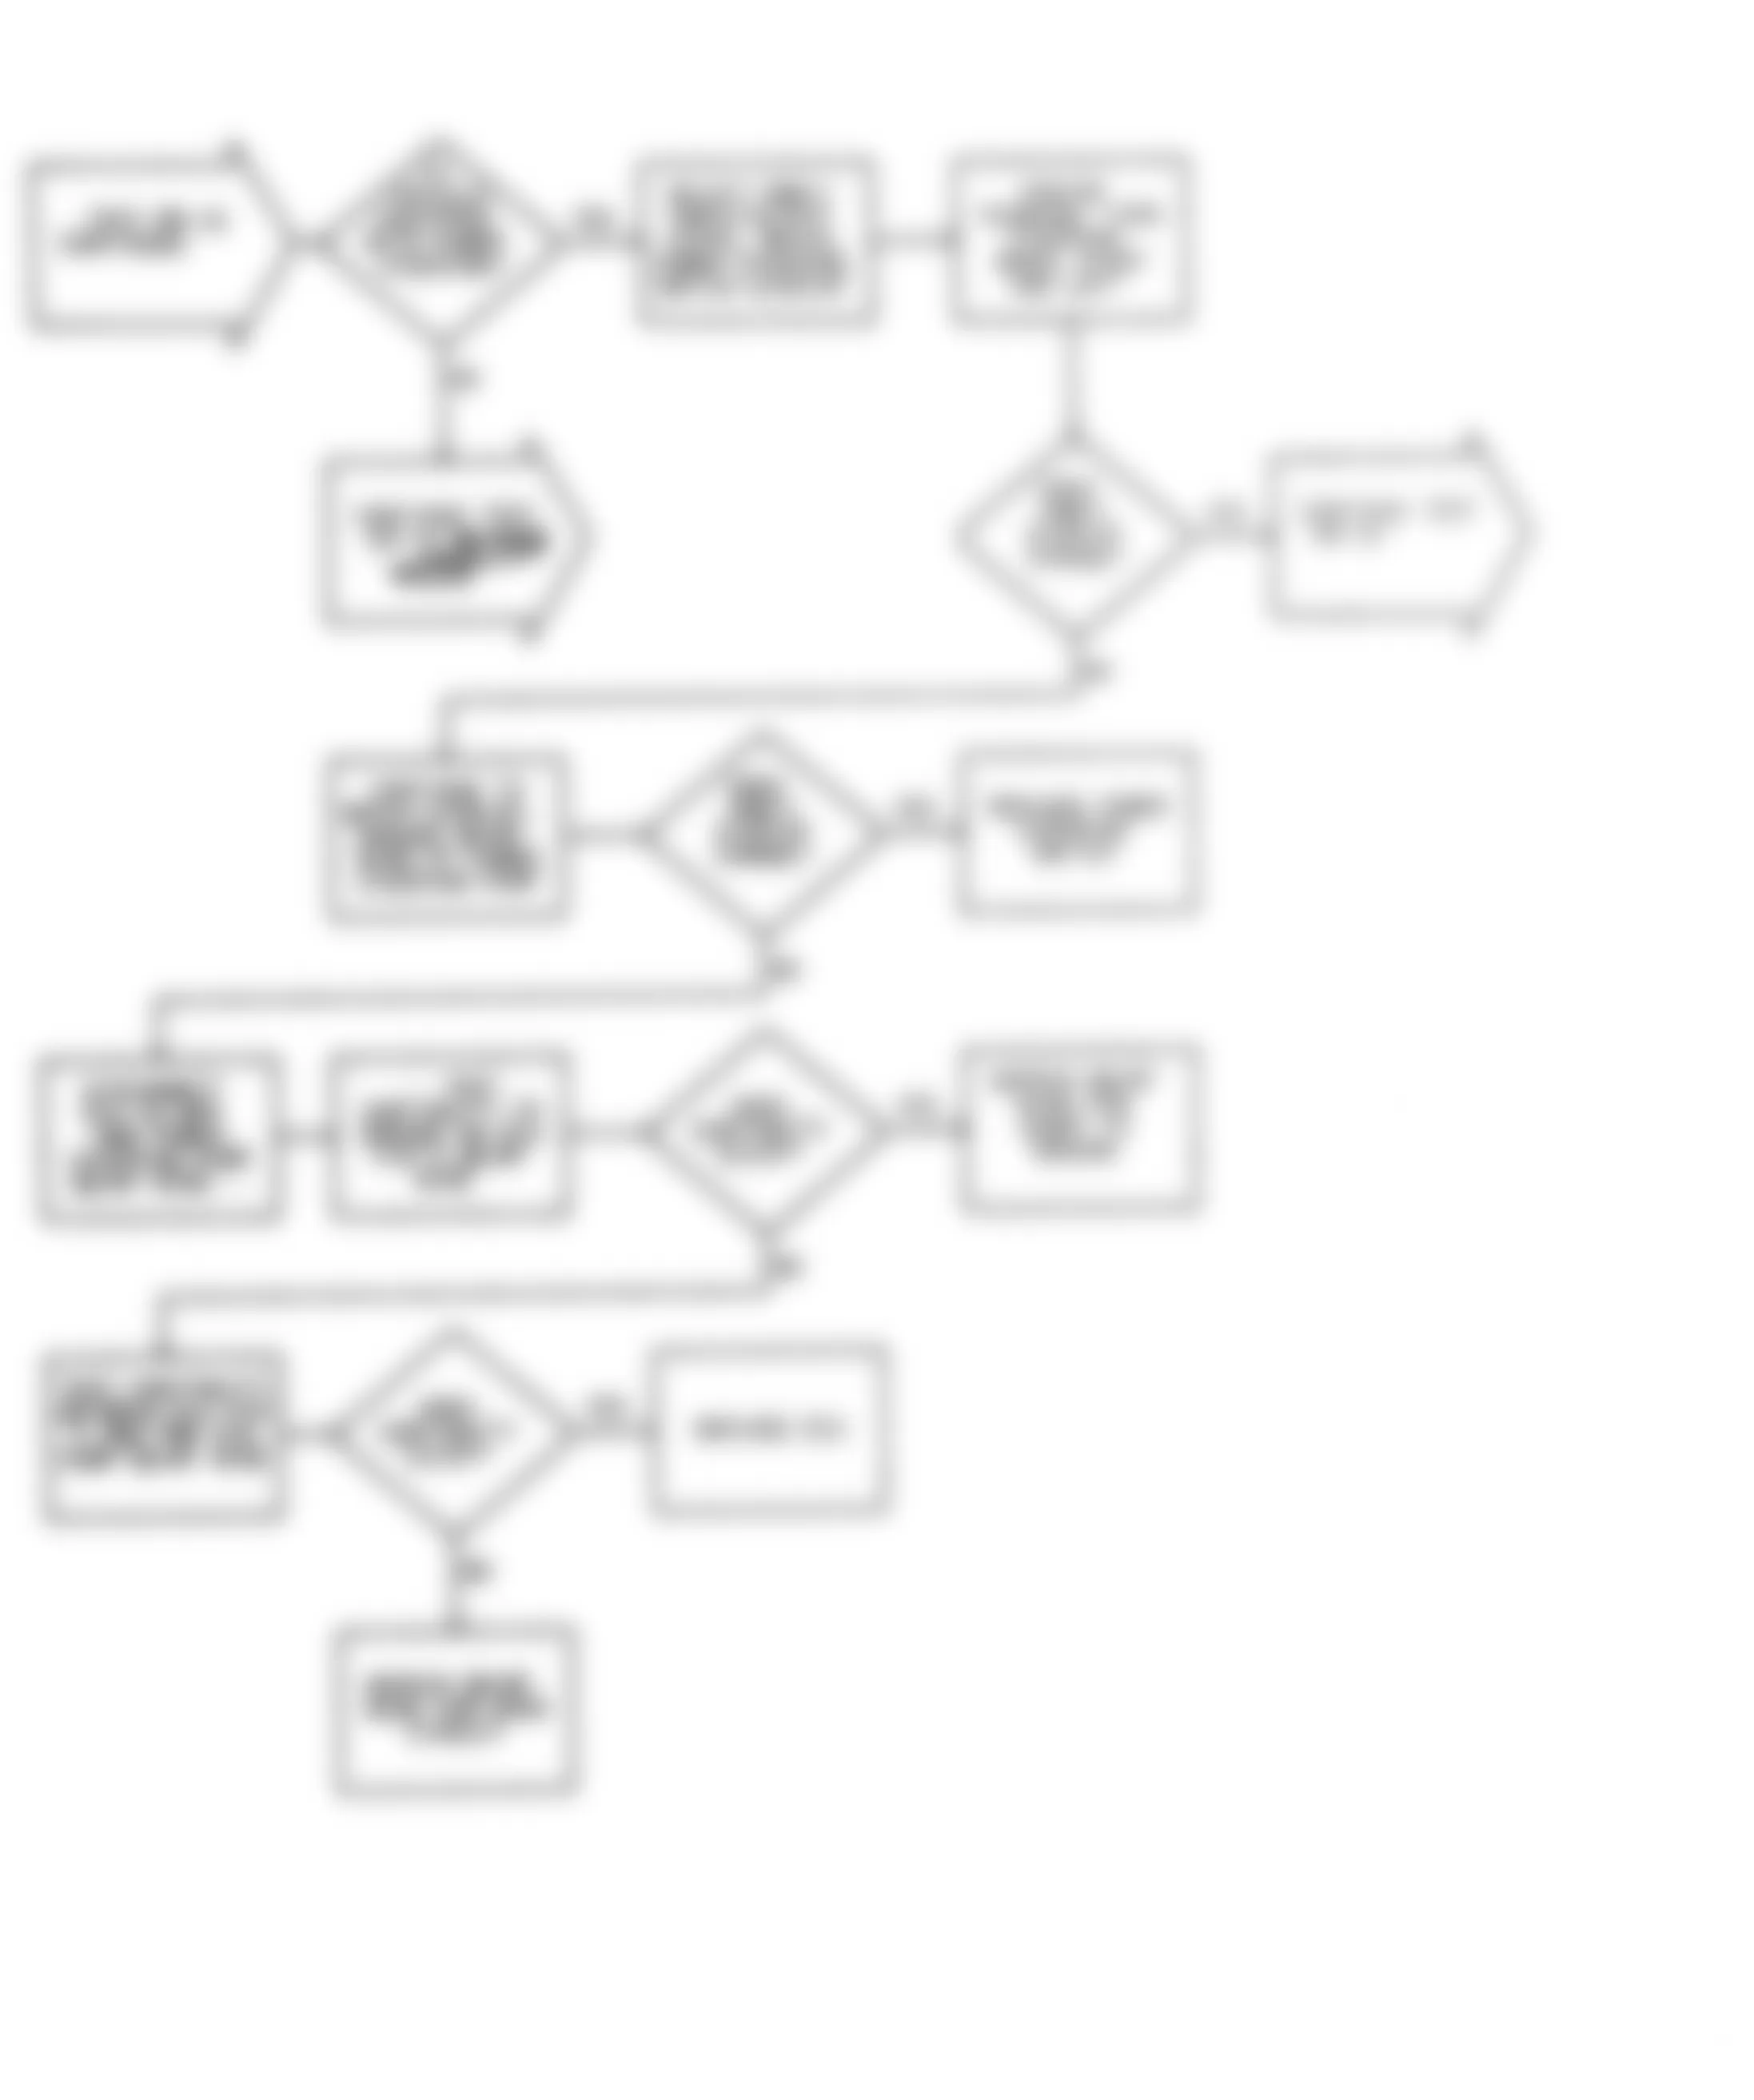
Dodge Colt GL 1992 - NS-6: TESTING CONTROL RELAY
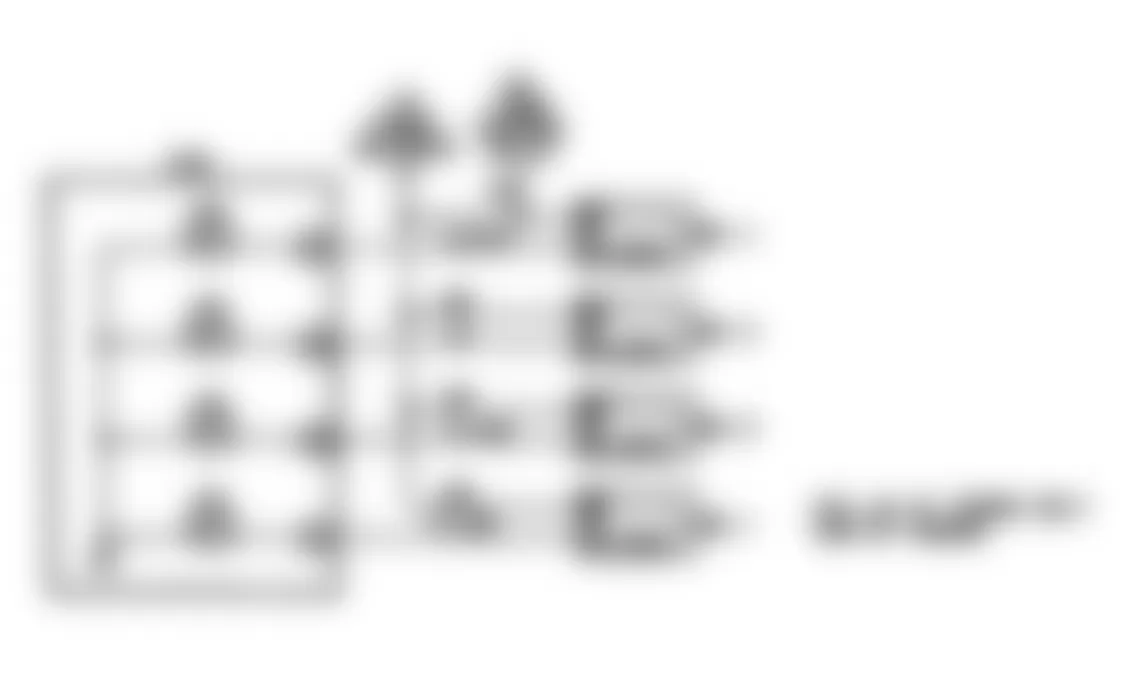
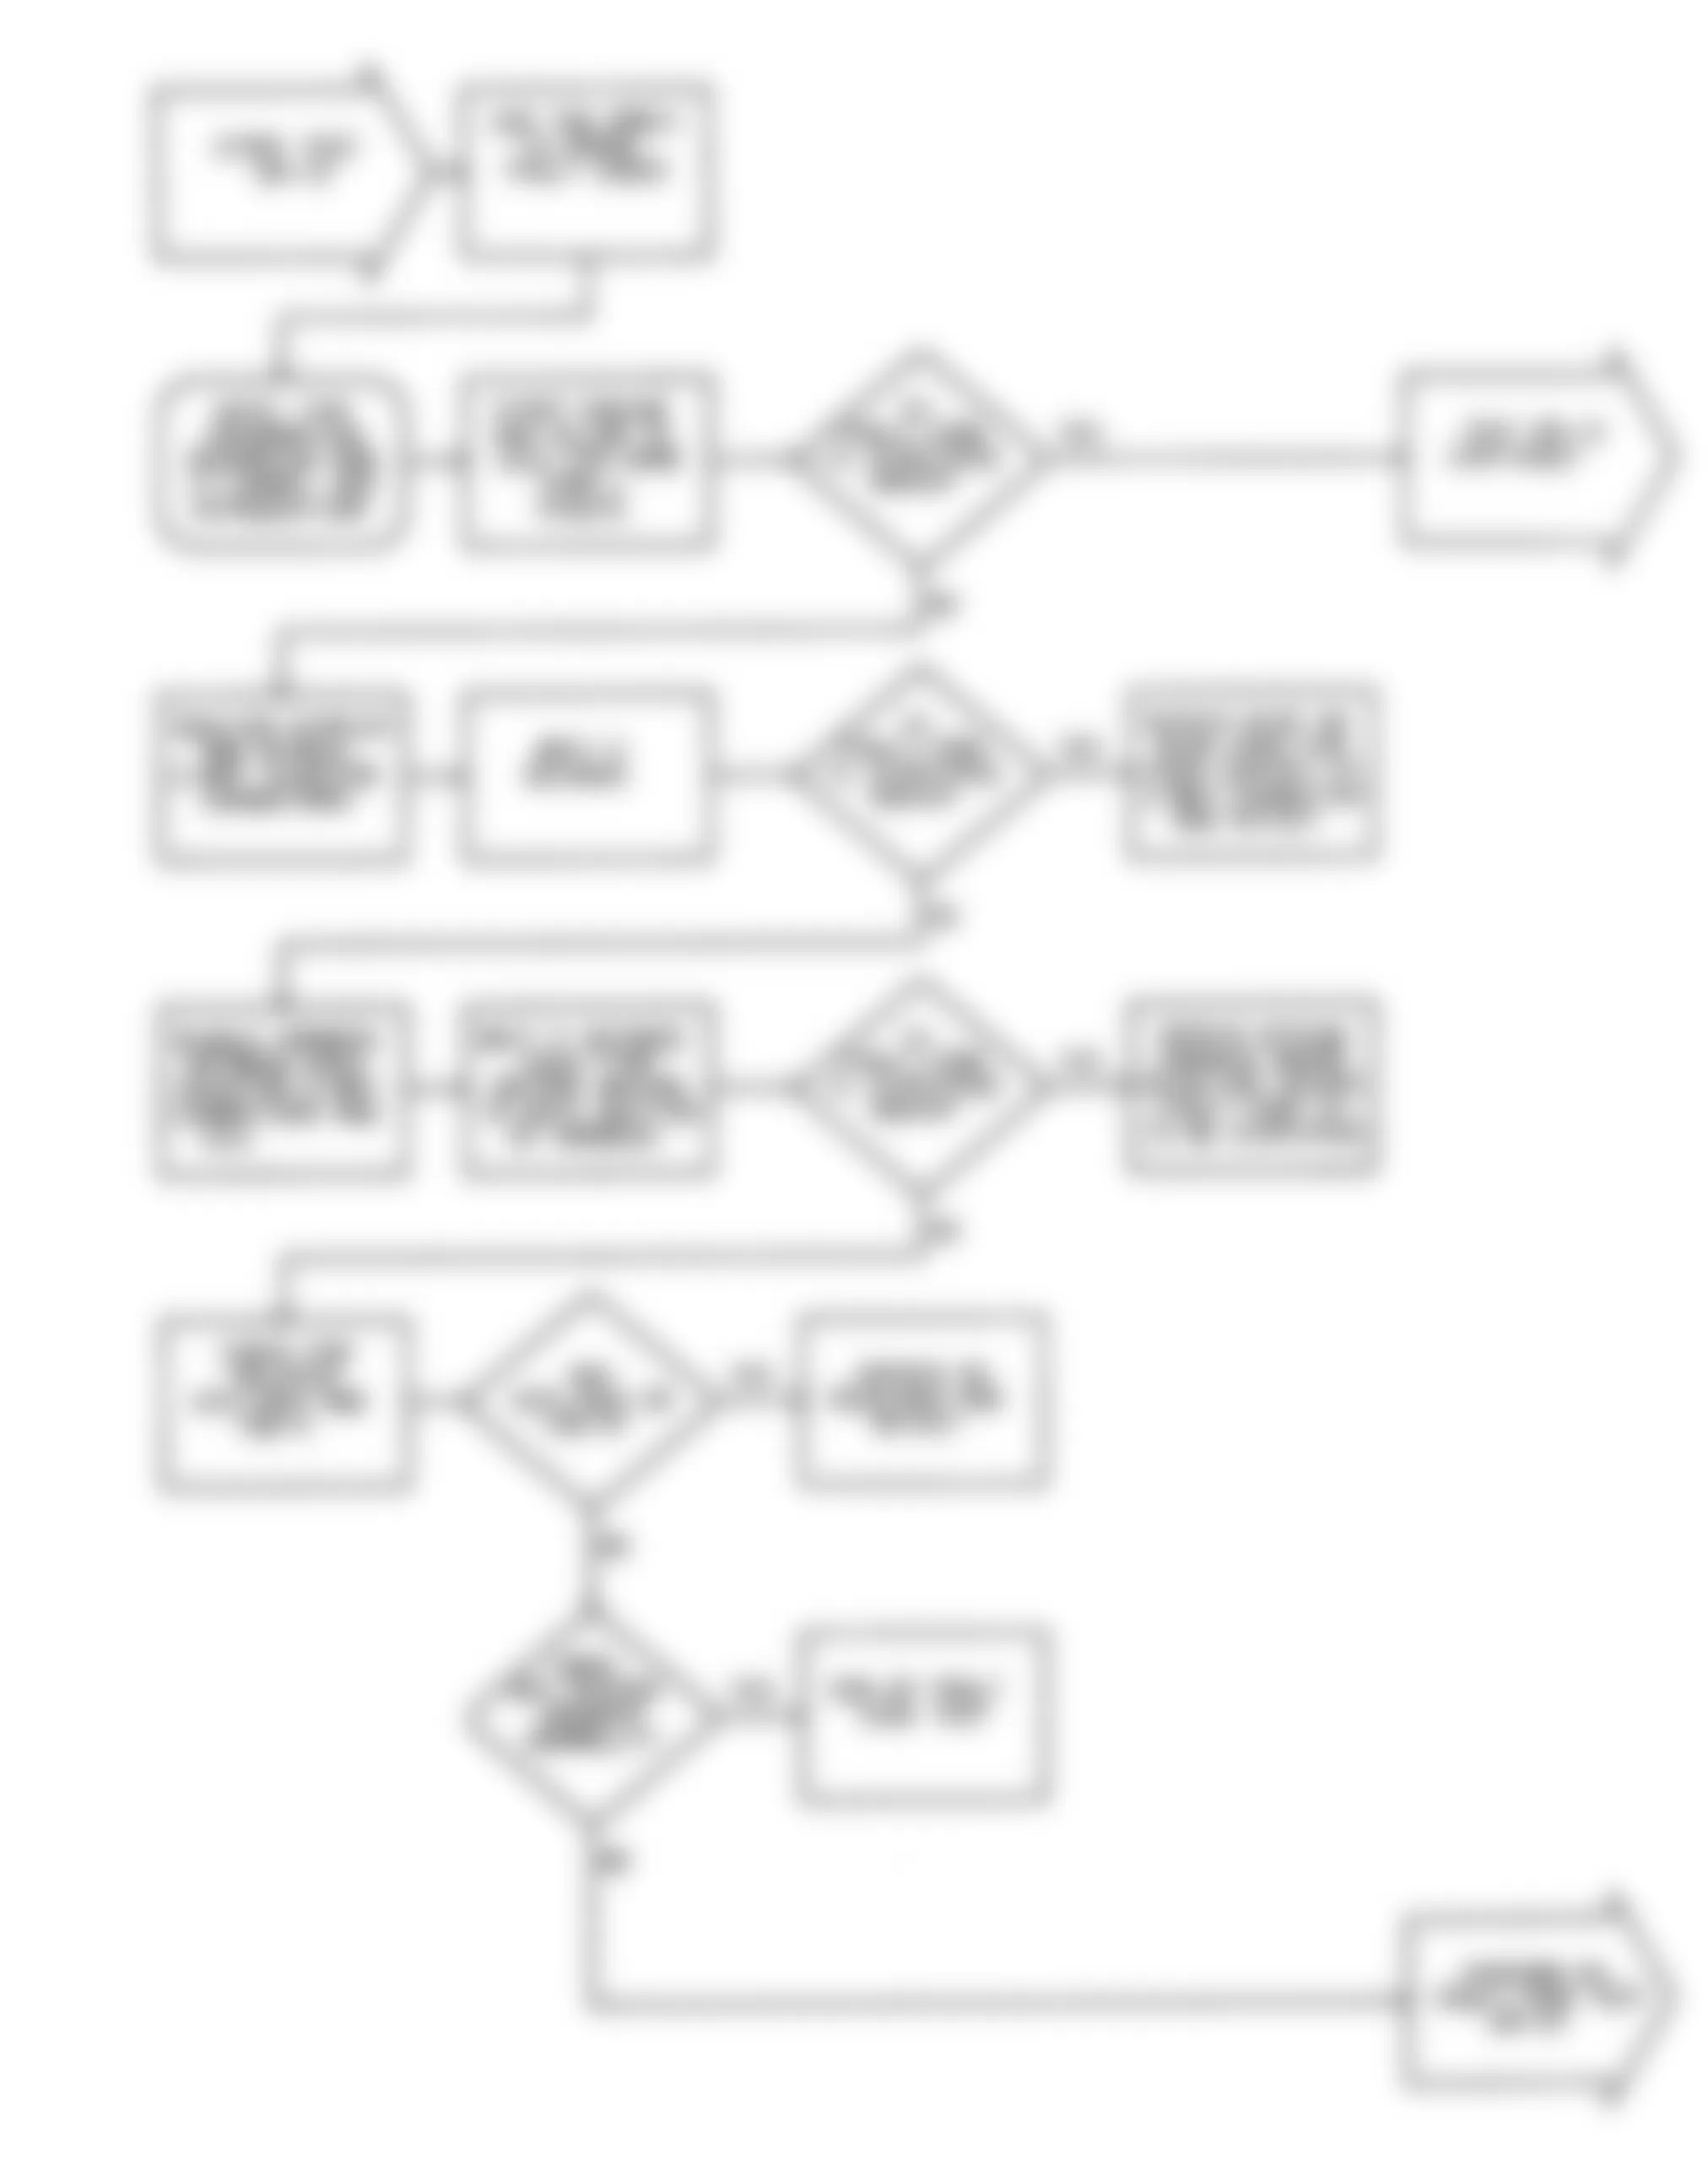
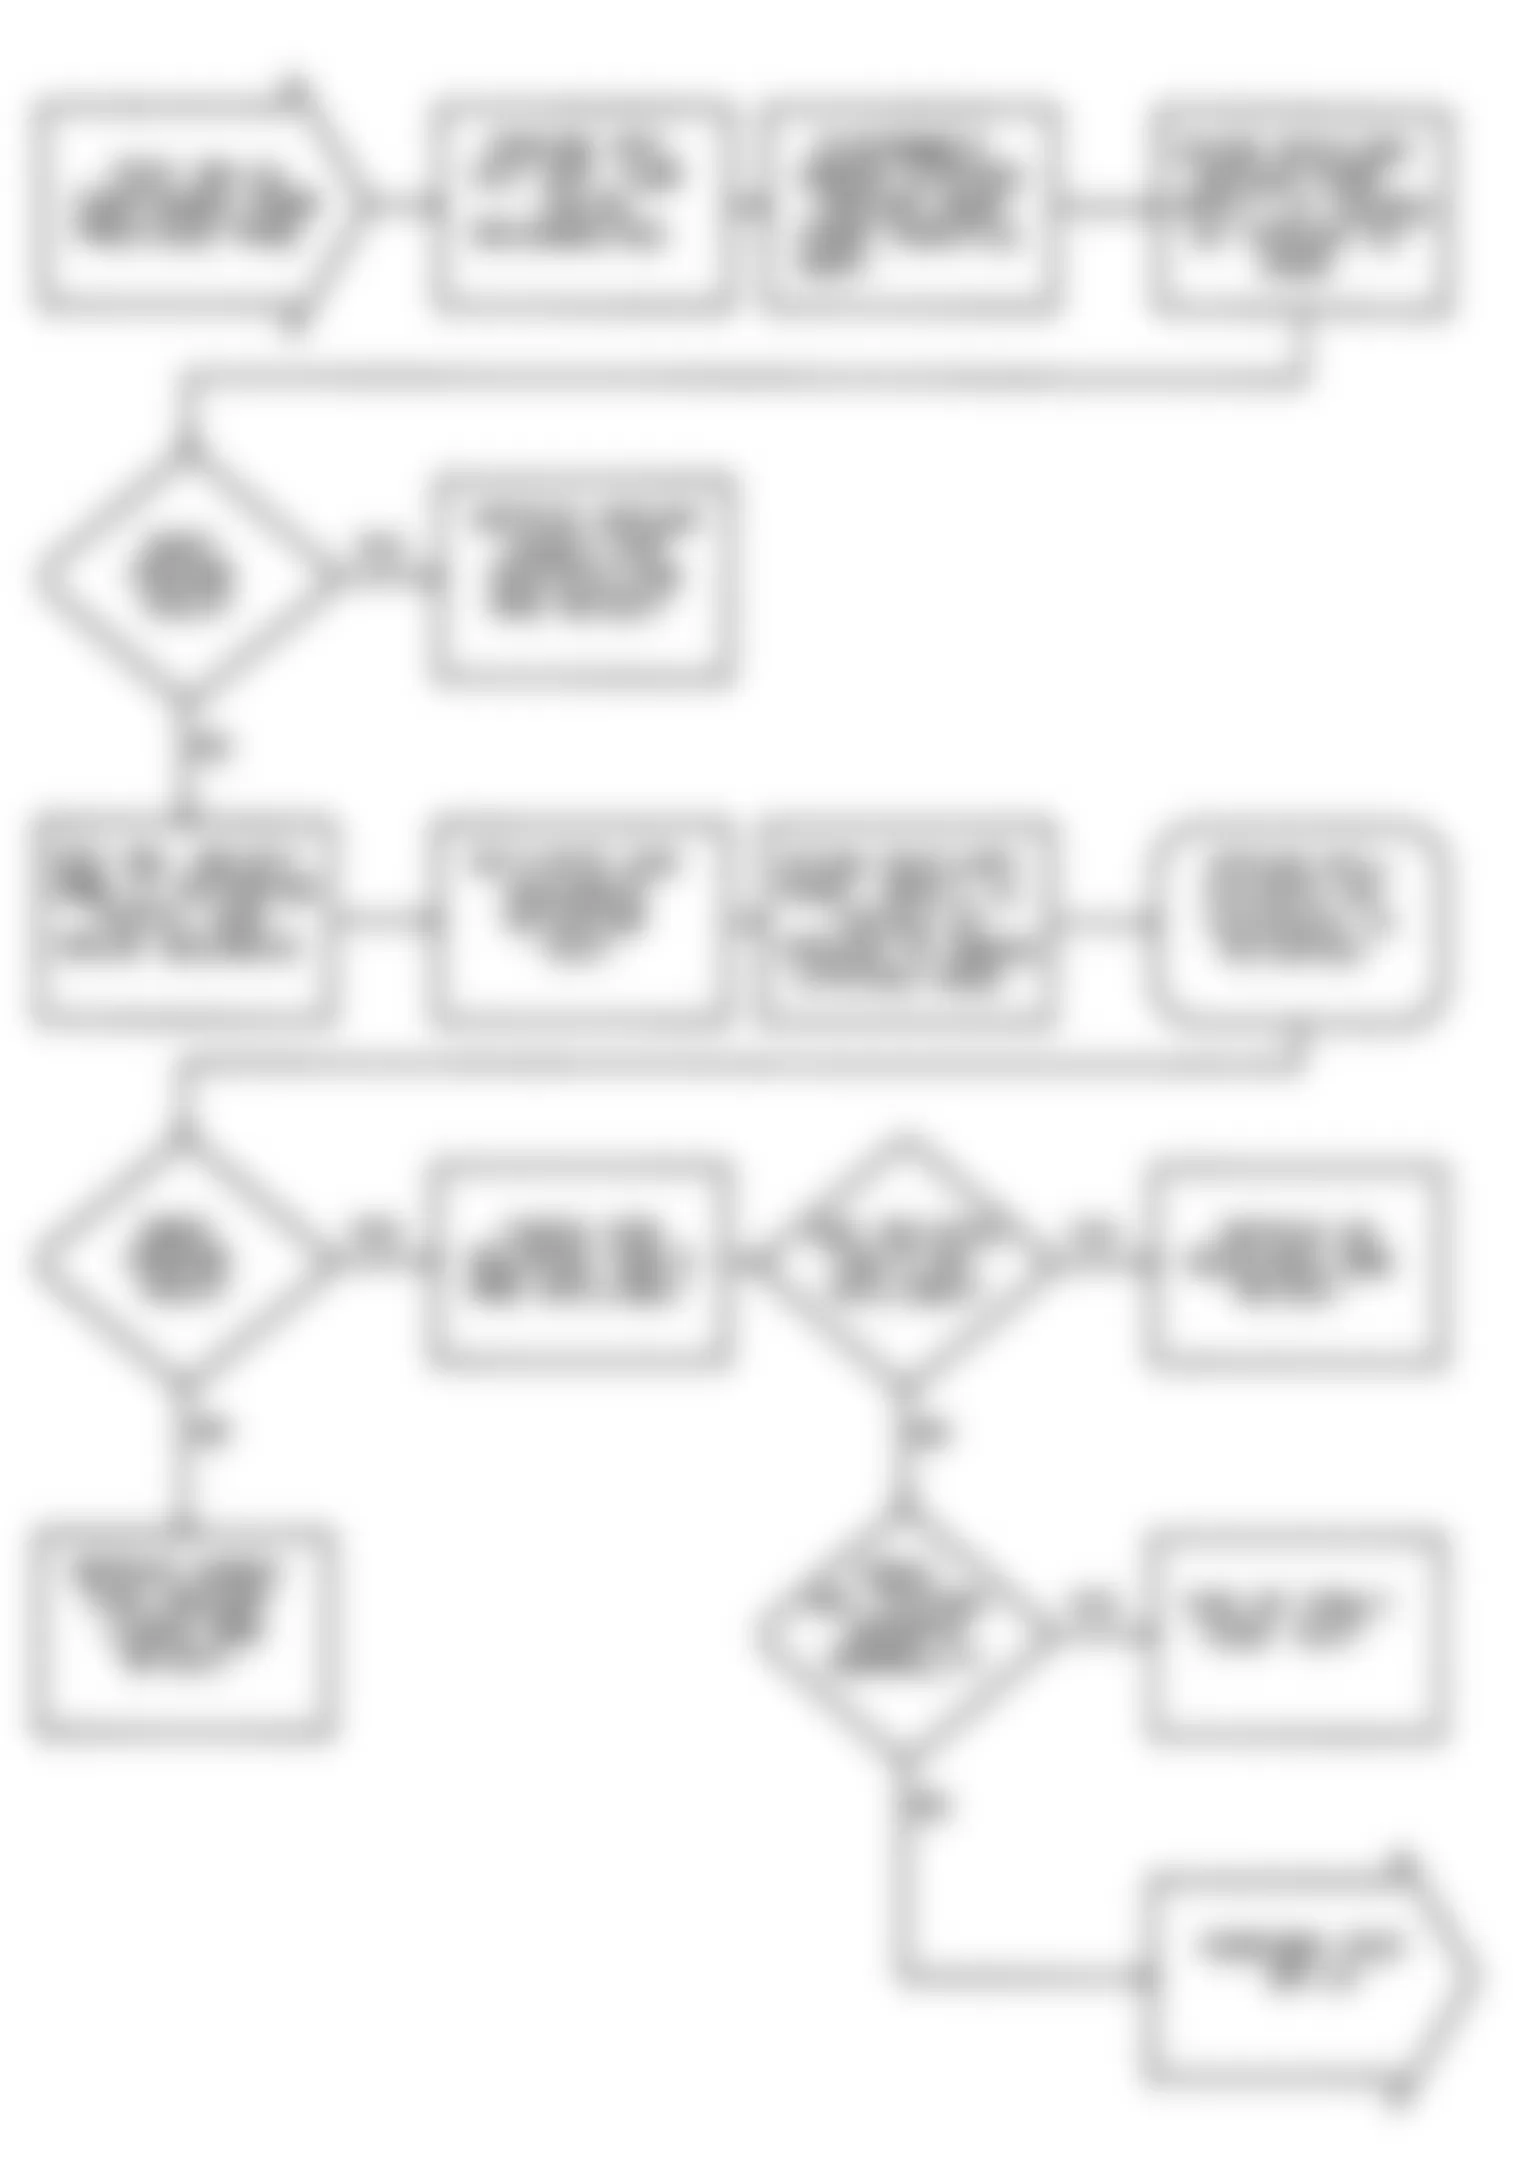
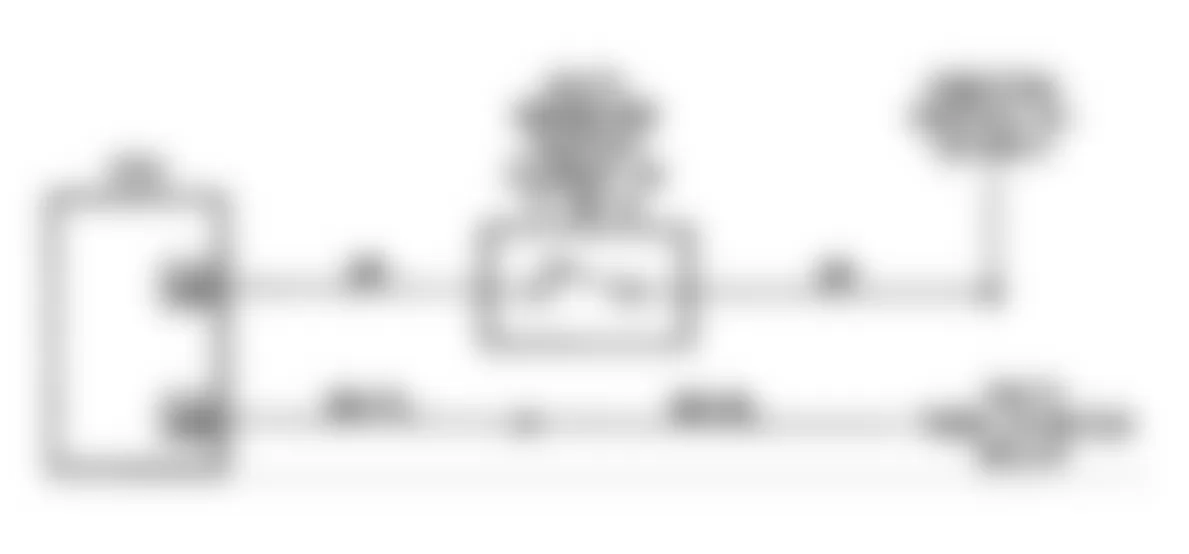
Fig. 21: Dodge Colt GL 1992 - Component Locations - No Start Test 6 Schematic Testing Control Relay

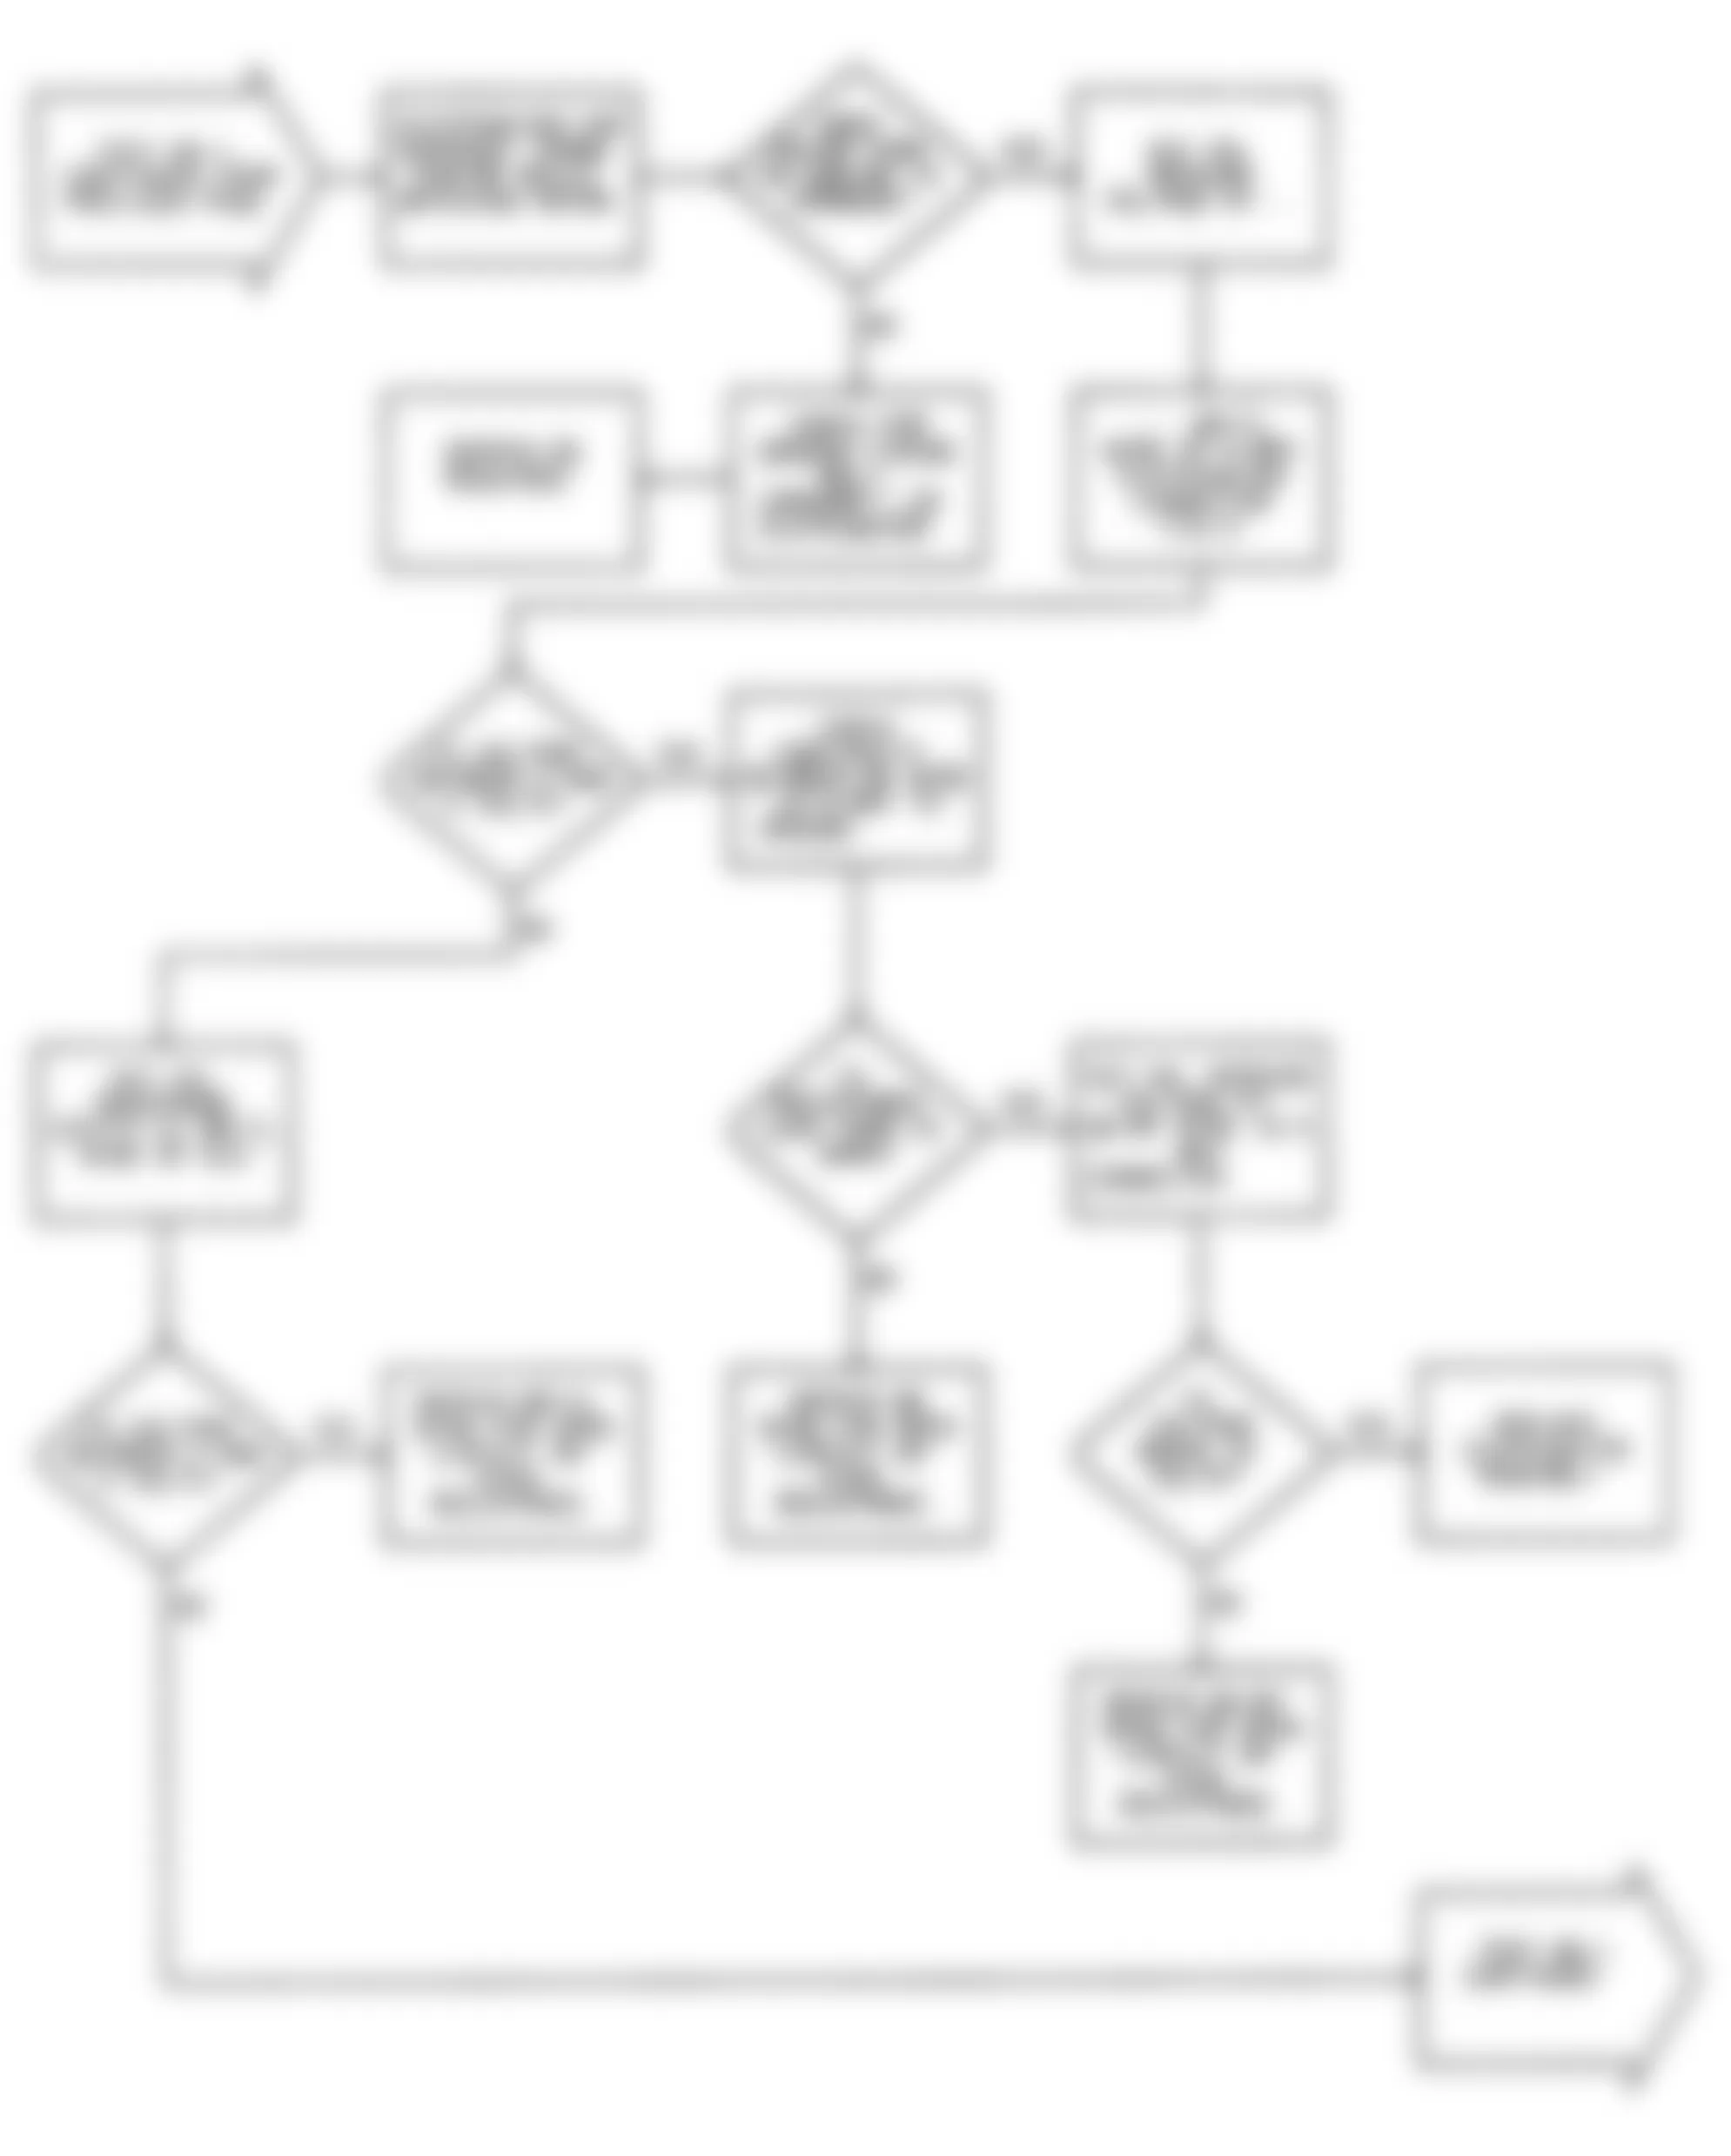
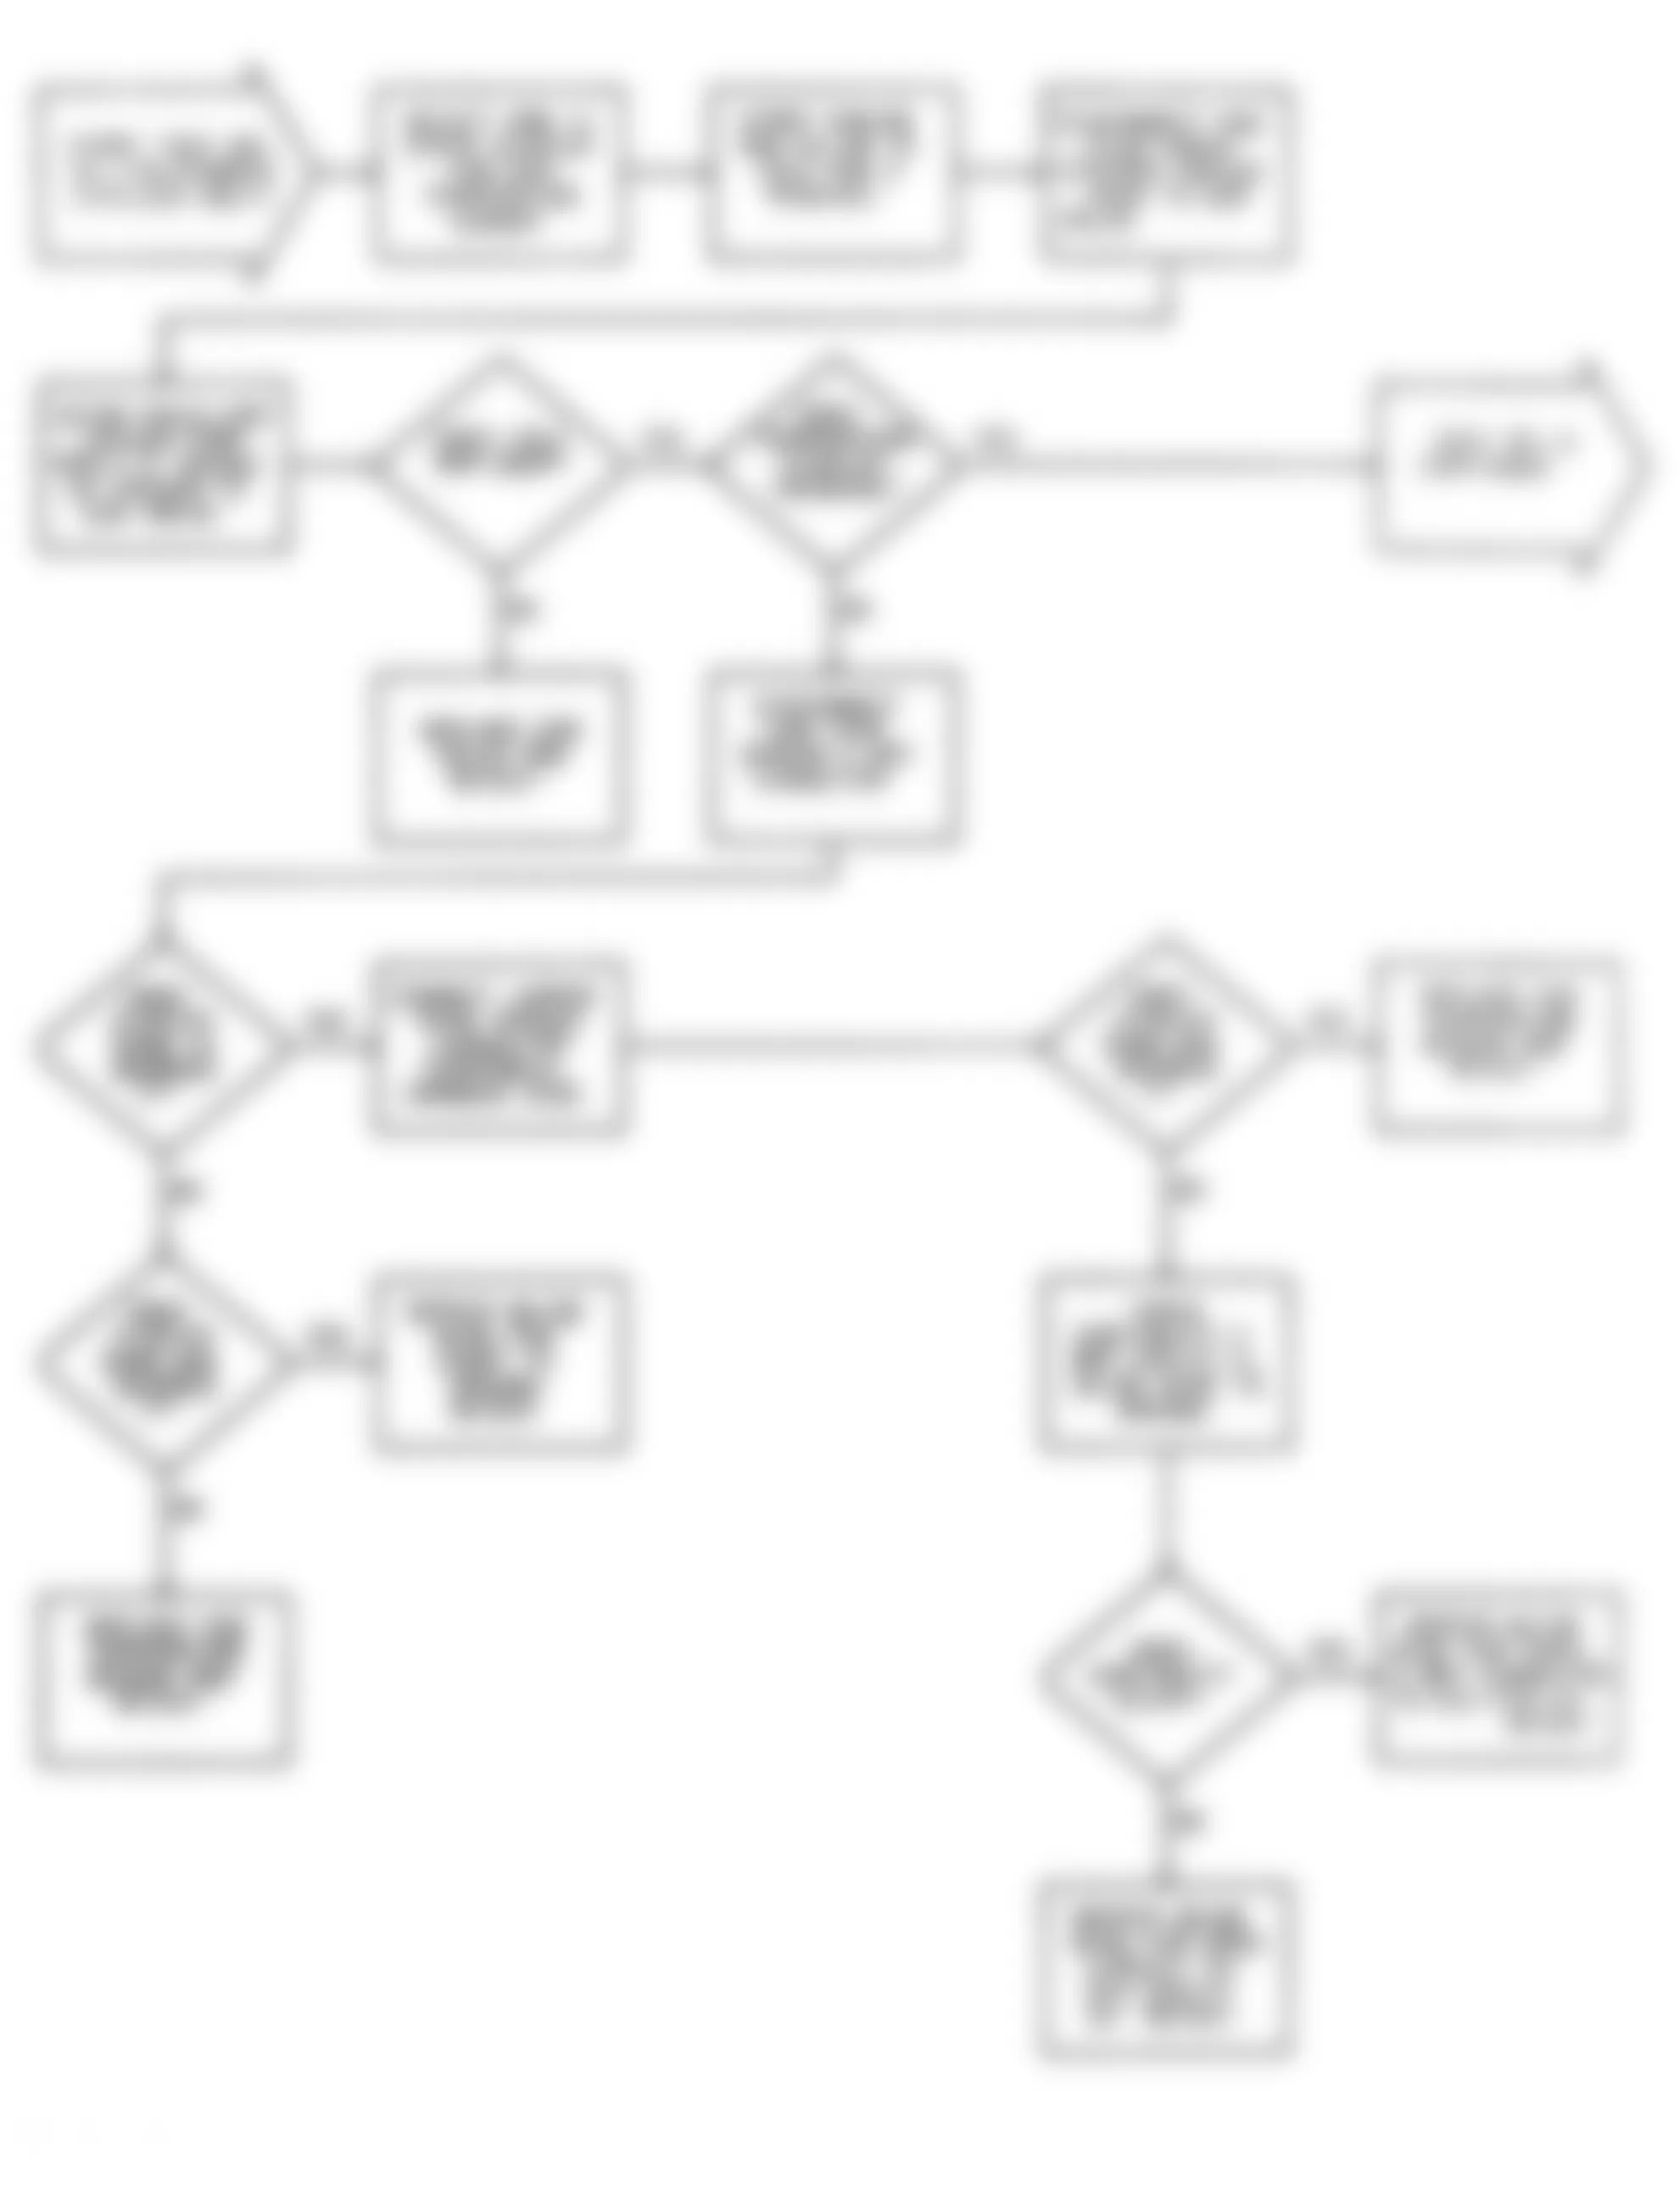
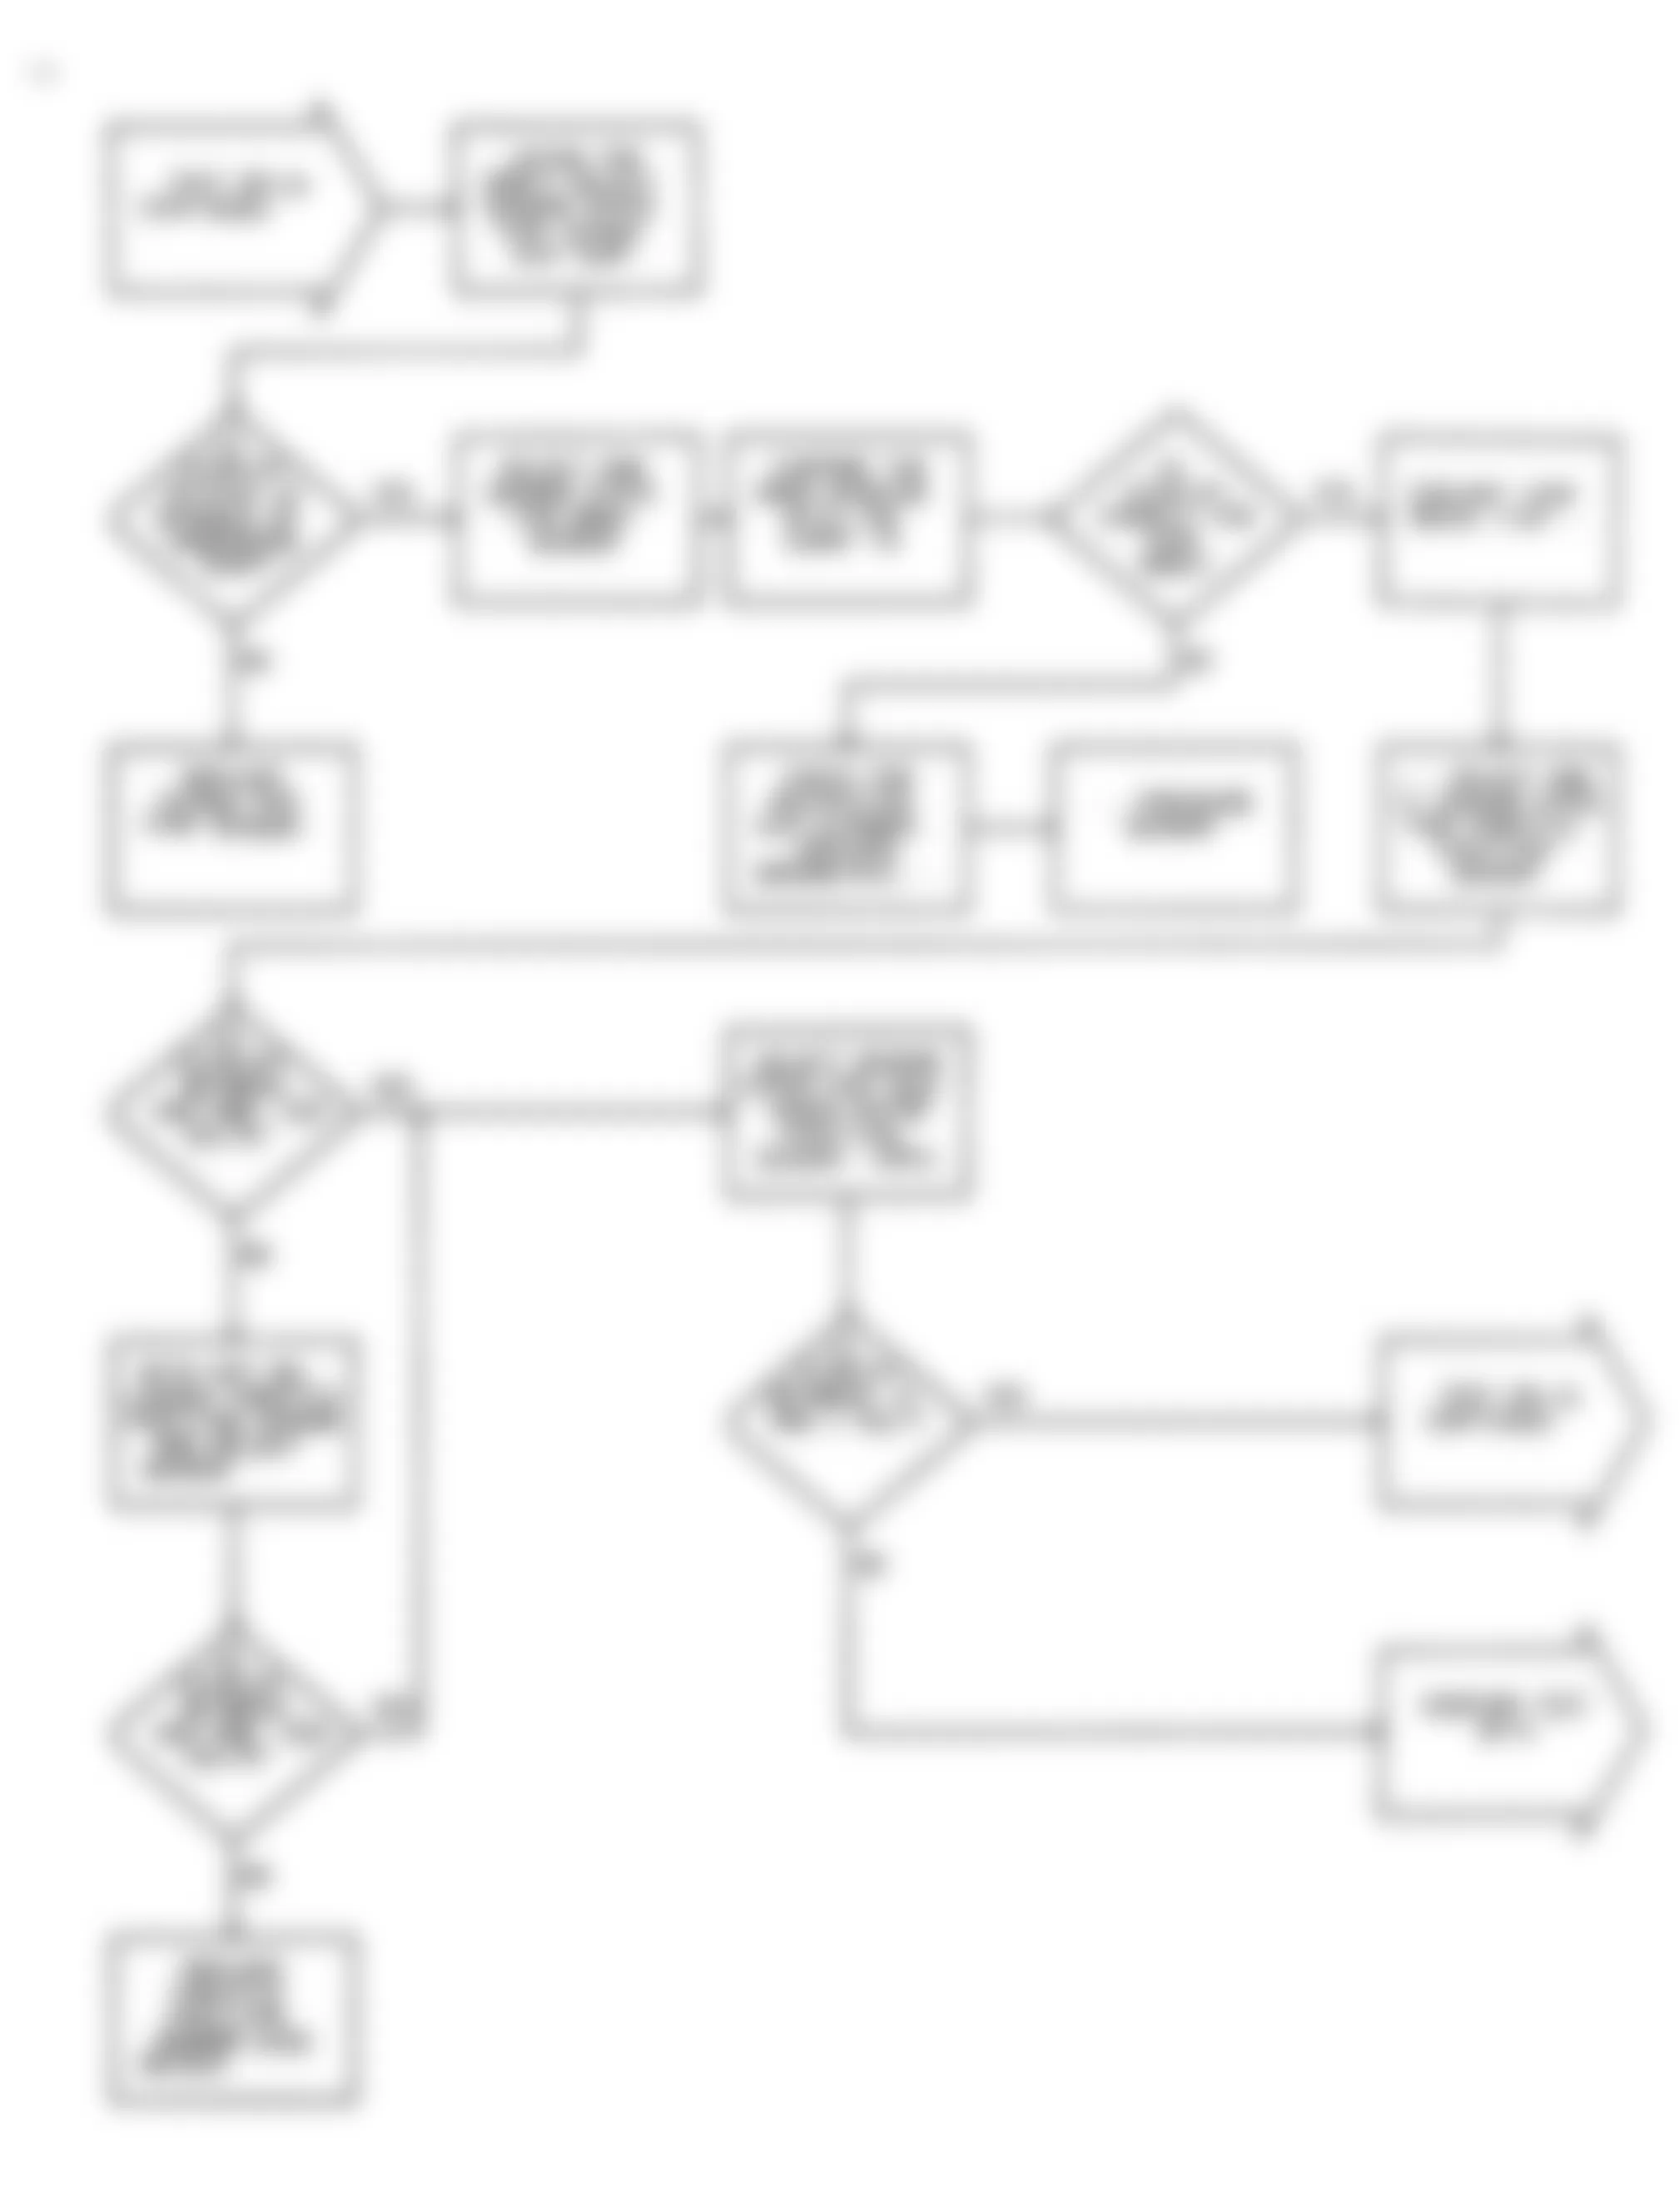
Fig. 22: Dodge Colt GL 1992 - Component Locations - No Start Test 6 Flow Chart Testing Control Relay
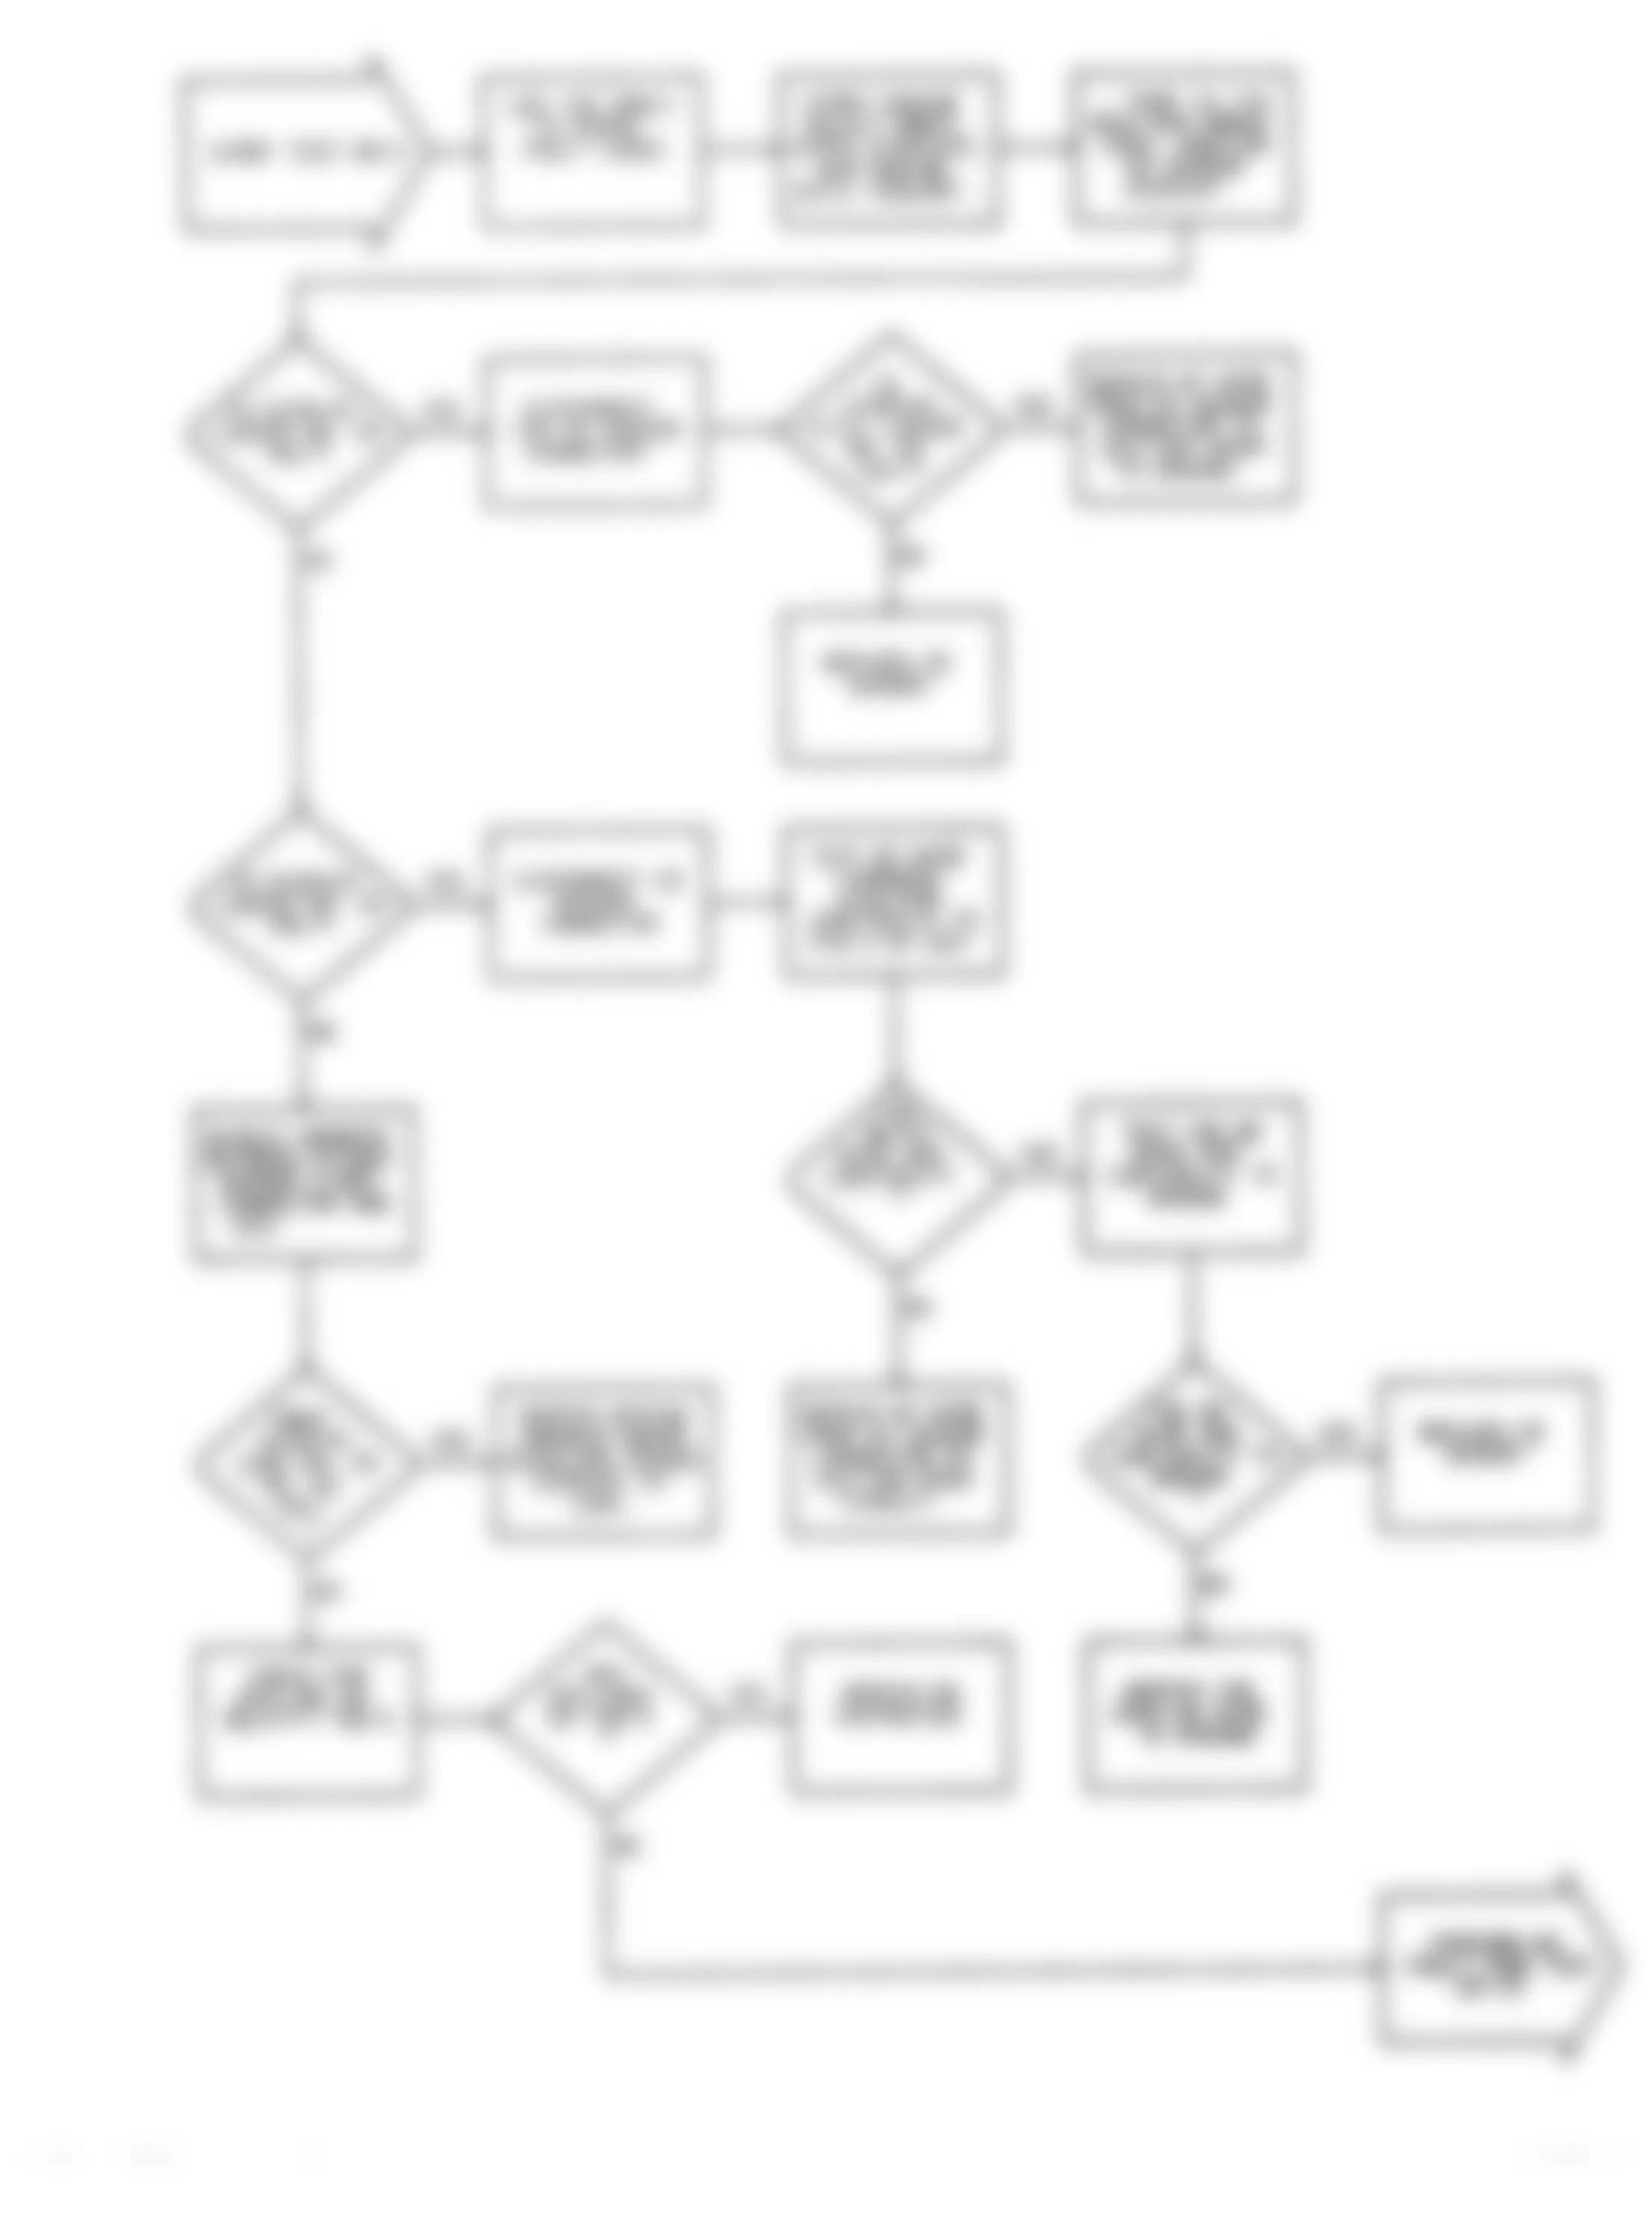
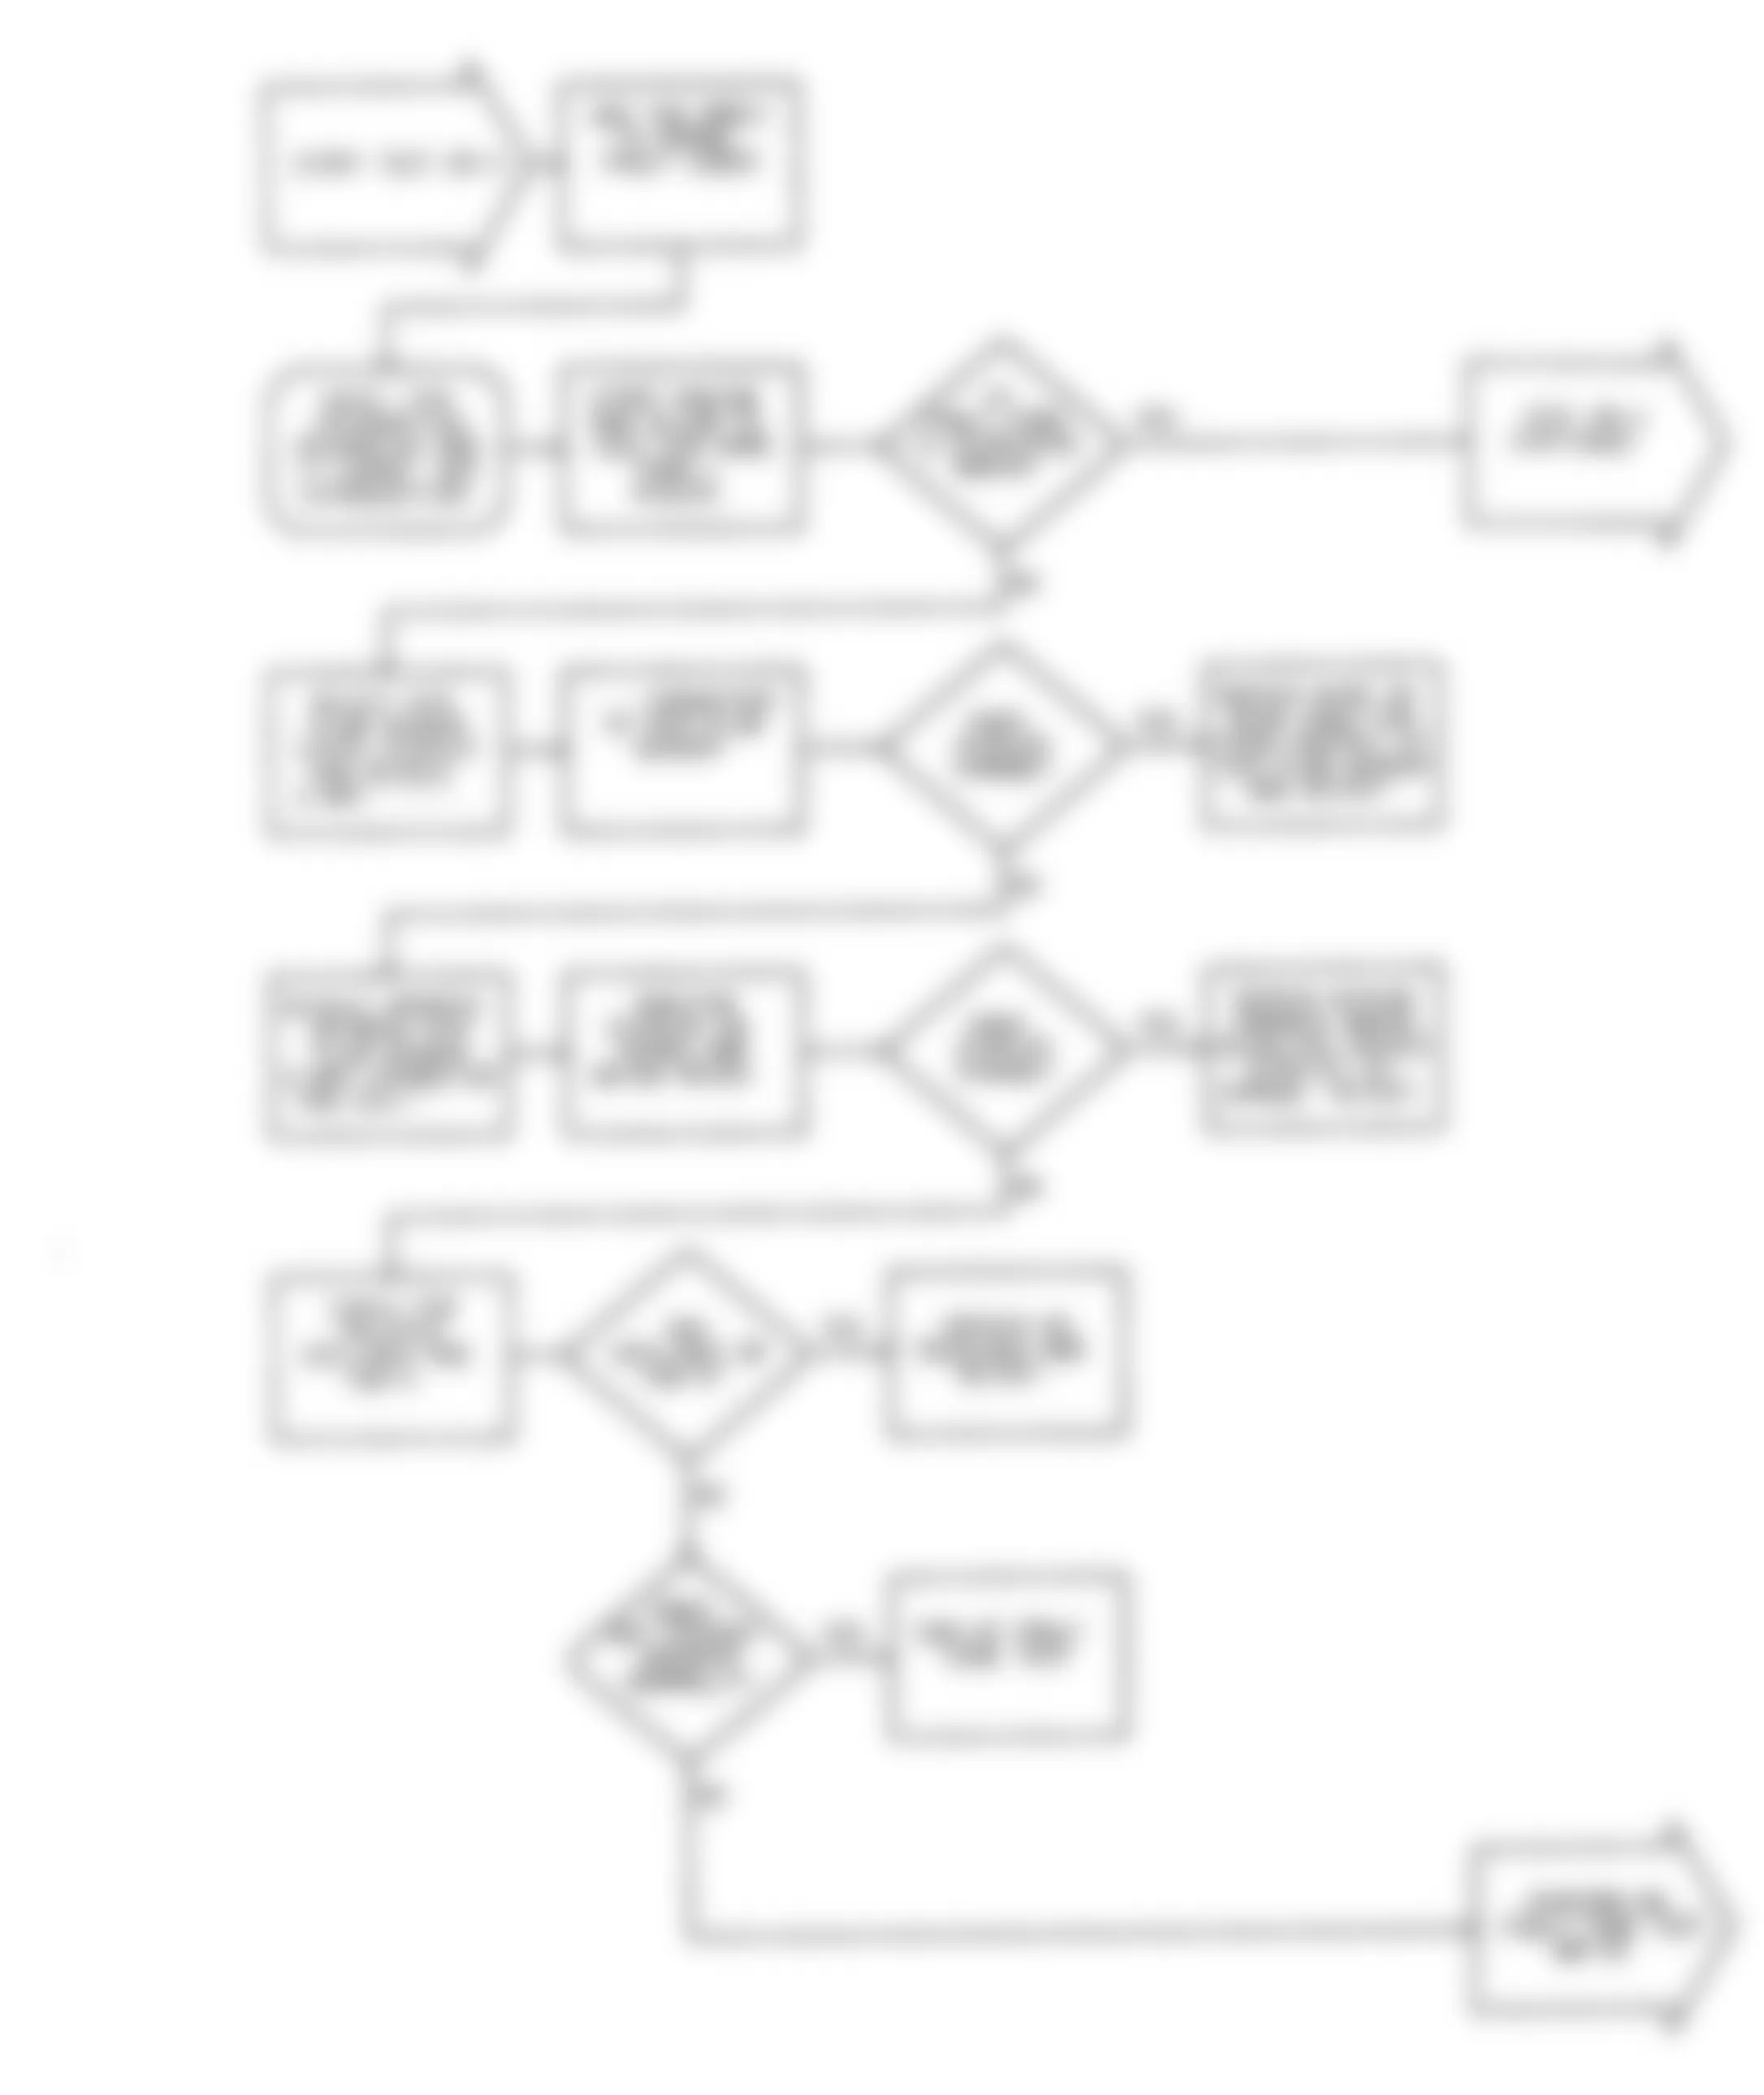
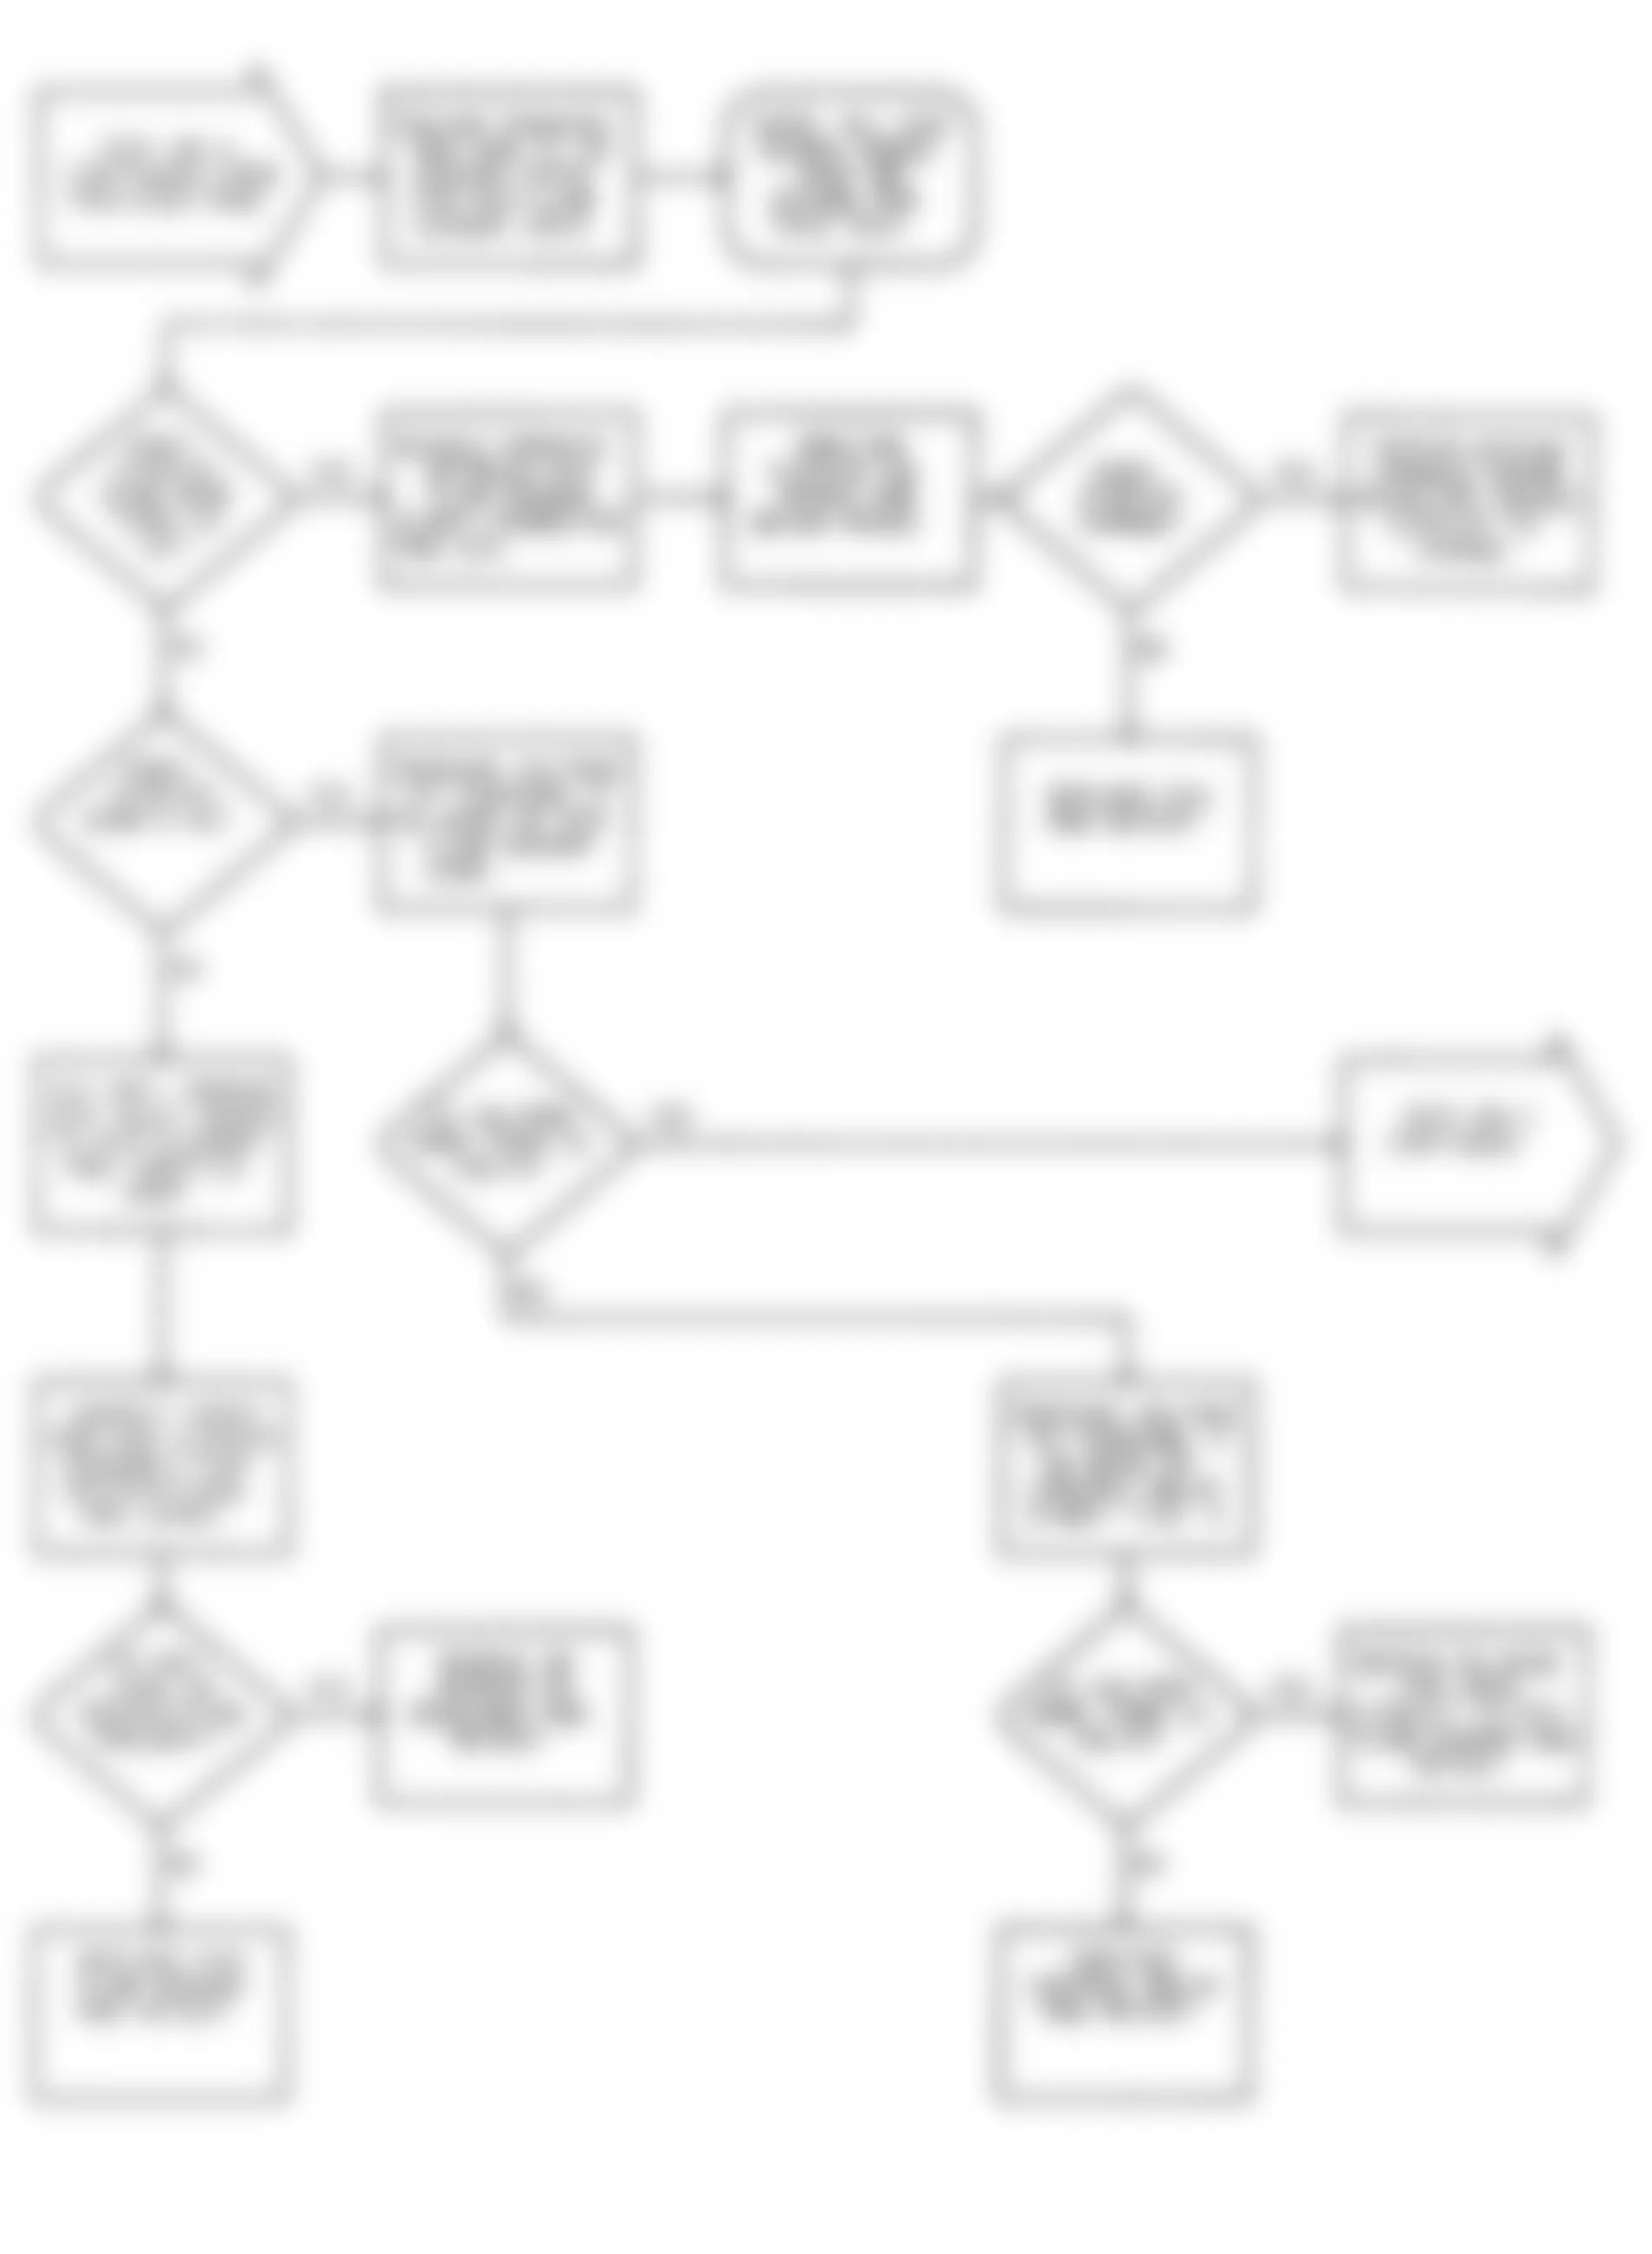
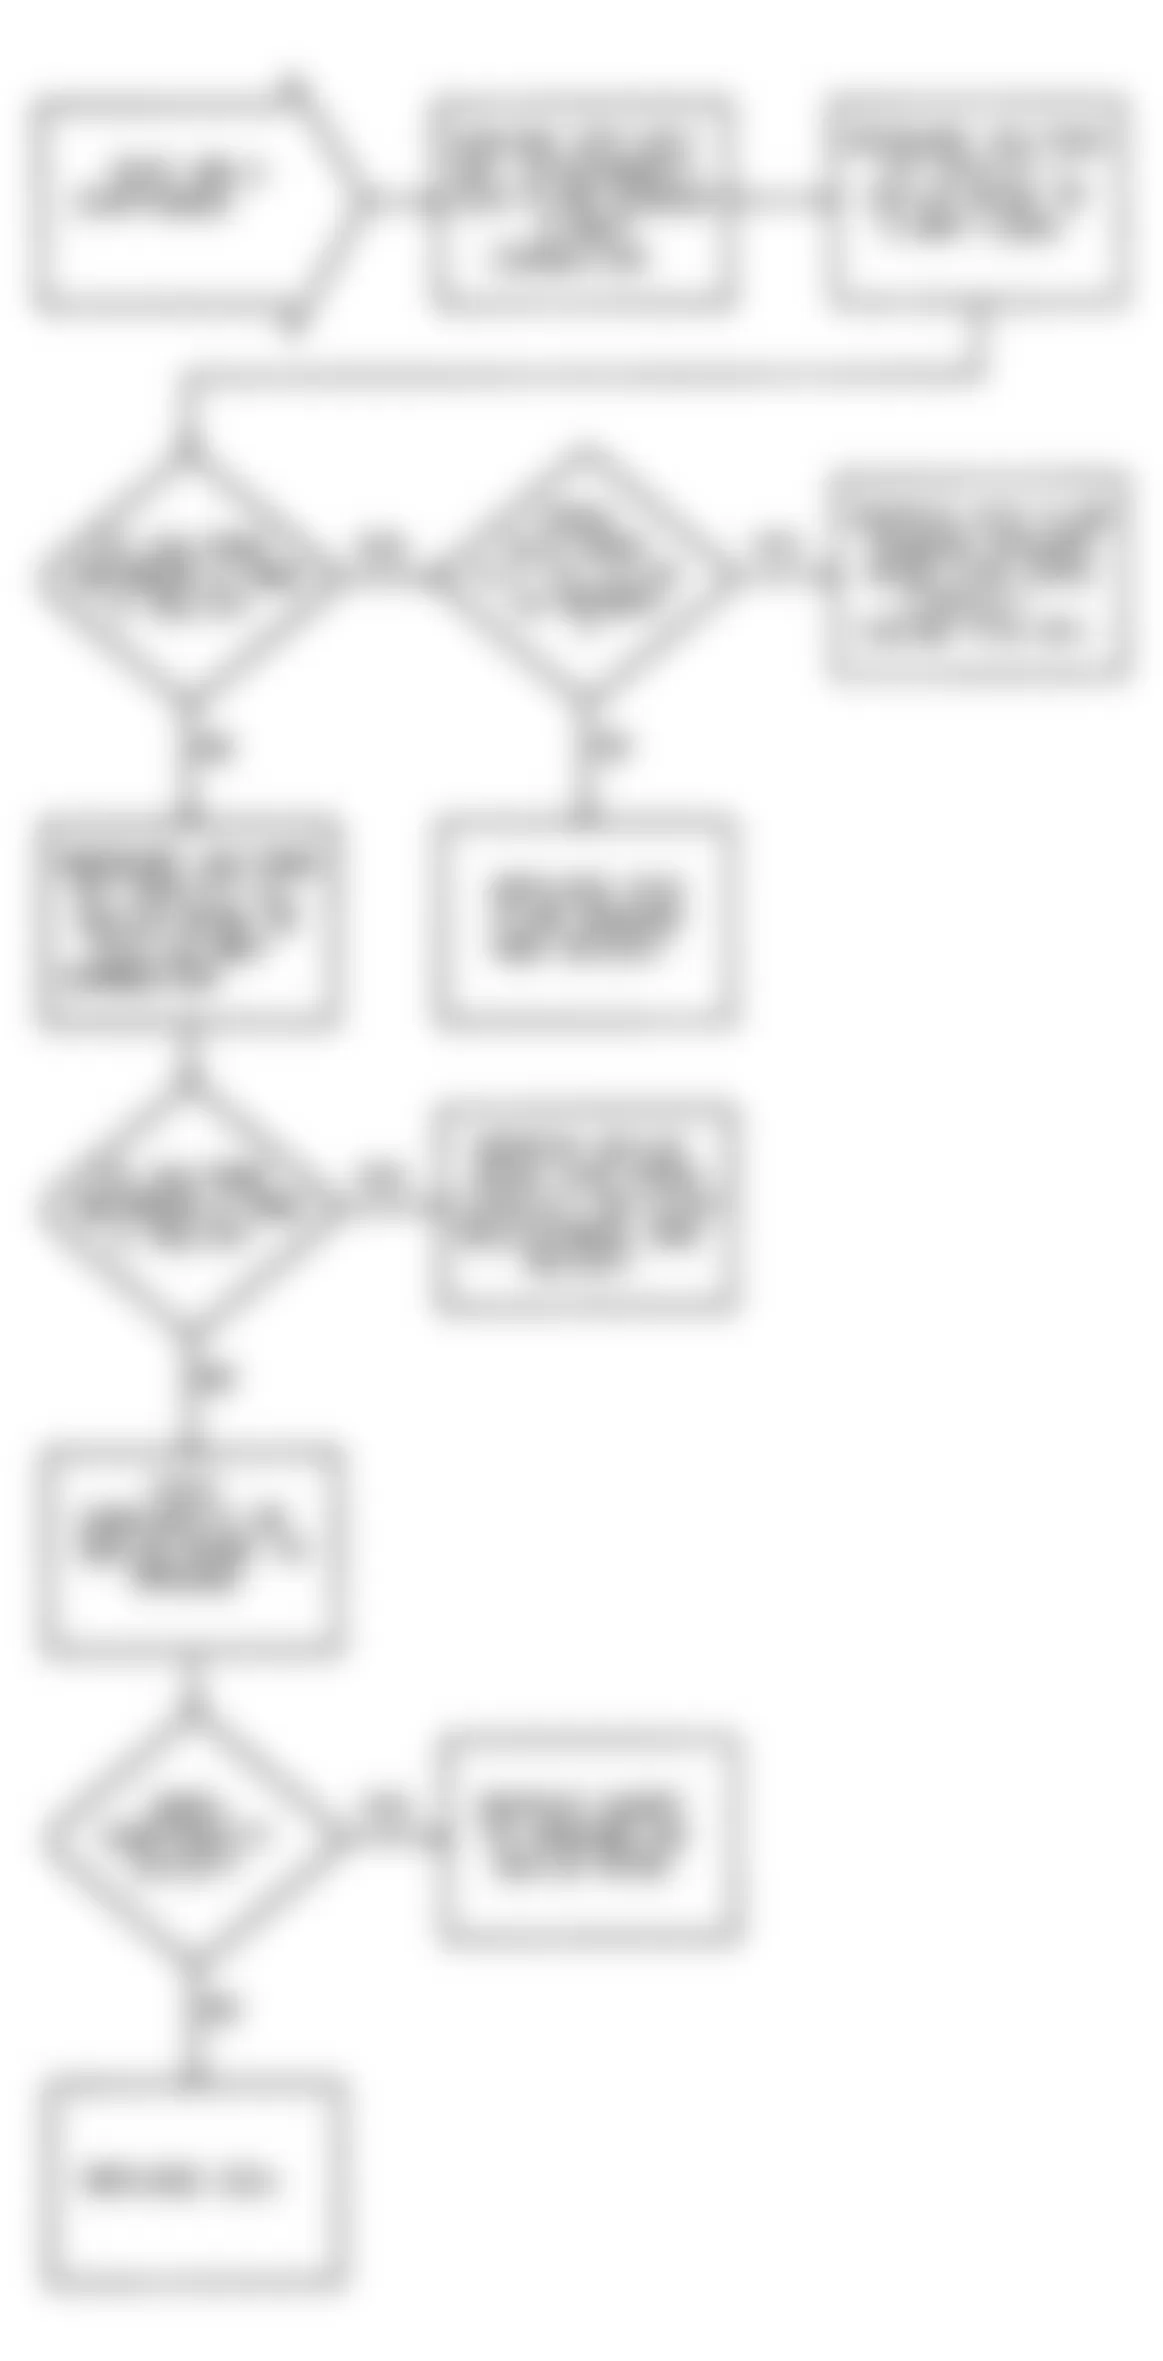
Dodge Colt GL 1992 - DR-1: TESTING FOR MPI SYSTEM FAULT CODES
Fig. 23: Dodge Colt GL 1992 - Component Locations - DR-1 Test Schematic MPI System Fault Codes

Dodge Colt GL 1992 - DR-2: TESTING OXYGEN SENSOR CIRCUIT
Dodge Colt GL 1992 - DR-3: TESTING AIRFLOW SENSOR CIRCUIT

Dodge Colt GL 1992 - DR-4: TESTING INTAKE AIR TEMP. SENSOR CIRCUIT

Dodge Colt GL 1992 - DR-5: TESTING THROTTLE POSITION SENSOR CIRCUIT

Dodge Colt GL 1992 - DR-6: TESTING MOTOR POSITION SENSOR

Dodge Colt GL 1992 - DR-7: TESTING COOLANT SENSOR
Fig. 40: Dodge Colt GL 1992 - Component Locations - DR-7 Test Schematic Testing Coolant Sensor

Dodge Colt GL 1992 - DR-8: TESTING DIAGNOSTIC CONNECTOR
Fig. 43: Dodge Colt GL 1992 - Component Locations - DR-8 Test Schematic Testing Diagnostic Connector
Dodge Colt GL 1992 - DR-9: TESTING TOP DEAD CENTER SENSOR CIRCUIT

Dodge Colt GL 1992 - DR-10: TESTING SPEED SENSOR CIRCUIT

Dodge Colt GL 1992 - DR-11: TESTING BAROMETRIC PRESSURE SENSOR

Dodge Colt GL 1992 - DR-12: TESTING INJECTOR CIRCUIT
Fig. 53: Dodge Colt GL 1992 - Component Locations - DR-12 Test Schematic Testing Injector Circuit
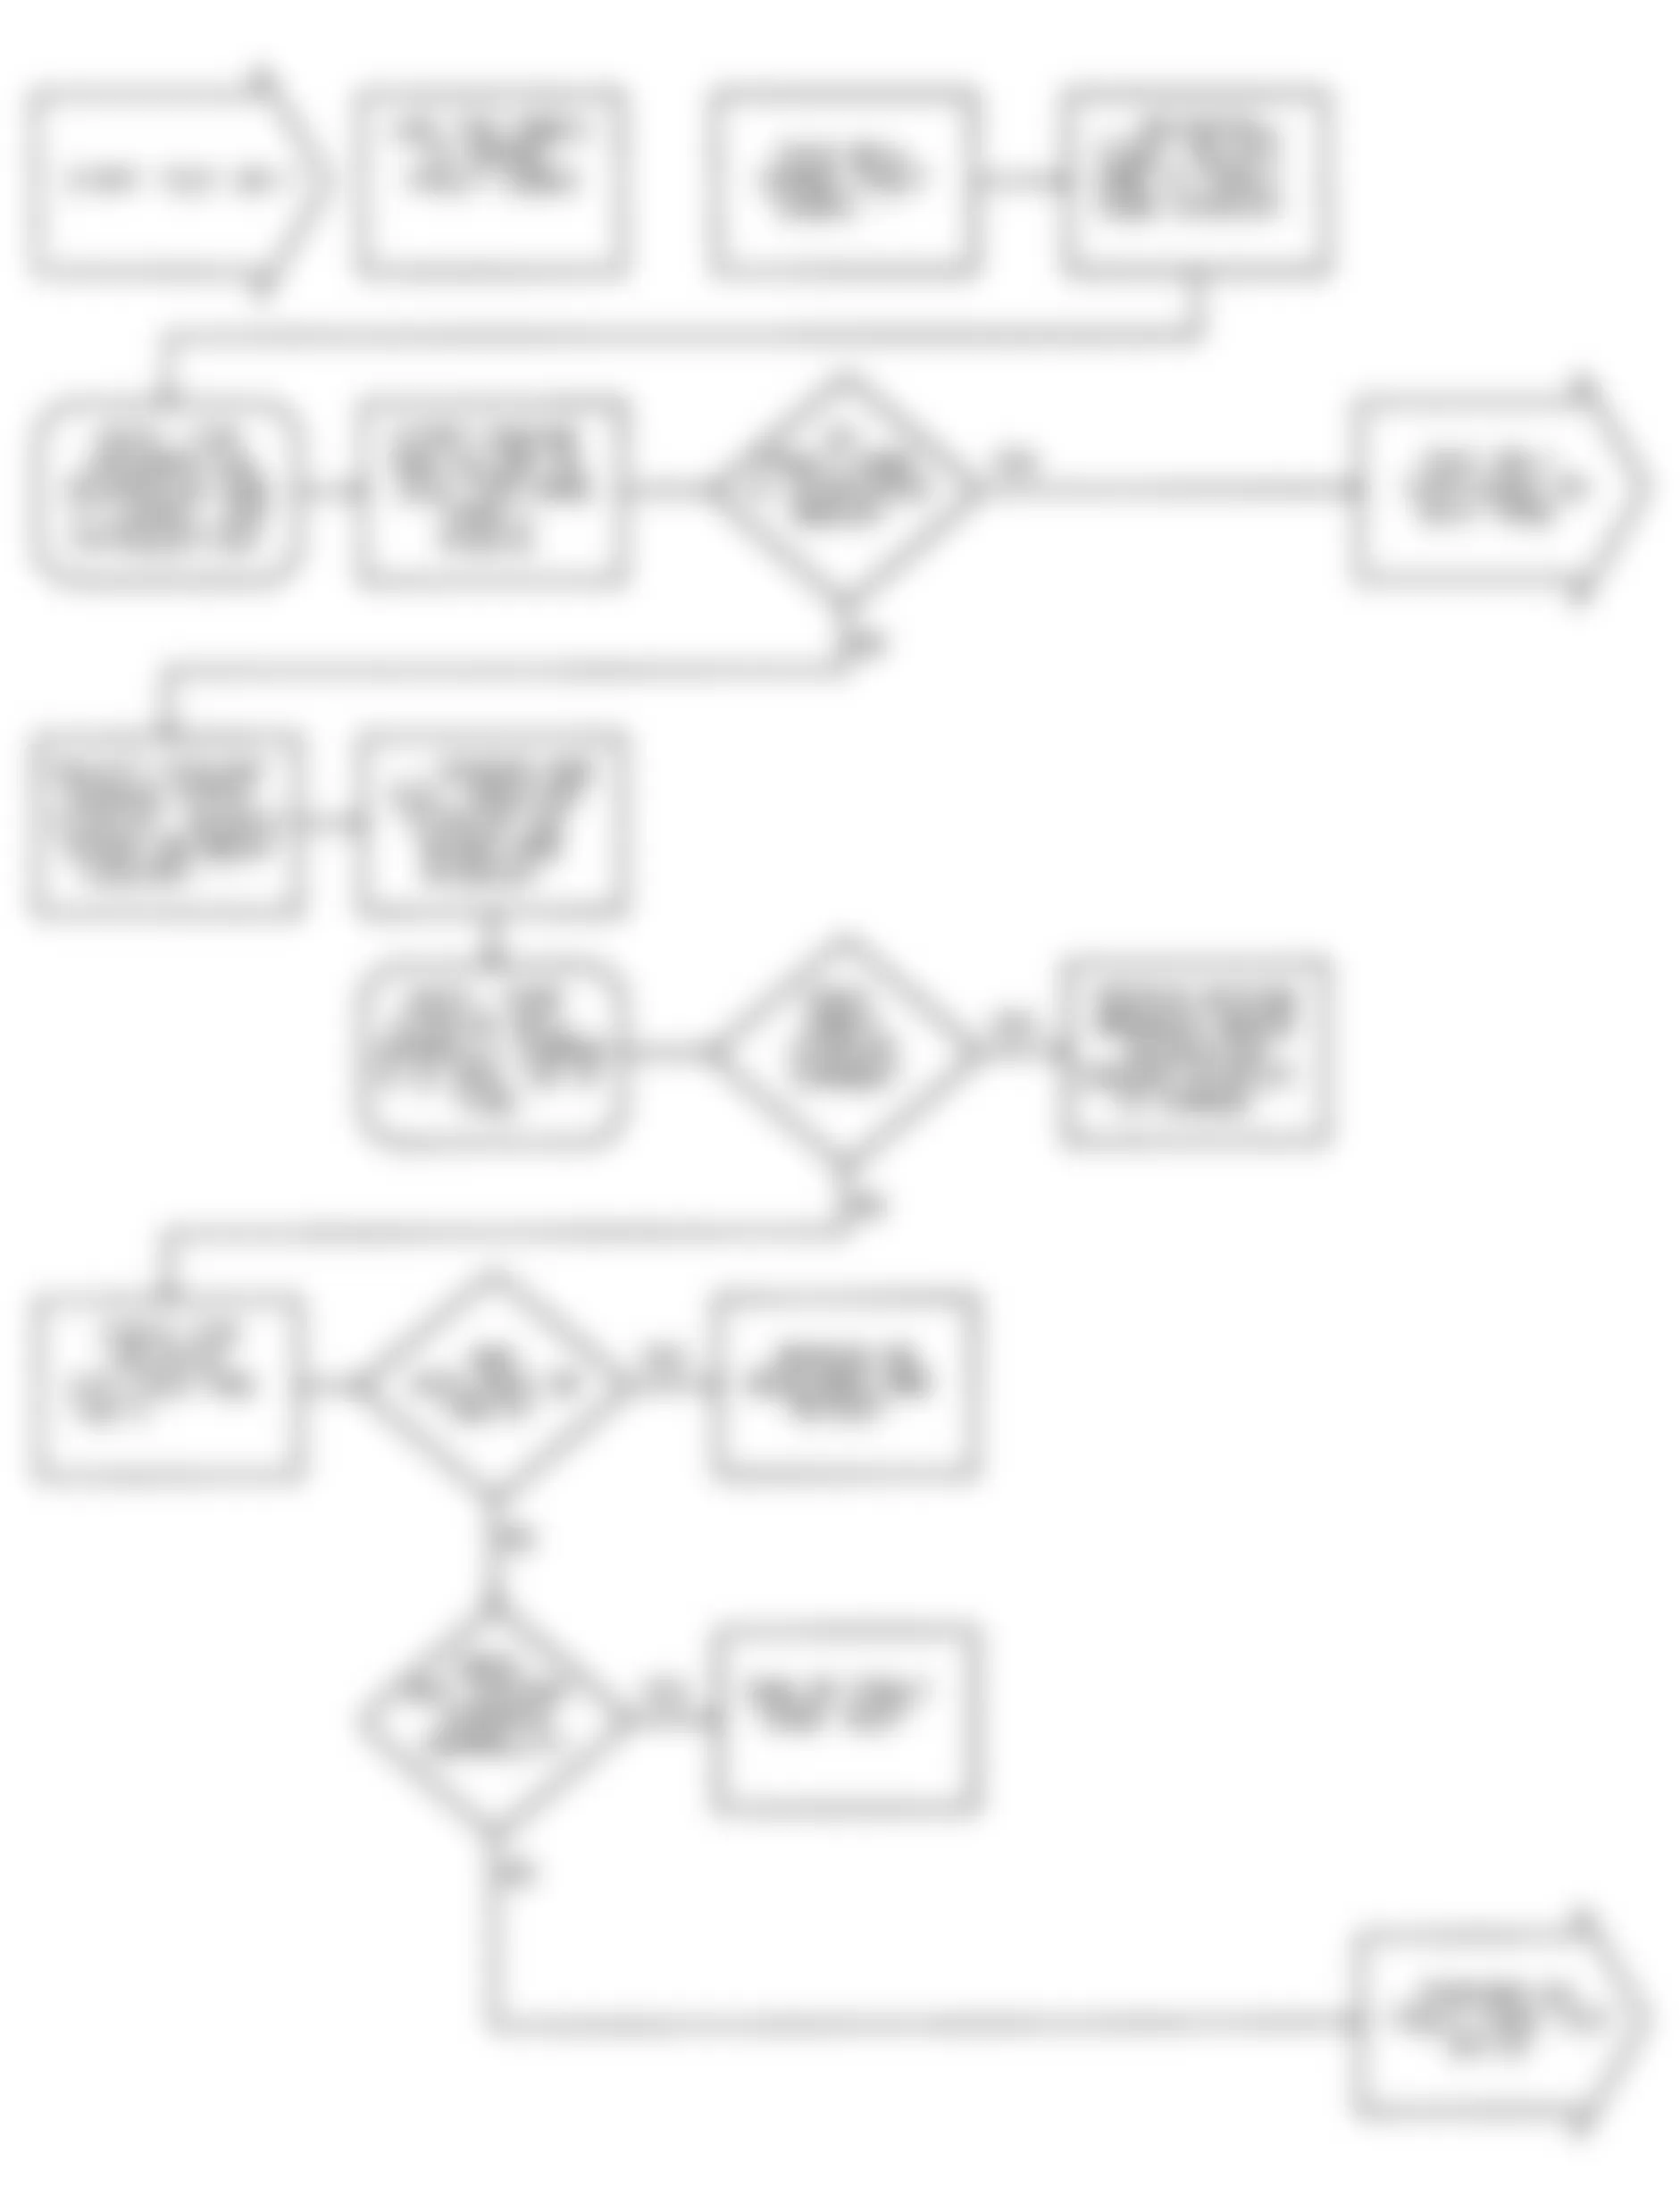
Dodge Colt GL 1992 - DR-13: TESTING FUEL PUMP CIRCUIT
Fig. 56: Dodge Colt GL 1992 - Component Locations - DR-13 Test Schematic Testing Fuel Pump Circuit

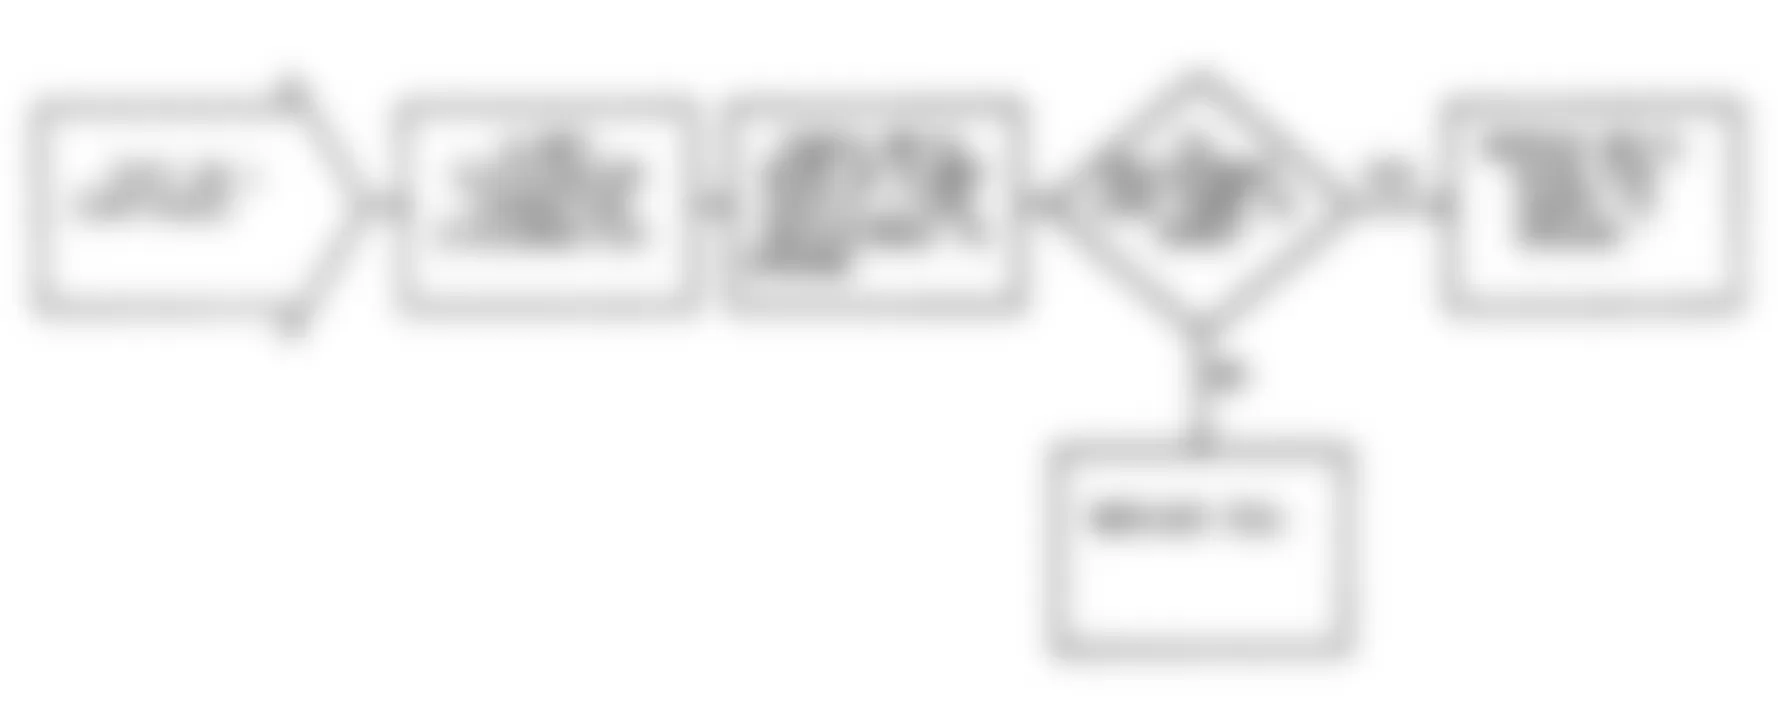
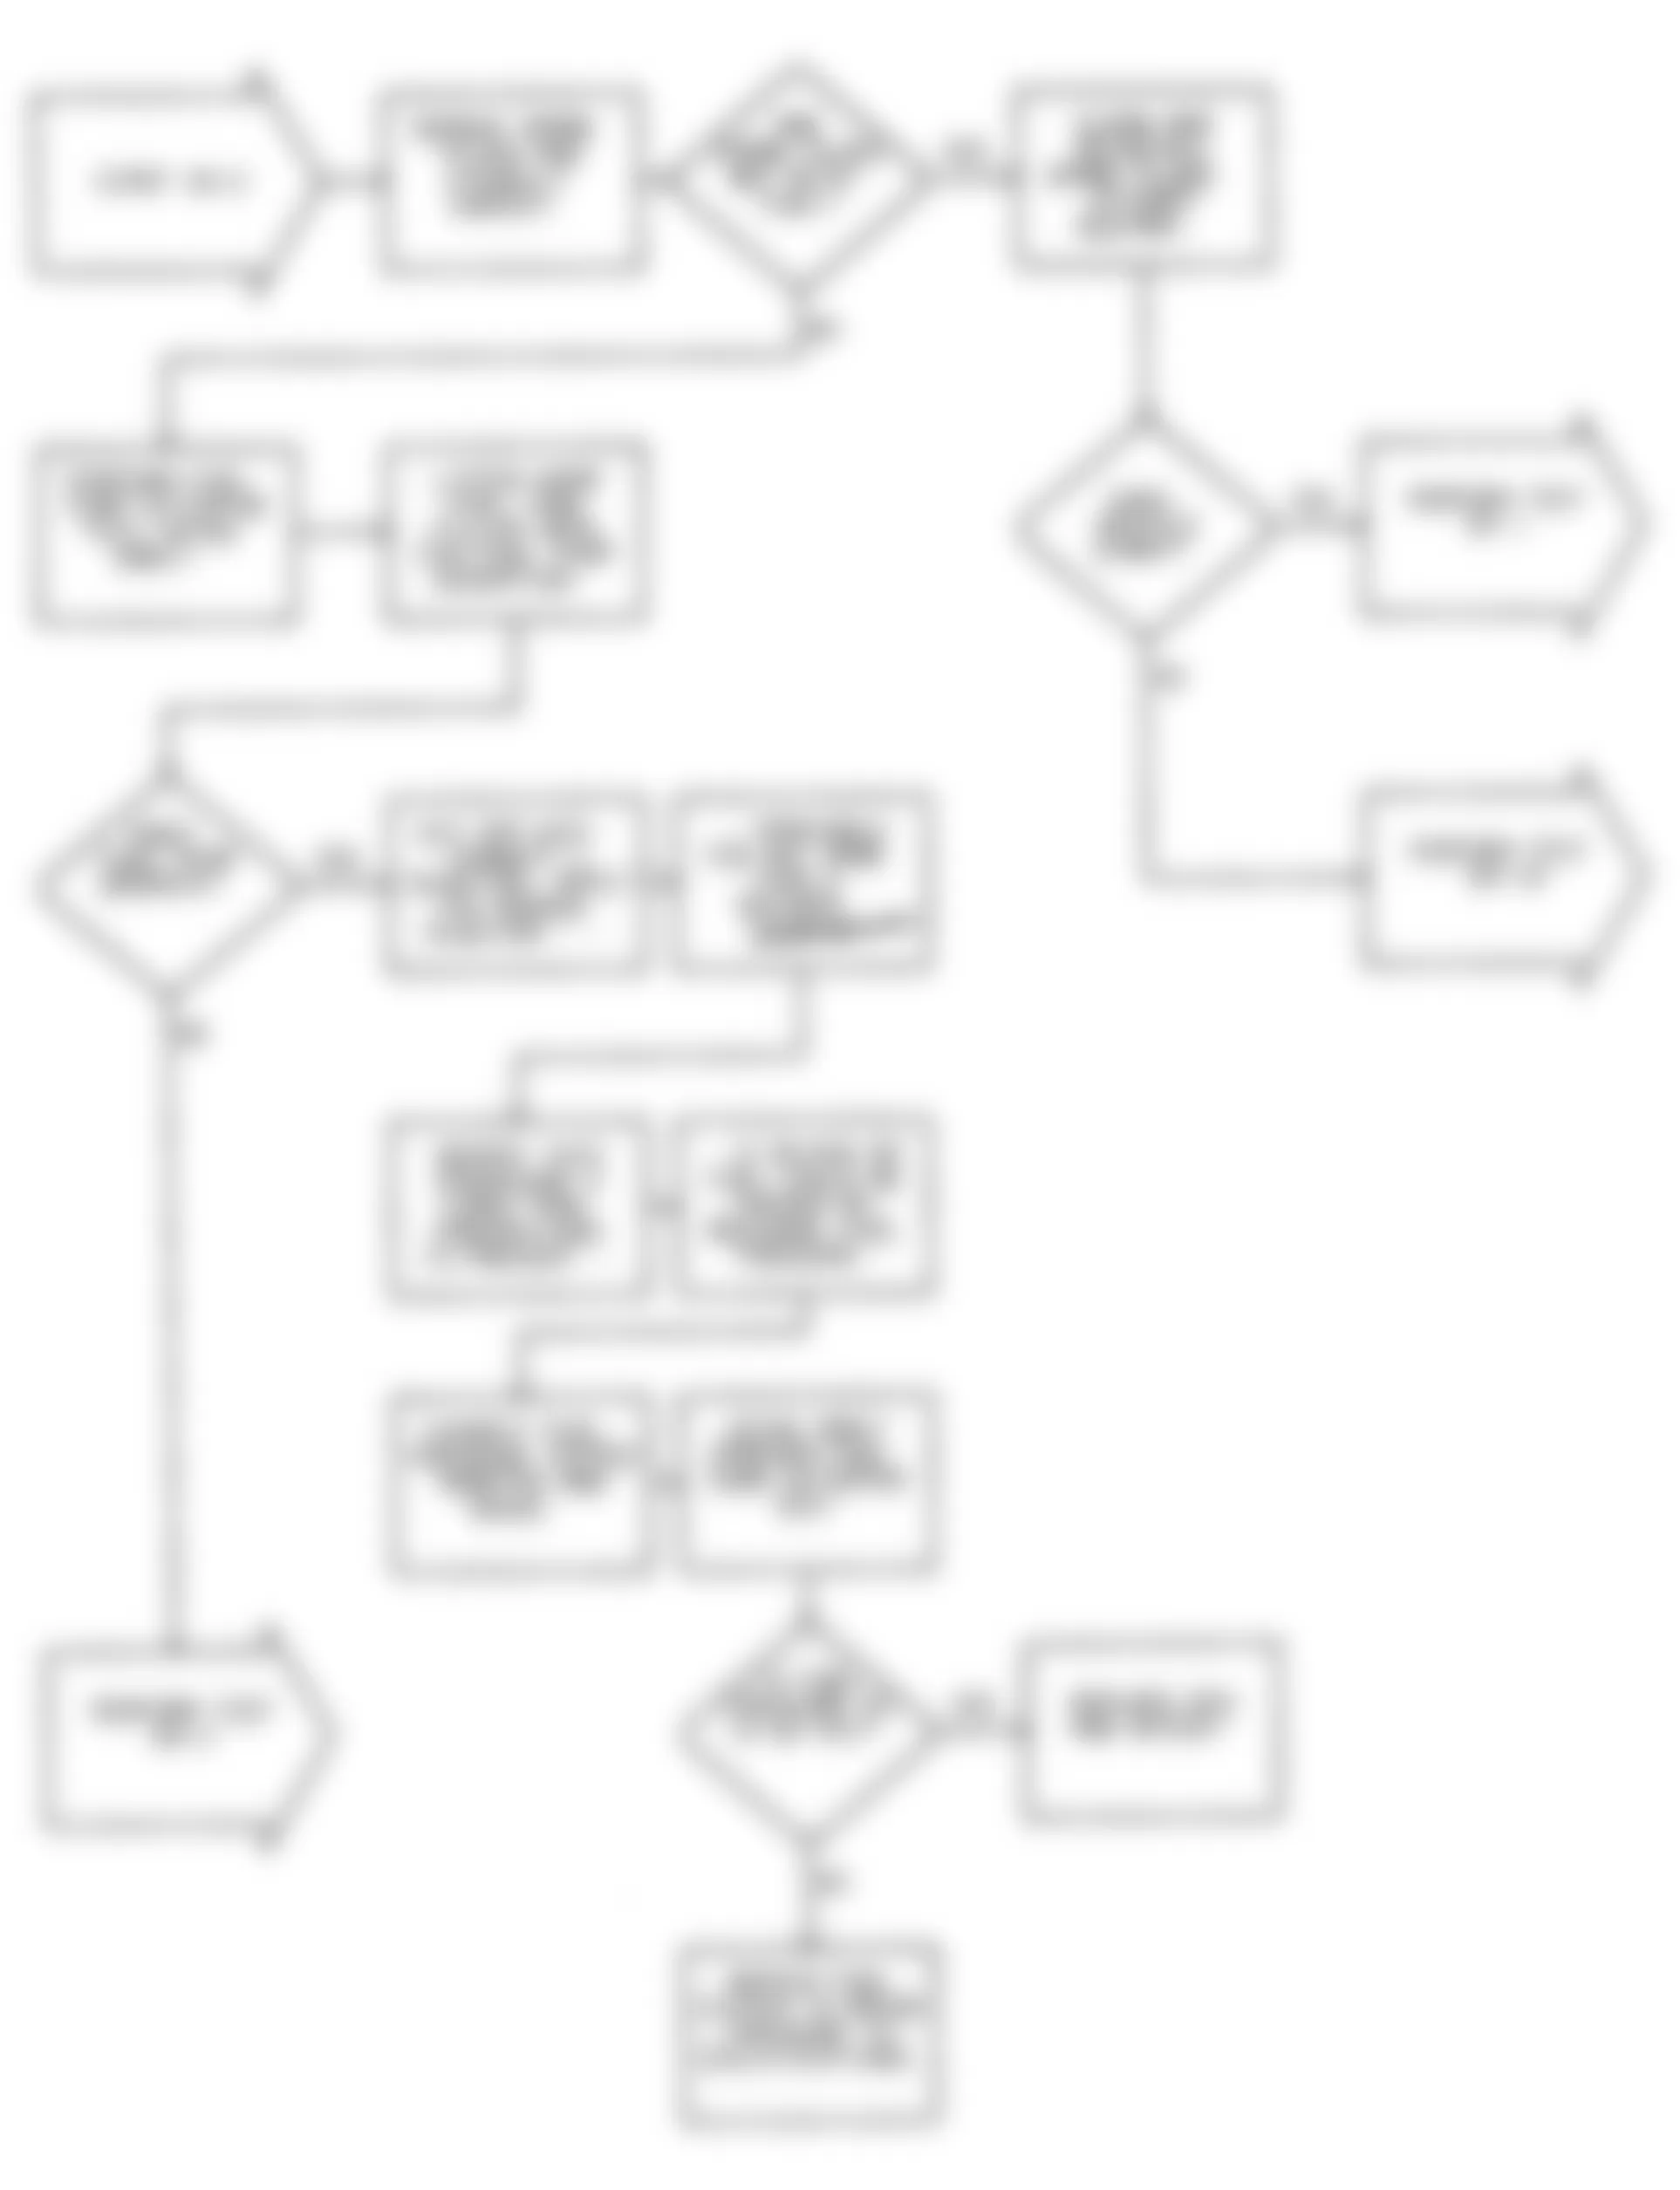
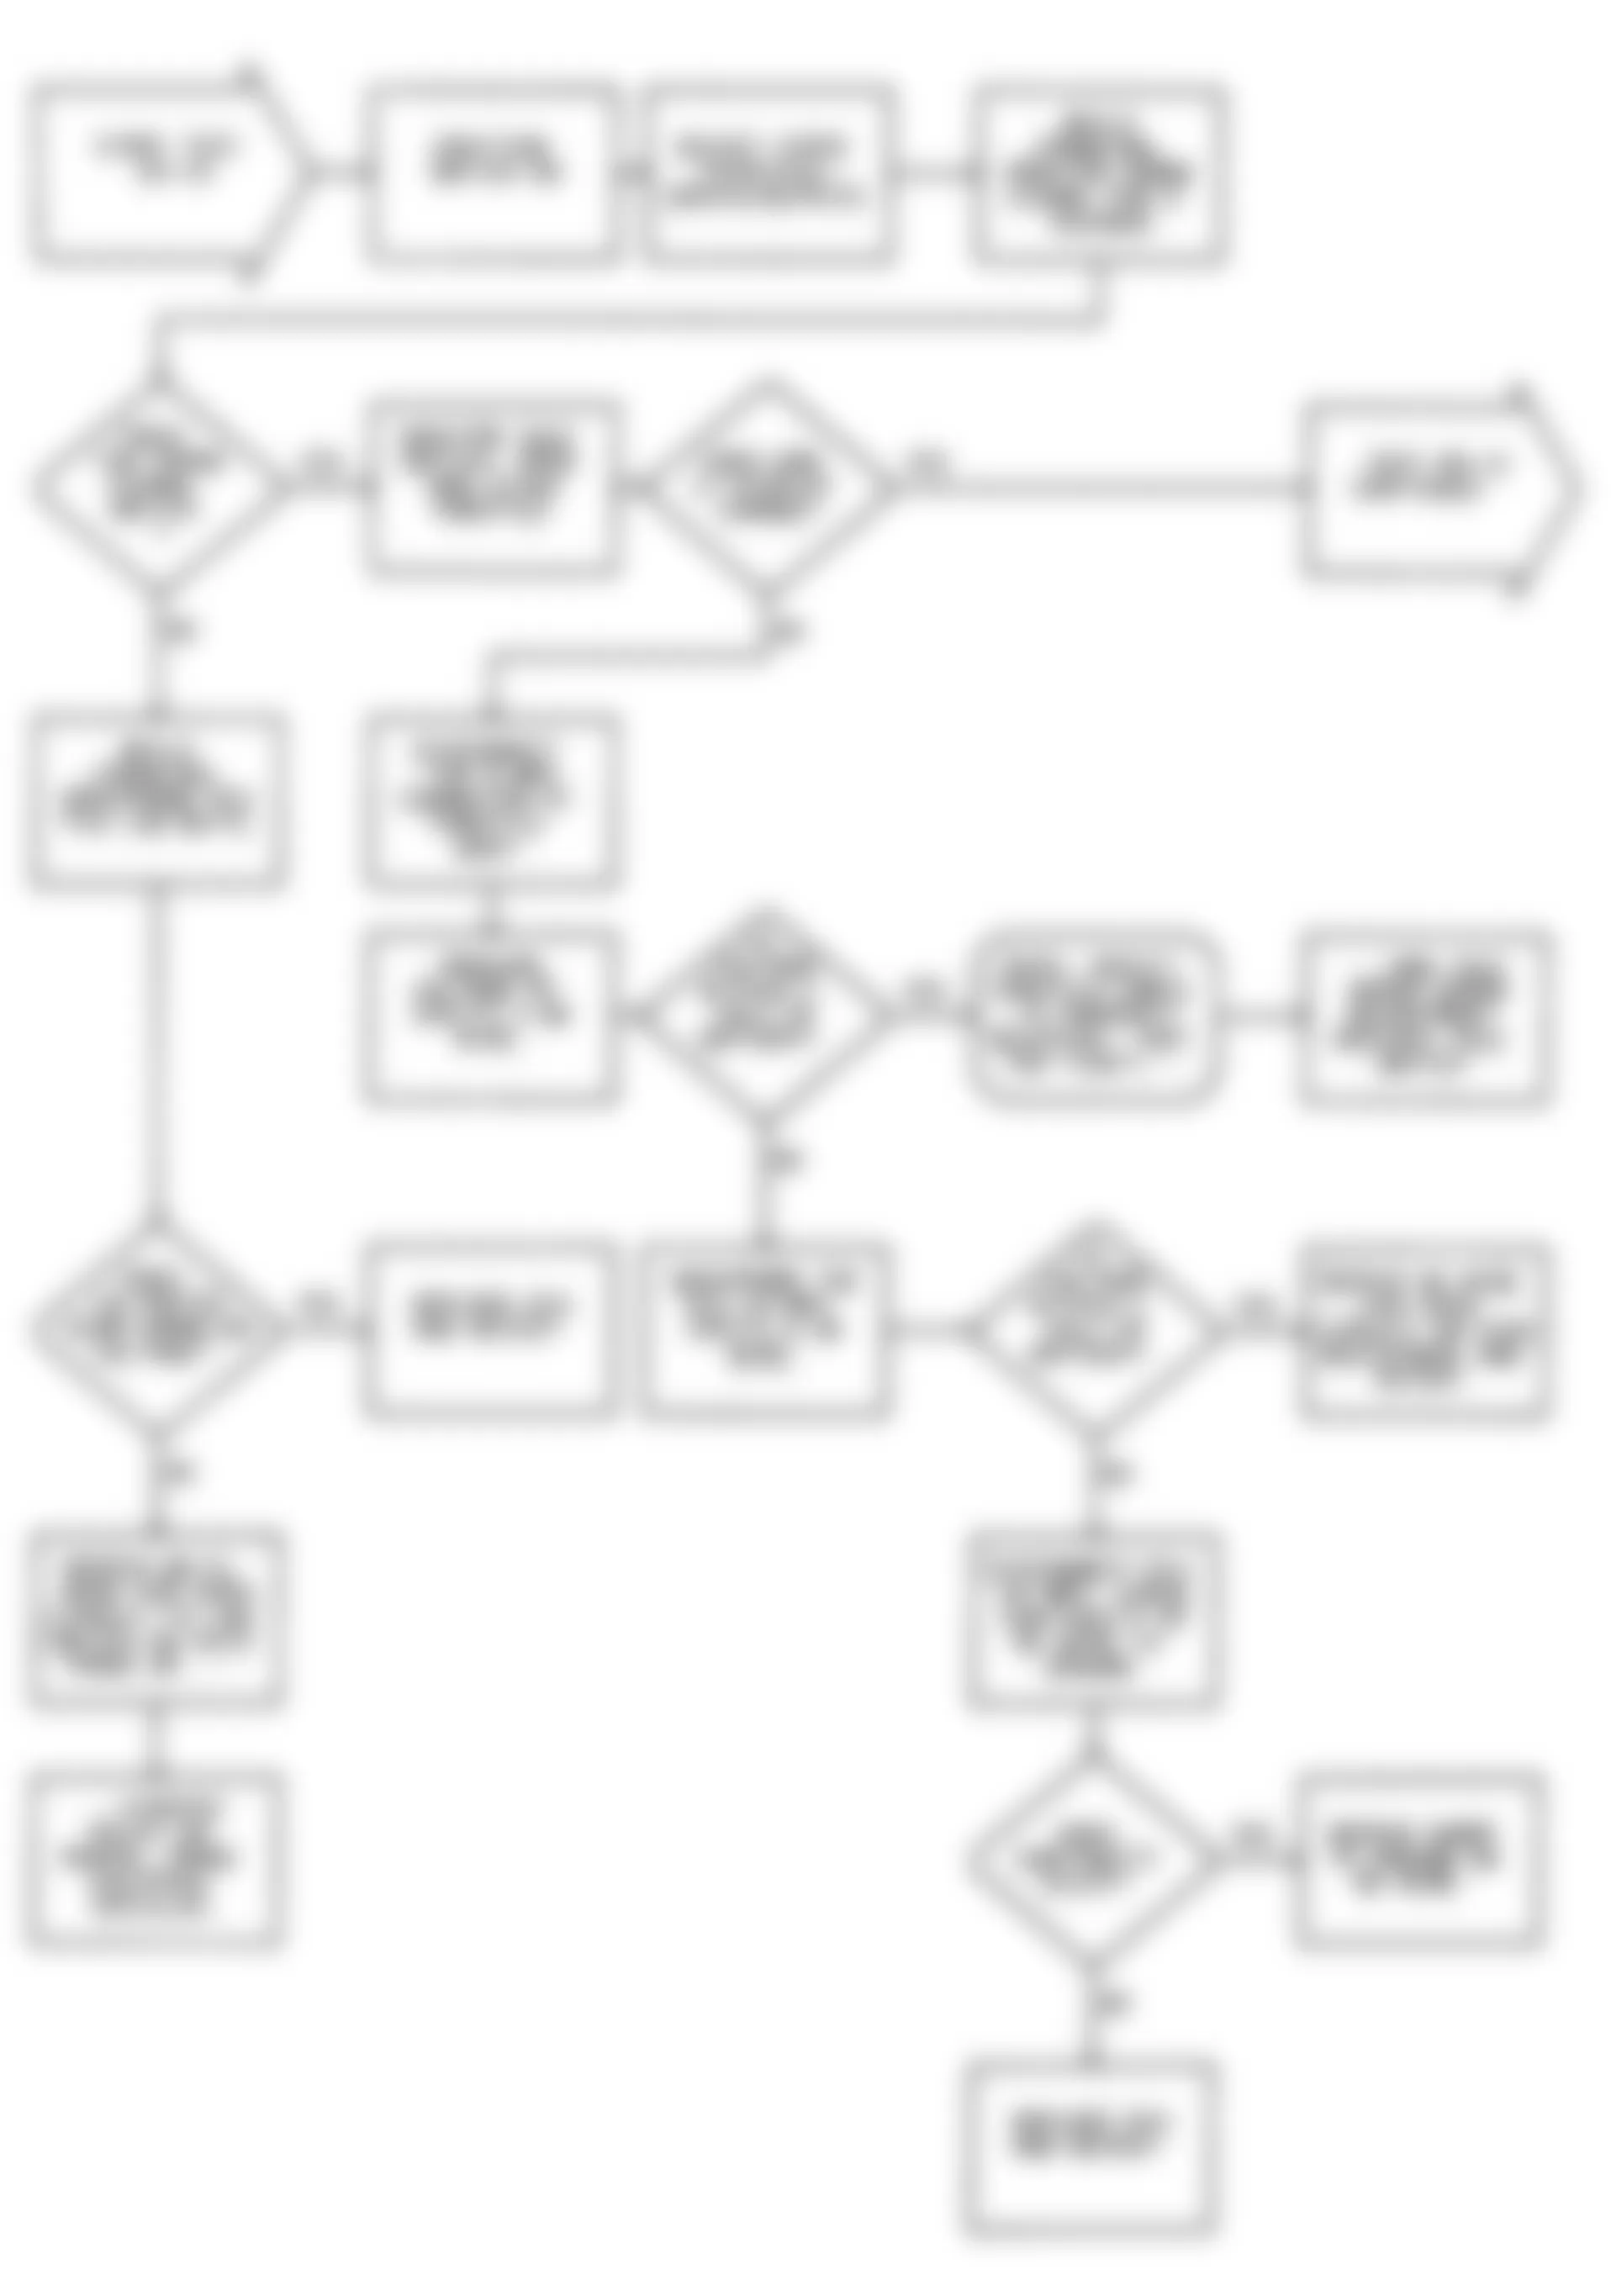
Fig. 57: Dodge Colt GL 1992 - Component Locations - DR-13 Test Flow Chart Testing Fuel Pump Circuit
Dodge Colt GL 1992 - DR-14: TESTING EGR TEMPERATURE SENSOR CIRCUIT
Dodge Colt GL 1992 - DR-15: NO FAULT CODE TESTING
Dodge Colt GL 1992 - DR-16: NO FAULT CODE SENSOR TEST
Dodge Colt GL 1992 DR-16 EGR TEMP SENSOR TEST
DRB-II EGR Temp. Display Engine Condition 160?F Hot Idle (198?F Coolant) 350?F 25 MPH at 3500 RPM 311?F 55 MPH at 3500 RPM
Dodge Colt GL 1992 DR-16 BARO SENSOR TEST
Altitude (Ft) DRB-II BARO Reading (in. HG) -1000 31.01 -900 30.90 Sea Level 29.92 500 29.38 1000 28.85 1500 28.33 2000 27.82 3000 26.81 4000 25.84 6000 23.97 8000 22.22 10,000 20.57 12,000 19.02 14,000 17.57

Dodge Colt GL 1992 - DR-17: TESTING PURGE SOLENOID CIRCUIT
Dodge Colt GL 1992 - DR-18: NO FAULT CODE MECHANICAL TEST
At this point in the driveability test procedure, you have determined that all of the engine control systems are operating as the were designed to. Therefore, they are not the cause of the driveability problem.
The following additional items can not be overlooked as possible cause of a driveability problem.
- THROTTLE VALVE AREA - Dirt or ice buildup causing rough idle and stalling.
- ENGINE IGNITION TIMING - Must be set with timing terminal grounded.
- ENGINE VACUUM - Must be normal for your altitude.
- ENGINE VALVE TIMING - To specifications.
- ENGINE COMPRESSION - To specifications.
- ENGINE P.C.V. SYSTEM - Must flow freely.
- ENGINE EXHAUST SYSTEM - Must be free of any restrictions.
- POWER BRAKE BOOSTER - No internal vacuum leaks.
- TORQUE CONVERTER CONDITION - May cause very low power at breakaway or high speed (Only 1 condition at a time).
- FUEL CONTAMINATION - High alcohol or water content.
- FUEL INJECTORS - Rough idle may be caused by injector wiring not connected to correct injector.
- ENGINE SECONDARY IGNITION CHECK - Abnormal scope patterns.
- TECHNICAL SERVICE BULLETINS - Any that apply to vehicle.
- All air intake piping and vacuum hoses must be in place and secure. The proper air filter element must be used.
- FUEL PRESSURE - Must be correct. Specification: With no vacuum at the regulator: 48 PSI on V6 & non-turbo 4 Cyl. engines and 36 PSI on turbo engines.
Dodge Colt GL 1992 - SUMMARY
If no hard fault codes (or only pass codes) are present, driveability symptoms exist or intermittent codes exist, proceed to TESTS W/O CODES article in the ENGINE PERFORMANCE Section for diagnosis by symptom (i.e., ROUGH IDLE, NO START, etc.) or intermittent diagnostic procedures.